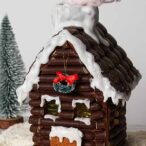
Vegan Gingerbread House
Eggless, dairy-free gingerbread house decorated to look like a Christmas log cabin!
Ingredients
Gingerbread:
- 125 g Black treacle (or molasses)
- 3 Tablespoons Unsweetened soy milk
- 1 Teaspoon Vanilla extract
- 350 g Plain flour
- 1 Teaspoon Bicarbonate of soda (baking soda)
- 4 Teaspoons Ground ginger (powder)
- 1 Teaspoon Ground cinnamon
- 100 g Dairy-free margarine
- 165 g Caster sugar
Decorations:
- Hard boiled sweets, roughly chopped (For the stained-glass windows. I used Fox's glacier fruits)
- Dark chocolate fingers or pretzel sticks, cut to size to cover your house pieces (see notes)
- 110 g Giant vegan chocolate buttons (see notes)
- 1 Biscoff biscuit (for the door)
- 1 Small Vegan cake decoration (for the door handle)
- Christmas wreath decoration (I used a small artificial one from Hobbycraft but you could also make one out of royal icing)
Royal Icing:
- 5 Tablespoons Aqua faba
- ¼ Teaspoon Cream of tartar
- 1 Teaspoon Vanilla extract
- 450 g Icing sugar
- 2 Tablespoons Cocoa powder
Instructions
For the gingerbread:
-
Before you begin, draw and cut out this gingerbread house template (cut out 2 of each piece). This recipe makes quite a lot of dough so you can use a larger template if you prefer.
-
Preheat your oven to 180°C (or 160°C for fan or convection ovens). Line 2 trays with baking paper.
-
In a small bowl, mix together the treacle, soy milk and vanilla until smooth.
-
In a separate bowl, mix together the flour, baking soda, ginger and cinnamon.
-
Rub the margarine into the flour mixture until it resembles breadcrumbs. Stir in the caster sugar.
-
Pour the molasses mixture into the bowl of dry ingredients and mix. When it starts to stick together, use your hands to press it into a dough.
-
Once it comes together as a ball, lightly knead the dough on a floured surface, adding more flour as needed until it's no longer sticky.
-
Using a lightly floured rolling pin, roll out about ¼ of the dough at a time onto a sheet of baking paper until ½ cm thick.
-
Lightly flour the top side of the rolled dough then use the templates to cut out the shapes. Use the baking paper to carefully transfer them to your tray (this helps it to hold shape). Use any leftover dough to cut out small gingerbread shapes such as trees, or freeze to use at a later date.
-
On the front and side pieces, cut out small rectangles where you want the windows to be.
-
Place all of your shapes in the freezer for 15 minutes, or in the fridge for 1 hour. This will help them to hold their shape as they bake.
-
Place a large piece of a boiled sweet into the window holes on the sides and front.
-
Bake the gingerbread for 15-18 minutes until firm at the edges. Smaller pieces like the chimney and gingerbread trees will need less time, around 8-10 minutes. Let them cool completely on the tray before removing.
For the royal icing:
-
Add the aqua faba, cream of tartar and vanilla extract to a bowl. Use an electric mixer to whisk until frothy.
-
Add the icing sugar, a little at a time, using a wooden spoon to mix it in. Once it's all been added, mix it with the electric mixer until smooth and glossy.
-
Transfer around ¼ of the icing to an airtight container and set aside for later. Add the cocoa powder to the rest of the icing and mix in well. Add more water to loosen it or more icing sugar to thicken it.
-
Transfer the chocolate royal icing into a piping bag fitted with a medium round nozzle.
-
Use the icing to stick the chocolate fingers onto the front/back/sides, and the chocolate buttons onto the roof and chimney pieces. Once that has dried, 'glue' the Biscoff biscuit door on and stick the door knob on with more icing. Leave to dry before assembling.
Assembly:
-
Pipe some icing onto the bottom of the first gingerbread piece and stick it onto a cake board. Use a small object such as a spice bottle to hold it in place while you get the next piece.
-
Ice the bottom and both edges of the next piece and stick it into place. I used a spice bottle for every wall to keep it sturdy! Repeat until you have the front, back, and two sides stuck together on the board.
-
Let the gingerbread house walls set completely before adding the roof. Four hours is a good amount of time but I recommend leaving it overnight if you can.
-
Once the walls are set in place, put a small set of battery-operated string lights into the house, tucking the battery pack neatly at the back of the house. The roof will cover the wire. This is optional of course, but I think it looks lovely with the stained glass windows!
-
Ice each side of the roof and stick into place, again using a spice bottle to hold it in place until dry. Repeat with the other side and let it set fully before 'gluing' the chimney on top.
-
Put the white icing into a piping bag fitted with a small nozzle and use it to add 'snow' to your house. Finish off with a small Christmas wreath decoration.
Recipe Notes
- Since I created this recipe, Bournville have added milk powder to their chocolate fingers and buttons. The only like-for-like replacement for Bournville chocolate fingers that I can find are Hotel Chocolat's chocolate batons but they are quite pricey. For a cheaper alternative, you can use pretzel sticks, either plain or covered in vegan chocolate. Alternatively, make extra chocolate royal icing and use that to decorate the house.
- For the roof buttons, you can use Asda free-from giant buttons.
- If you can't get molasses or treacle, use agave nectar and switch the caster sugar out for brown sugar.
- Use spreadable dairy-free margarine rather than block vegan 'butter'. The dough will likely be too dry if you use butter.
- The white icing will likely harden by the time you're ready to use it. Mix in a splash of water to make it pipeable again.
- To stop the icing from drying out in the bag while the house is setting, place a piping tip cover onto the nozzle then secure the open end of the piping bag so that it becomes airtight. Let the bag sit in a bowl or tub of room temperature water.