This vegan gingerbread house is sweet, spicy and held together with homemade egg-free royal icing. It’s fun to decorate and makes a great Christmas project for children to help with. You can use any decorations you like to customise the house to your preference!
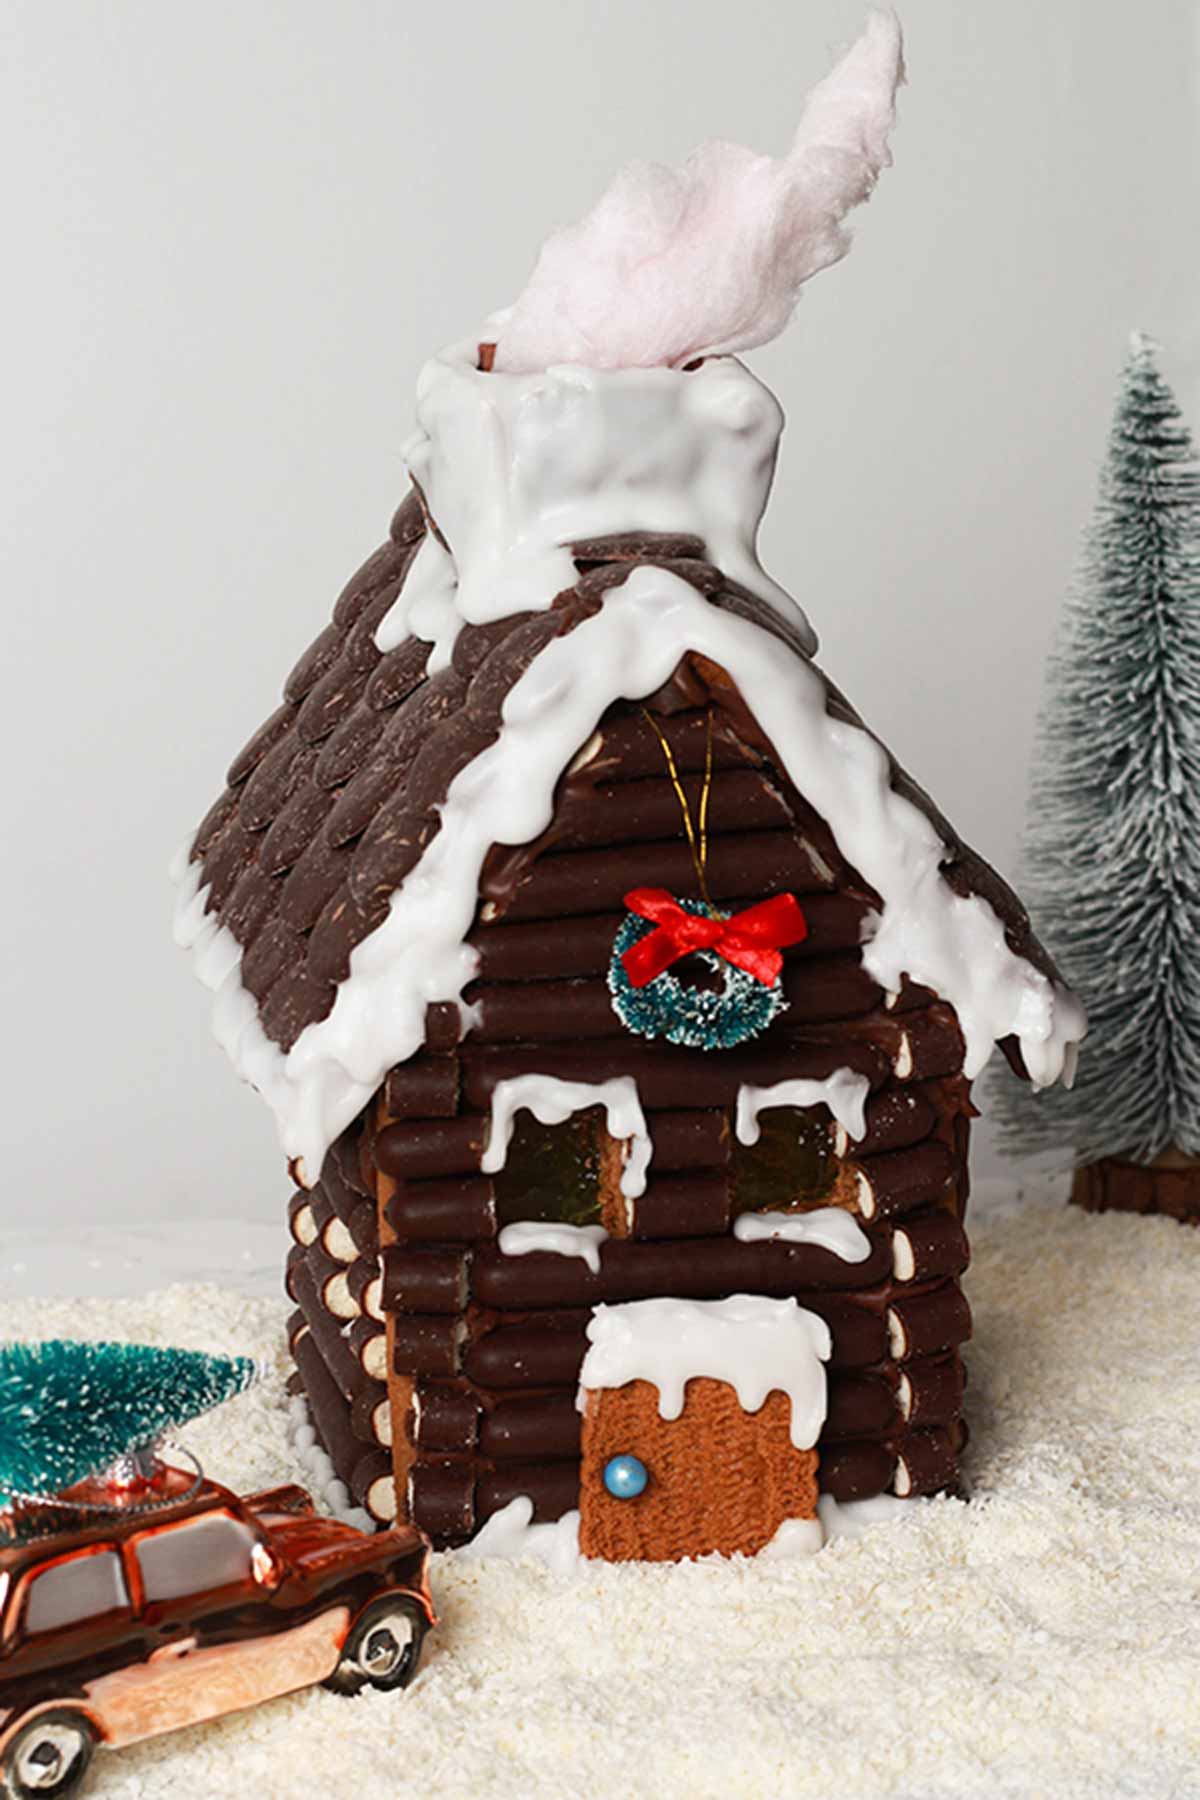
I am so pleased to share my Christmas vegan gingerbread house with you! It’s more of a gingerbread log cabin actually, but I just love how festive and cosy it looks.
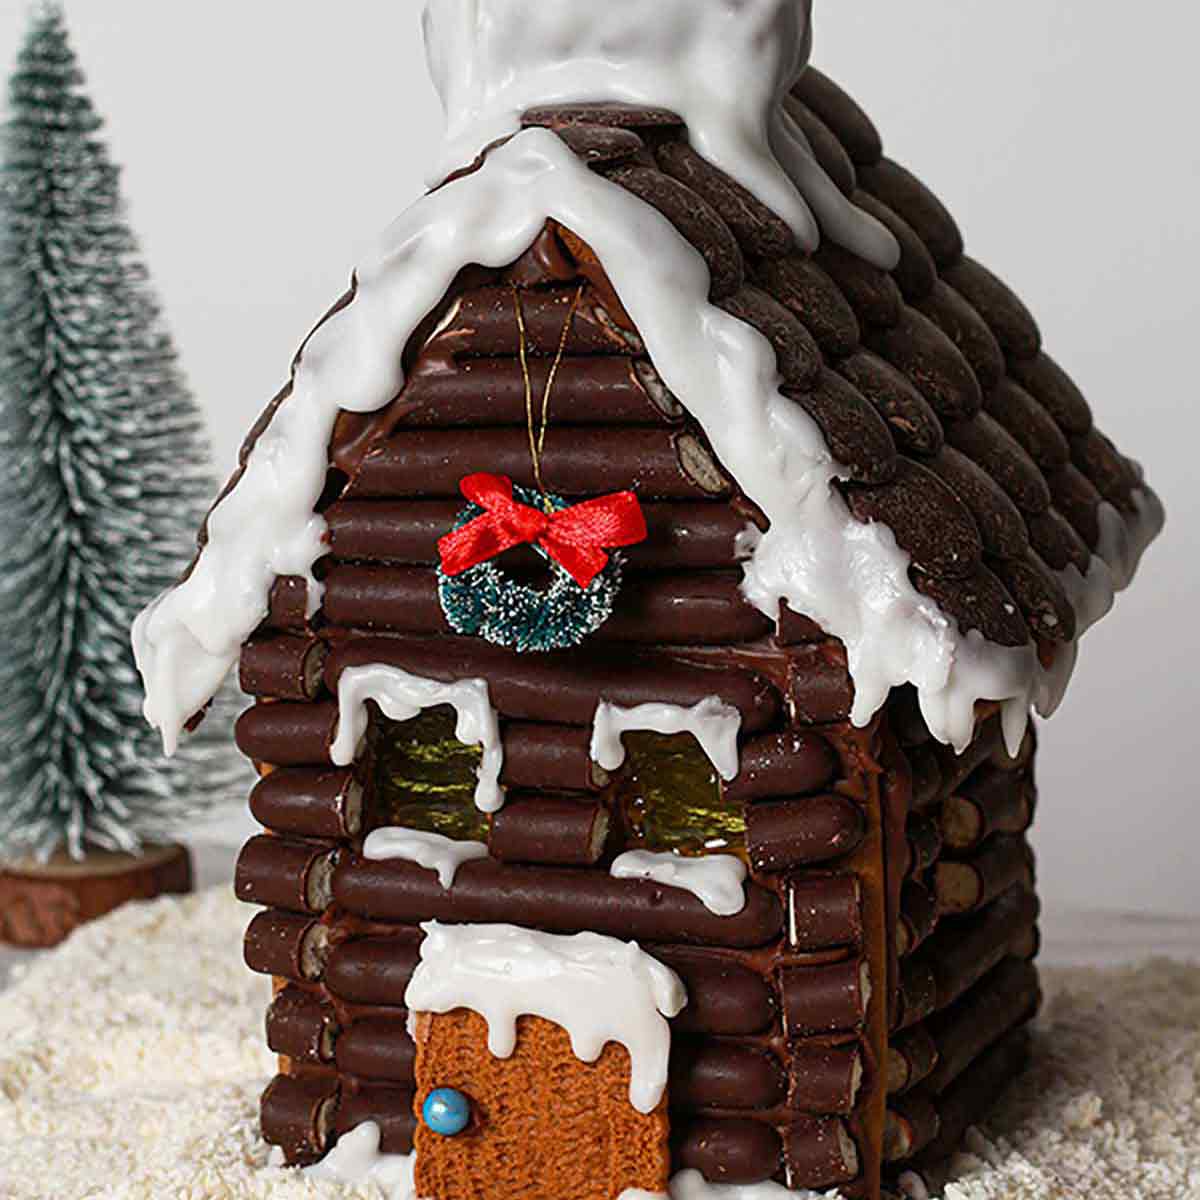
It’s made up of gingerbread walls with ‘stained glass’ windows, eggless vanilla and chocolate royal icing, dark chocolate finger biscuits and dark chocolate buttons. I also added a Biscoff biscuit and a small cake decoration for the door and the door knob. Everything on the house is edible except for the small wreath on the front.
This was actually my second attempt at a dairy-free gingerbread house. It took me 4 long days to get a fully constructed house that I was happy with. My first attempt was a complete disaster, to put it bluntly!
When I first considered making a gingerbread house from scratch, I thought it would be quite a straight forward task. Maybe it’d take a few hours to bake, construct and decorate… Oh man, I was wrong.
It wasn’t because the recipe itself took long to make, but more so because of my terrible decorating skills and lack of preparation.
I’d say I’m pretty OK at art (and cake decorating) if I have a visual representation of what I’m trying to achieve, but I am absolutely hopeless at it if I’m trying to work from a vision in my head. But for some strange reason, I decided to go ahead and trust the vision in my head.
The result was a gingerbread house that resembled an abandoned, vandalised church. LOL.
The walls were too long, the roof was far too heavy/thick and kept slipping down, and the stained glass window was barely visible. Not to mention the extremely thick ‘snow’ I added to try to hide the gaps between the house and the roof. The more I tried to fix it, the worse it got, so I just admitted defeat and decided I’d make another one. This one isn’t perfect but it’s much better than the first one!
Gingerbread log cabin
After my failed attempt, I decided I’d just find a design I liked online and copy that. None of them really stood out to me until I saw this beautiful one by Three Pixie Lane decorated like a log cabin. I had one look and knew that’s what I was going to do! I did change a few of the gingerbread house decorations though.
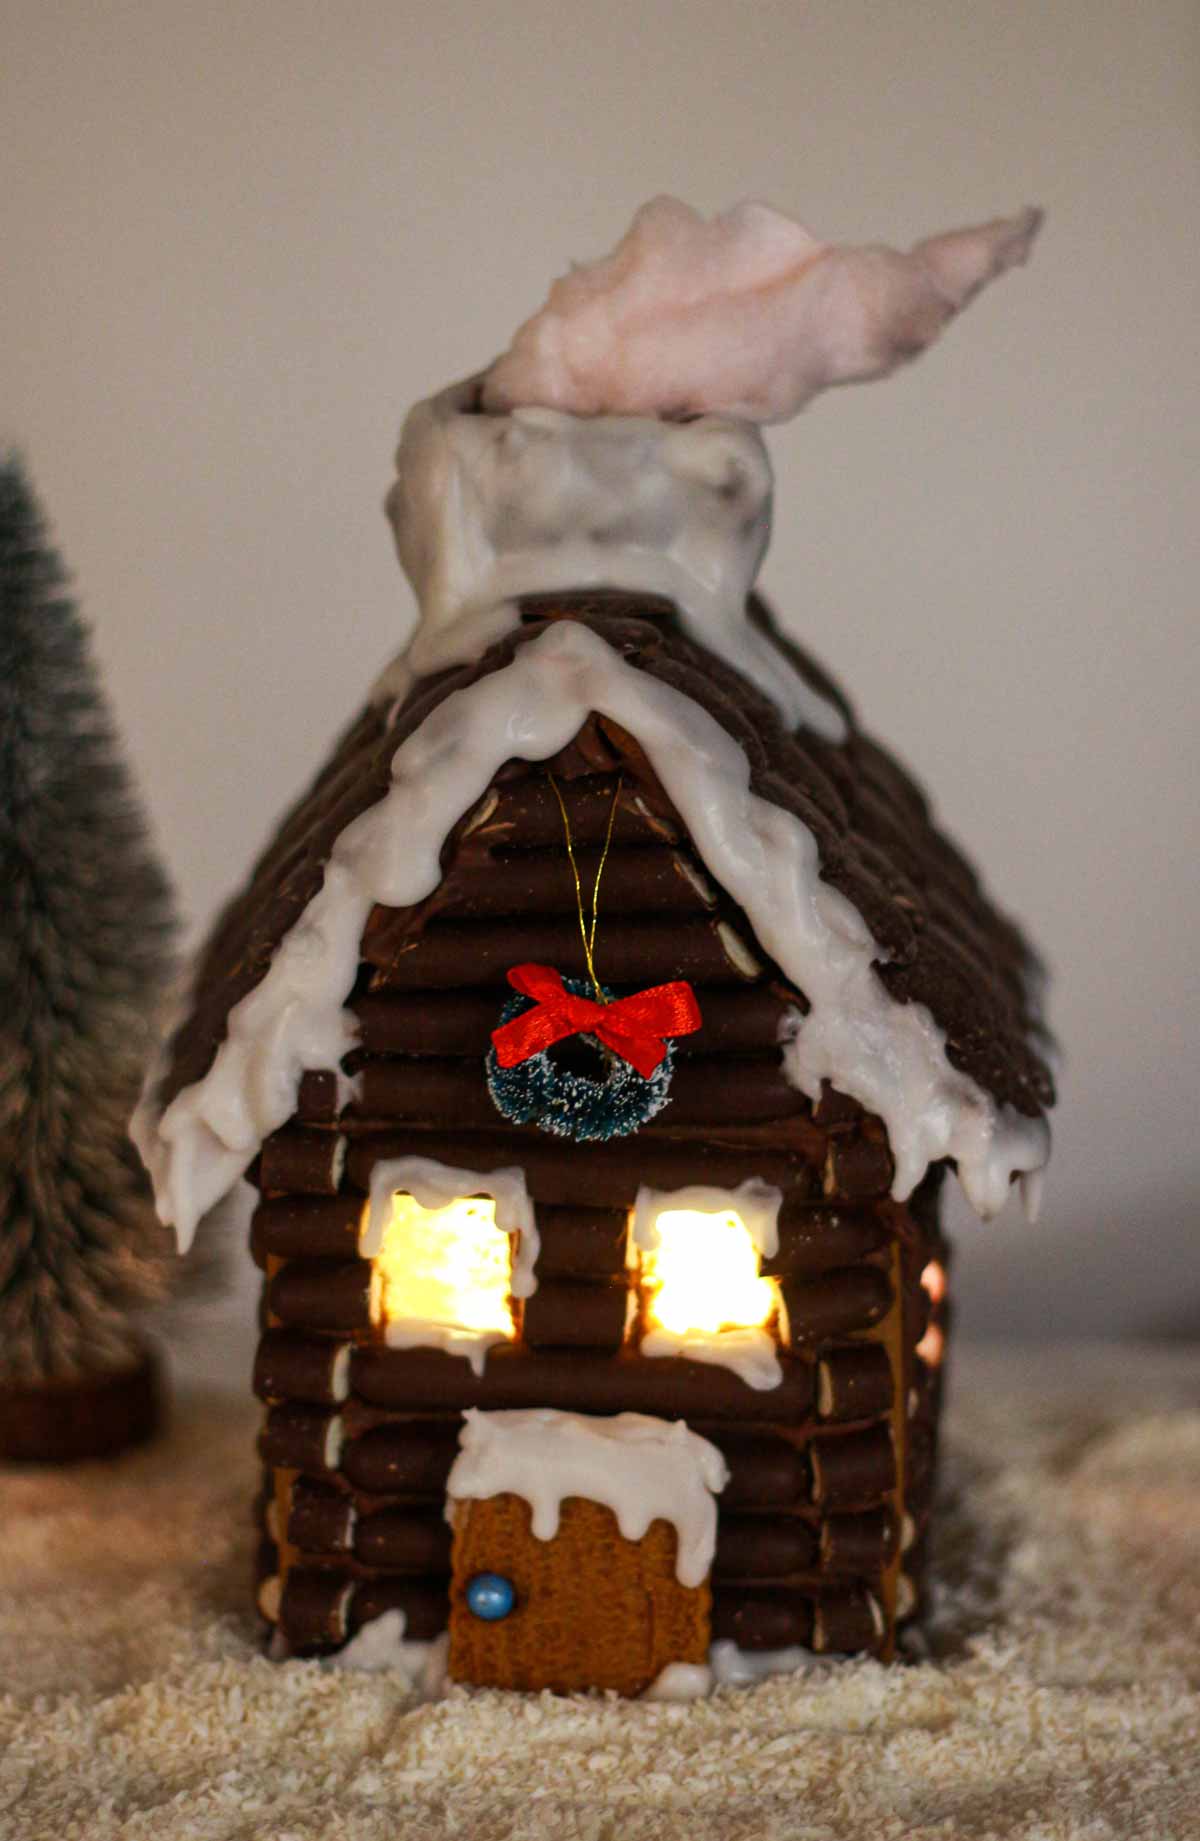
Instead of the cinnamon sticks that Christie used for the walls, I used Cadbury’s dark chocolate fingers. And instead of a Graham cracker door, my house had a Biscoff biscuit door. I used vegan candy floss for the ‘smoke’ just to take the pictures but it did dissolve after a few hours. You could use something like cotton wool or soft toy filling instead, which obviously isn’t edible but will not dissolve.
I also took a leaf out of Mary Berry’s book with the stained glass windows and chocolate buttons on the roof. I used Fox’s glacier fruits for the windows and Bournville buttons for the roof. Since creating this recipe, sadly Bournville have added milk powder to their products. Instead, I now recommend using Asda free-from giant buttons.
I decided to add cocoa powder to some of my royal icing so that it would blend in nicely with the chocolate fingers and buttons. I kept a little bit pf white icing aside for decorating the roof and the edges, to make it look snowy.
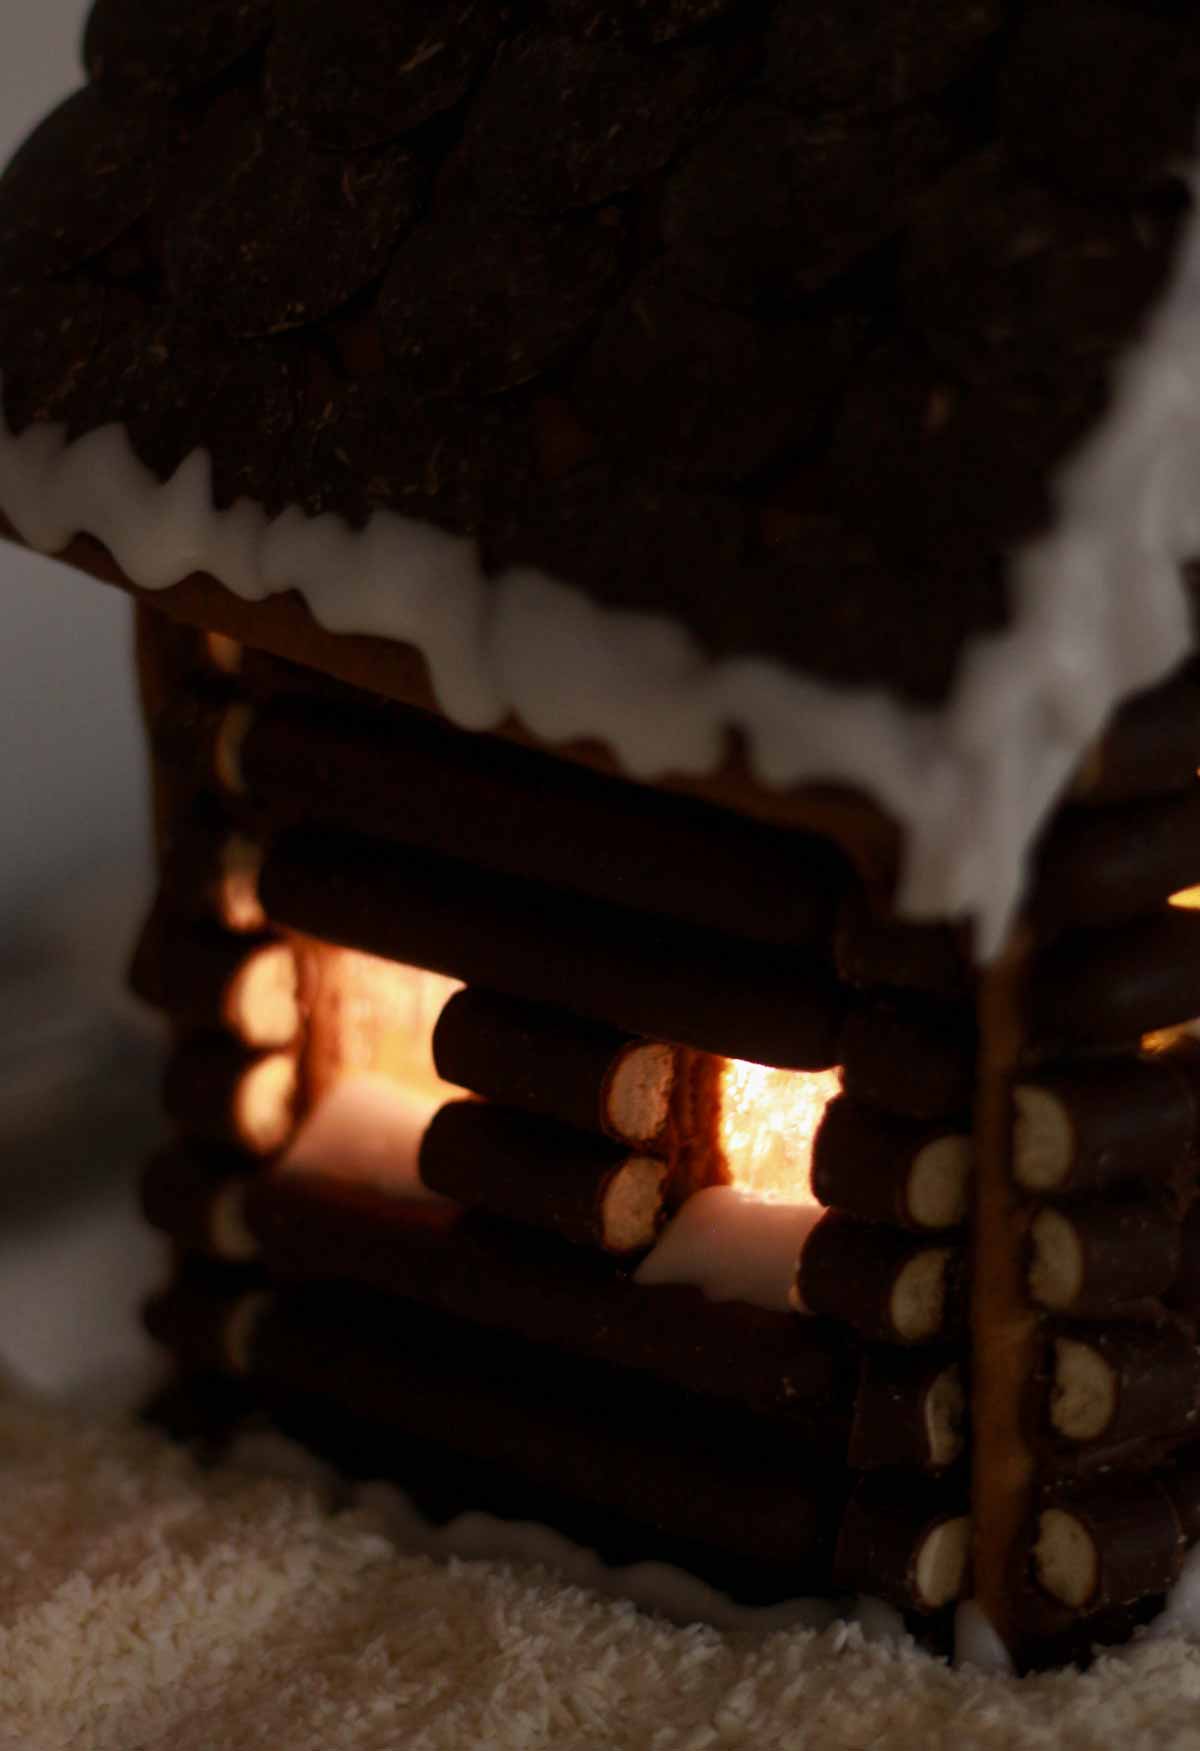
Lastly, I added some battery-operated string lights inside to help the windows glow! I kept the battery pack at the back of the house, with the wire concealed neatly under the roof. That way, I didn’t have to leave them on the whole time while the roof was still setting in place.
Other decoration ideas
Obviously, make sure whichever decorations you’re buying are vegan-friendly. Watch out for less obvious ingredients like beeswax and certain E-numbers- check out my E-numbers list if you’re unsure.
- Mini marshmallows
- Chocolate chips
- Christmas sprinkles
- Skittles
- Jelly Tots
- Candy canes
- Lollipops
- Desiccated coconut (I used this for the ‘snow’ on the ground)
Cut-out Gingerbread house template
I created my own template for my gingerbread log cabin. I just drew the shapes below onto some card using a ruler, cut them out then used them as a stencil to place onto my rolled-out dough. Just use a small knife to cut around the stencil.
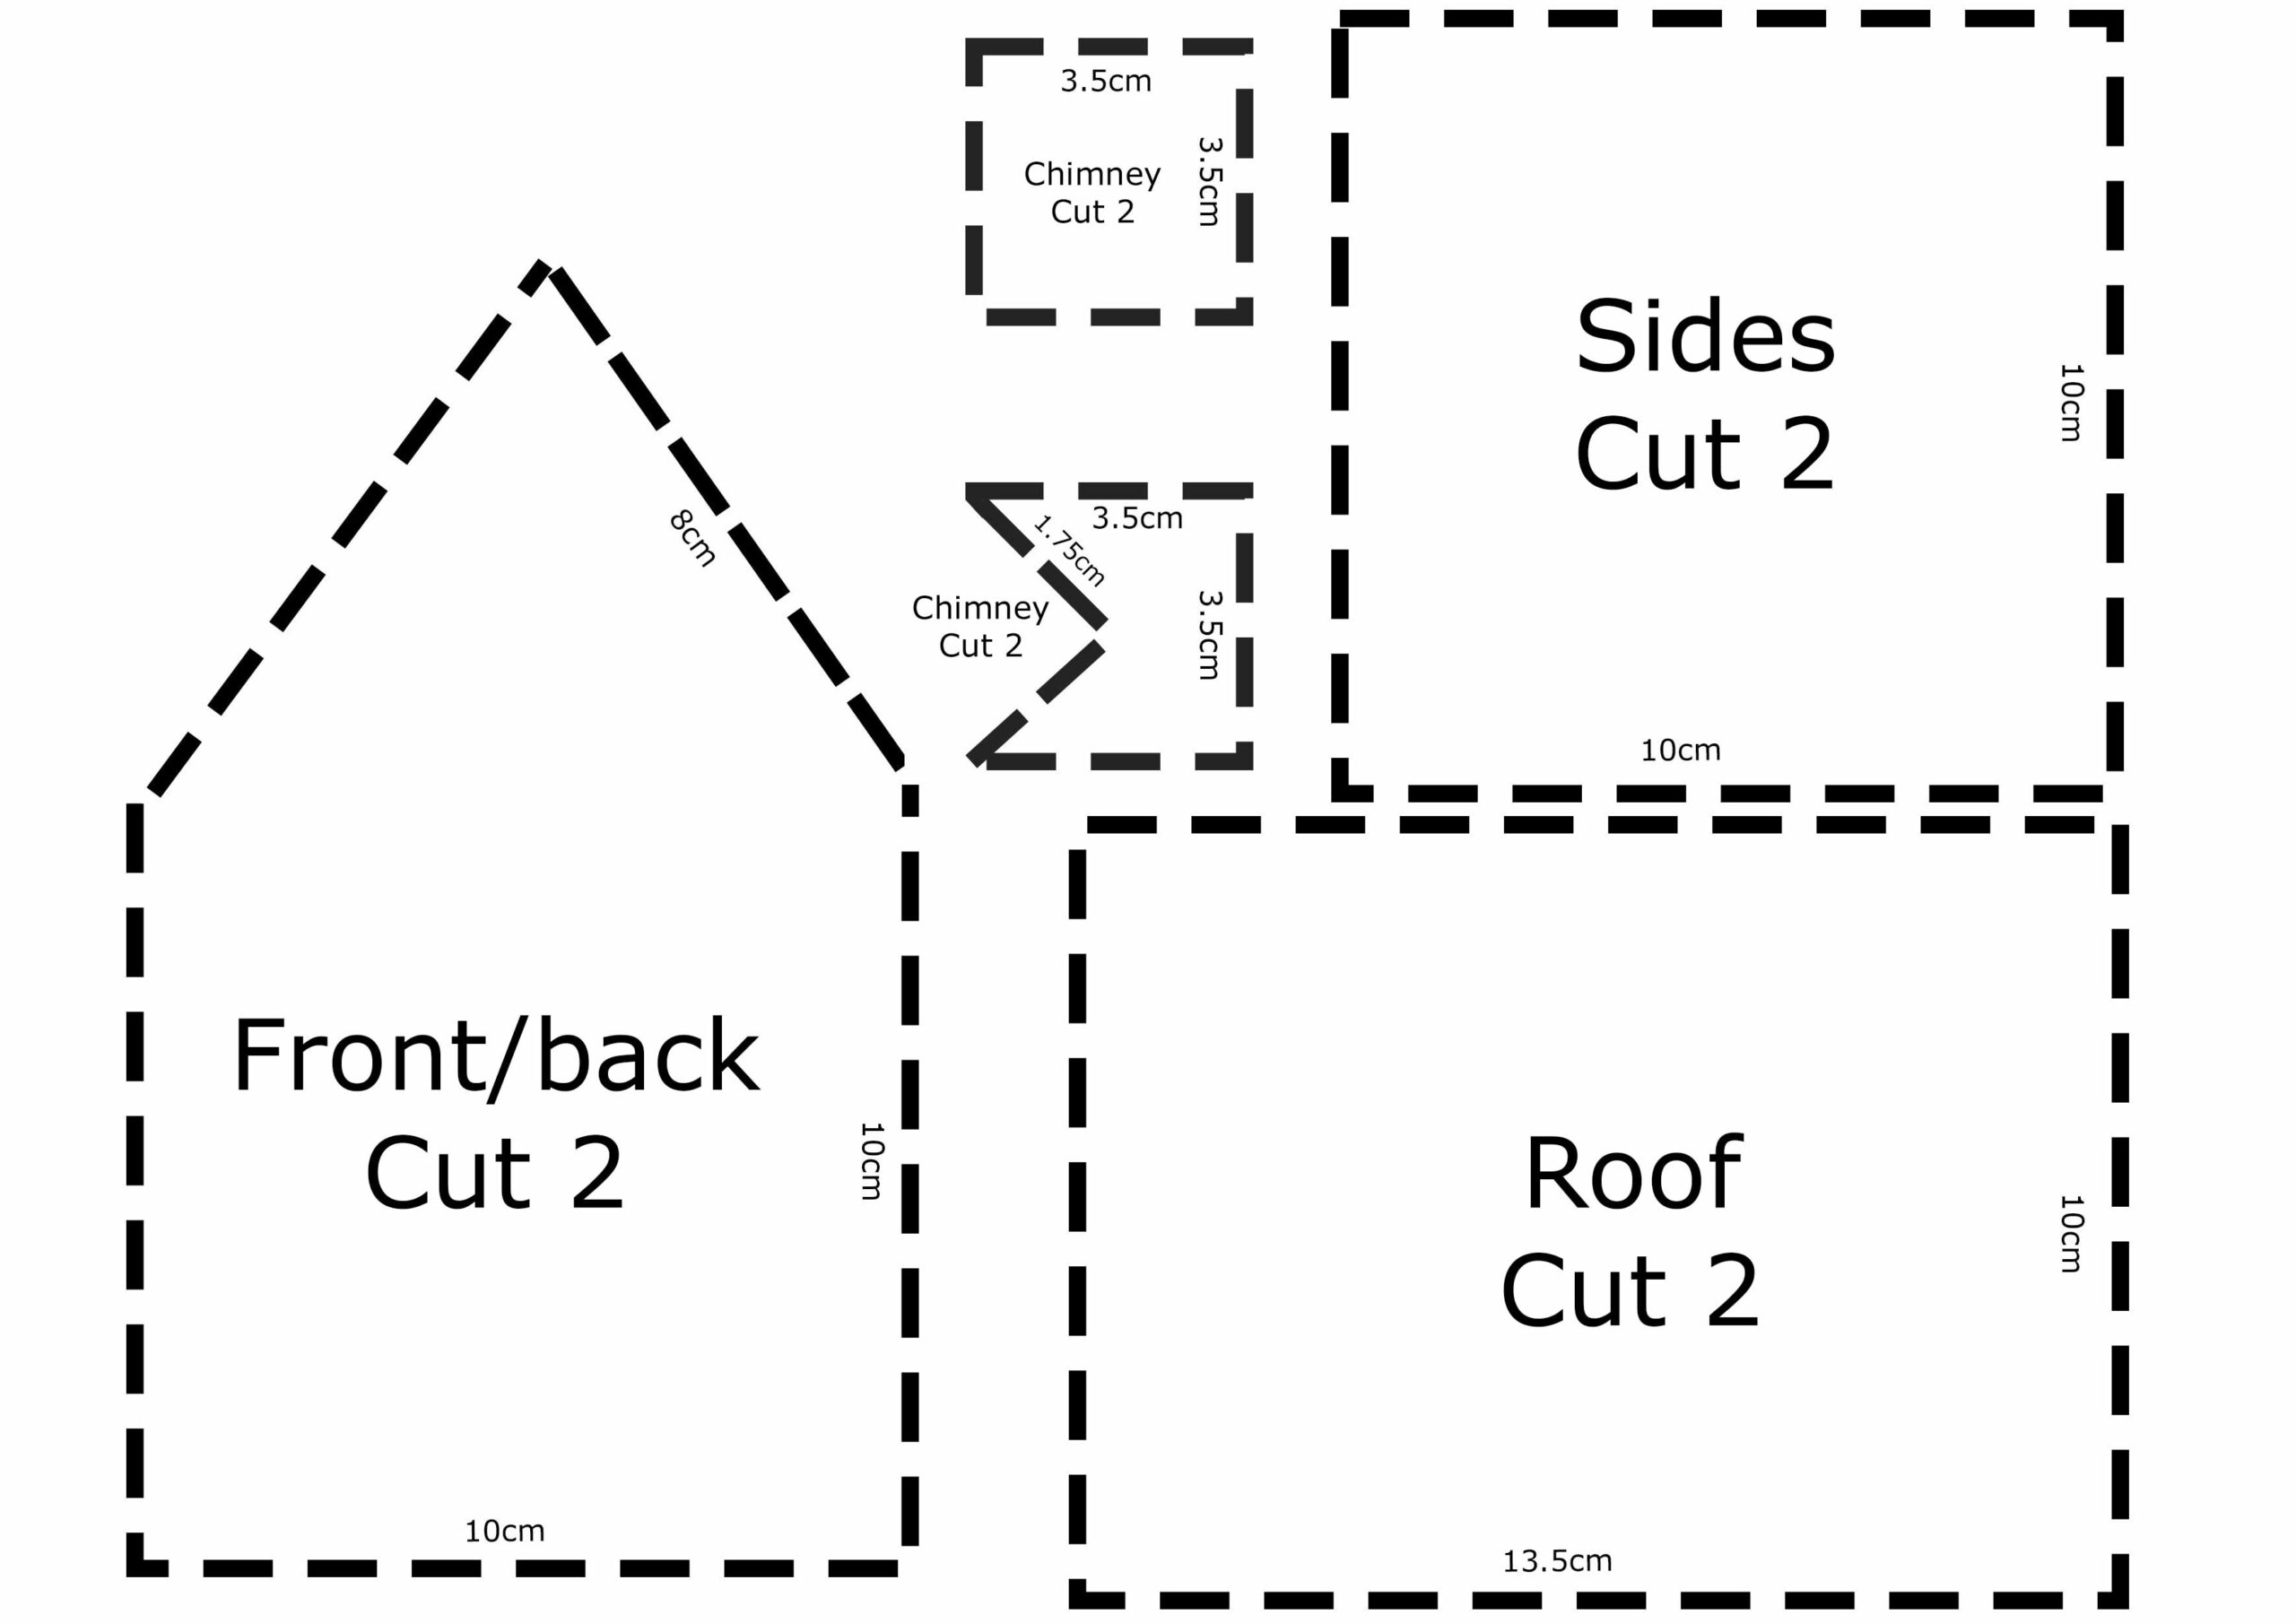
I haven’t tried printing this template yet but I think the cut-outs should be roughly the correct size. If not, there are many printable templates available online. This recipe yields enough gingerbread dough to make a slightly bigger house if you want to. Otherwise, you can use leftover dough to make gingerbread trees and people, or you can freeze it for the next time you fancy making some cookies.
Drawing and cutting out the template took me a bit longer than I thought it would, so I’d recommend that you have it cut out and ready to go before you begin baking.
How to make a vegan gingerbread house
Step 1:
Preheat your oven to 180°C/350°F and line two trays with baking paper. I don’t recommend using a non-stick cookie sheet for this recipe as I found it quite tricky to get the pieces off after baking.
Step 2:
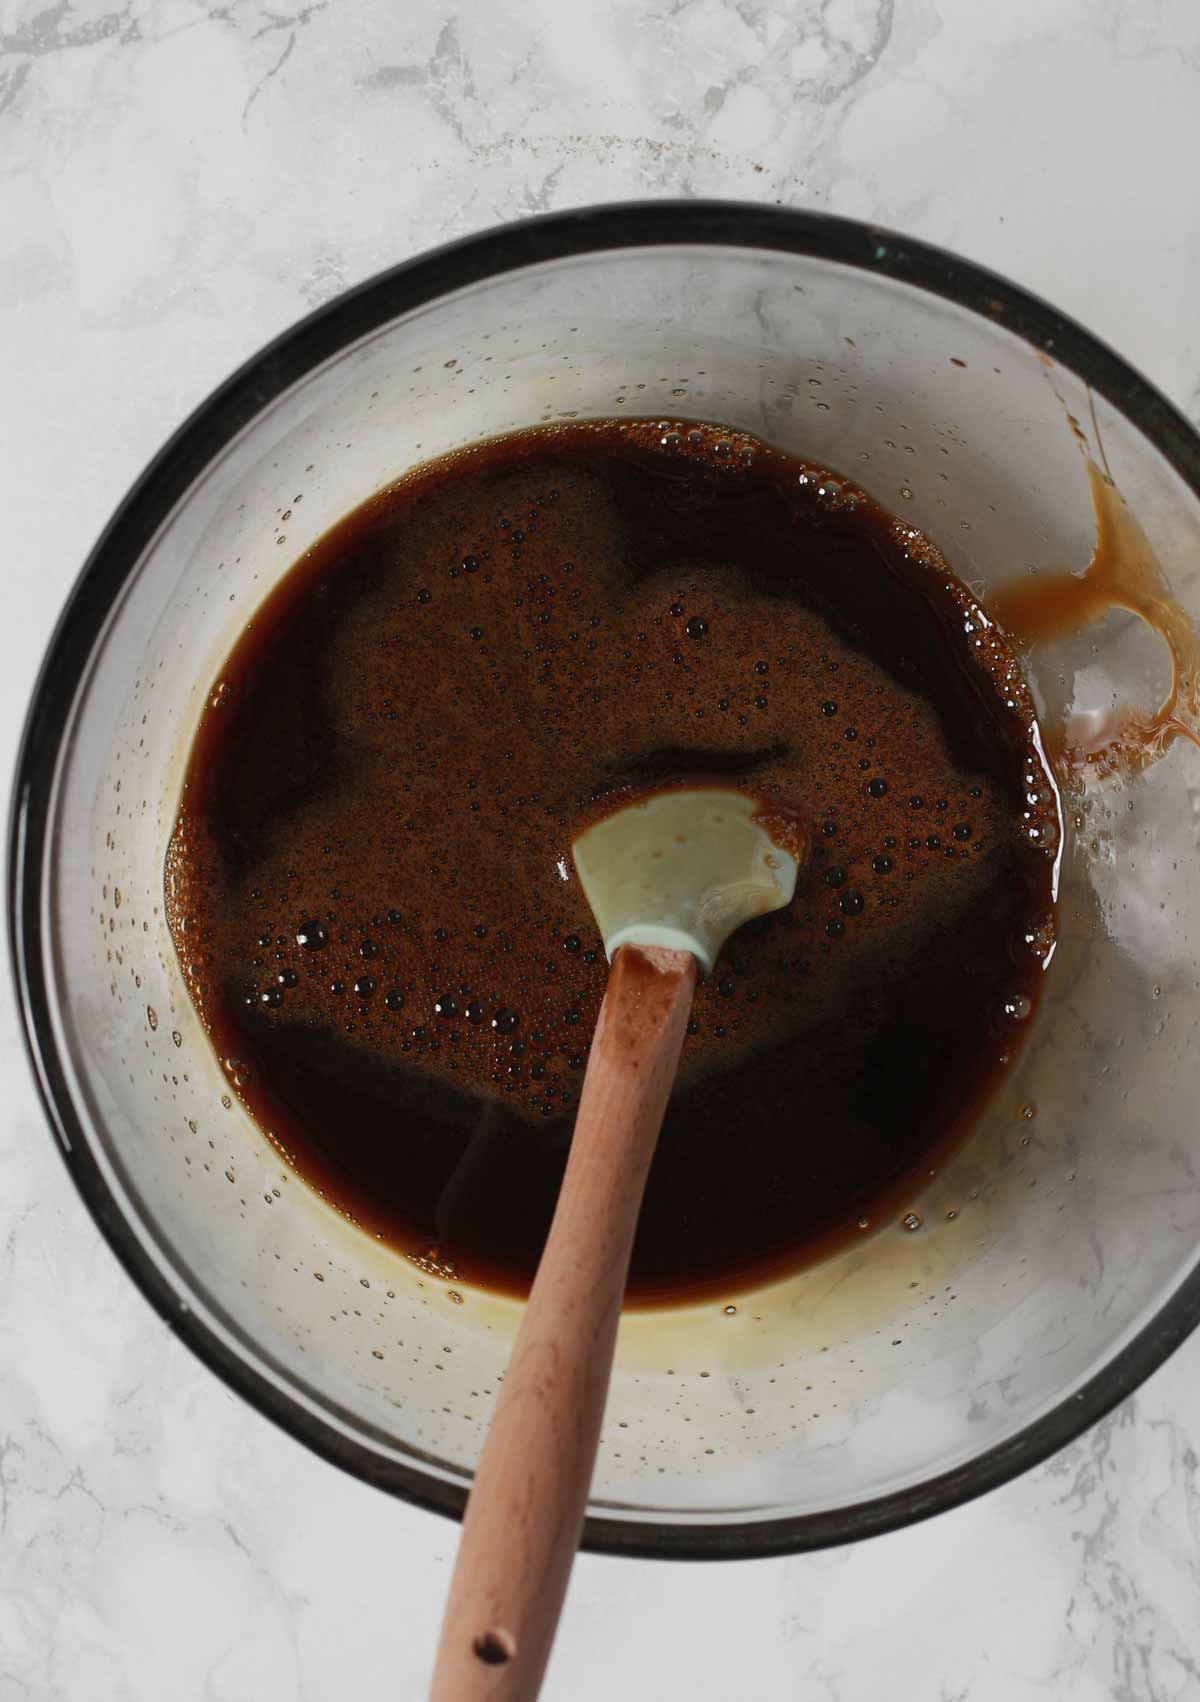
To a small bowl, add 125g of black treacle, 1 teaspoon vanilla extract and 3 tablespoons of soy milk. Mix until well combined.
Step 3:
In a separate, larger bowl, mix together 350g of plain flour, 1 teaspoon of bicarbonate of soda, 4 teaspoons of ginger and 1 teaspoon of cinnamon.
Rub in 100g of dairy-free margarine until you have a mixture that resembles breadcrumbs. Then stir in 165g of caster sugar.
Step 4:
Add the wet ingredients to the dry and mix well. When it starts to stick together, use your hands to press it into a ball of dough.
Once it has come together in a ball, knead it gently on a floured surface, adding more flour as needed. The aim is to get it firm enough to hold together but soft enough to roll out without it sticking. We want our vegan gingerbread house to be sturdy!

Step 5:
Roll the dough out onto baking paper until it’s around 1/2 cm thick. I recommend rolling out around 1/4 of the dough at a time to make it easier.
You can roll it out onto a floured surface if you prefer but I found it lost its shape slightly when I picked it up. Transferring it to the tray using the baking paper made it much easier.
Step 6:
Lightly flour the top of the dough and place your template on top. Use a small knife to cut around the template, then carefully transfer the shape onto your baking tray. Repeat until you have all of your shapes cut out.
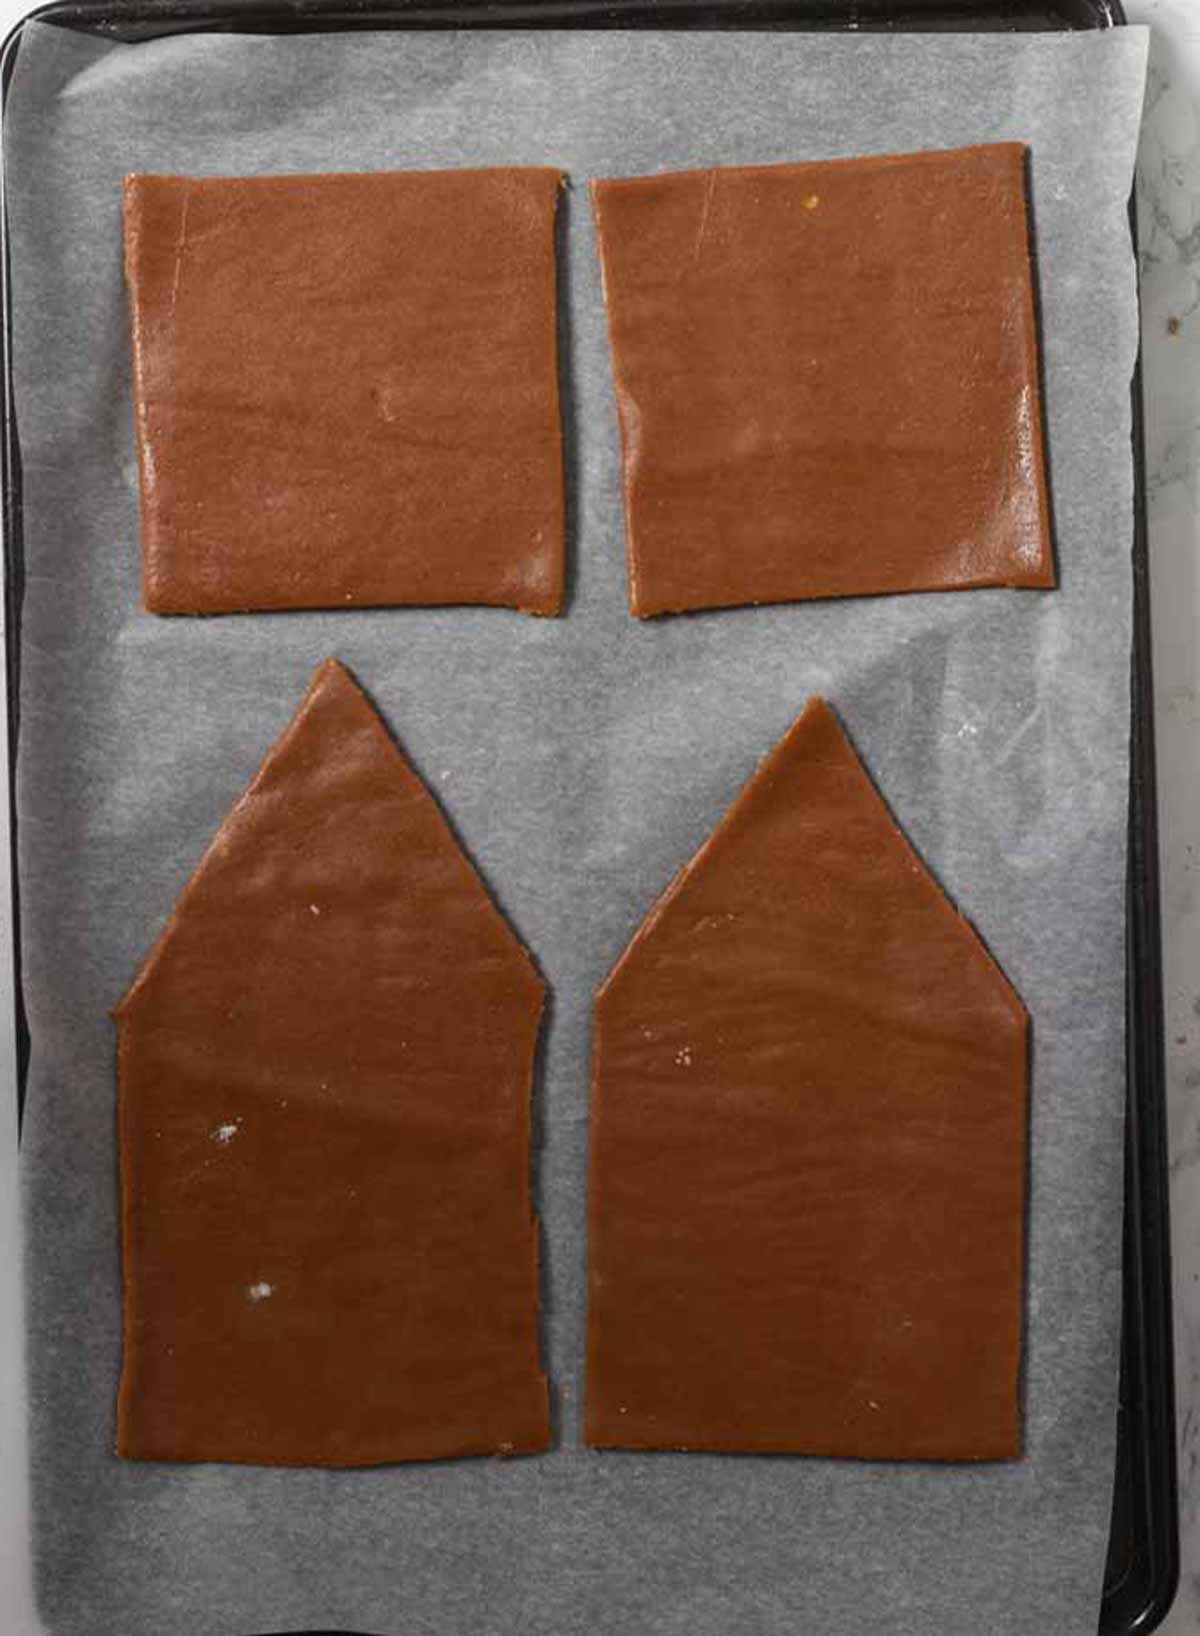
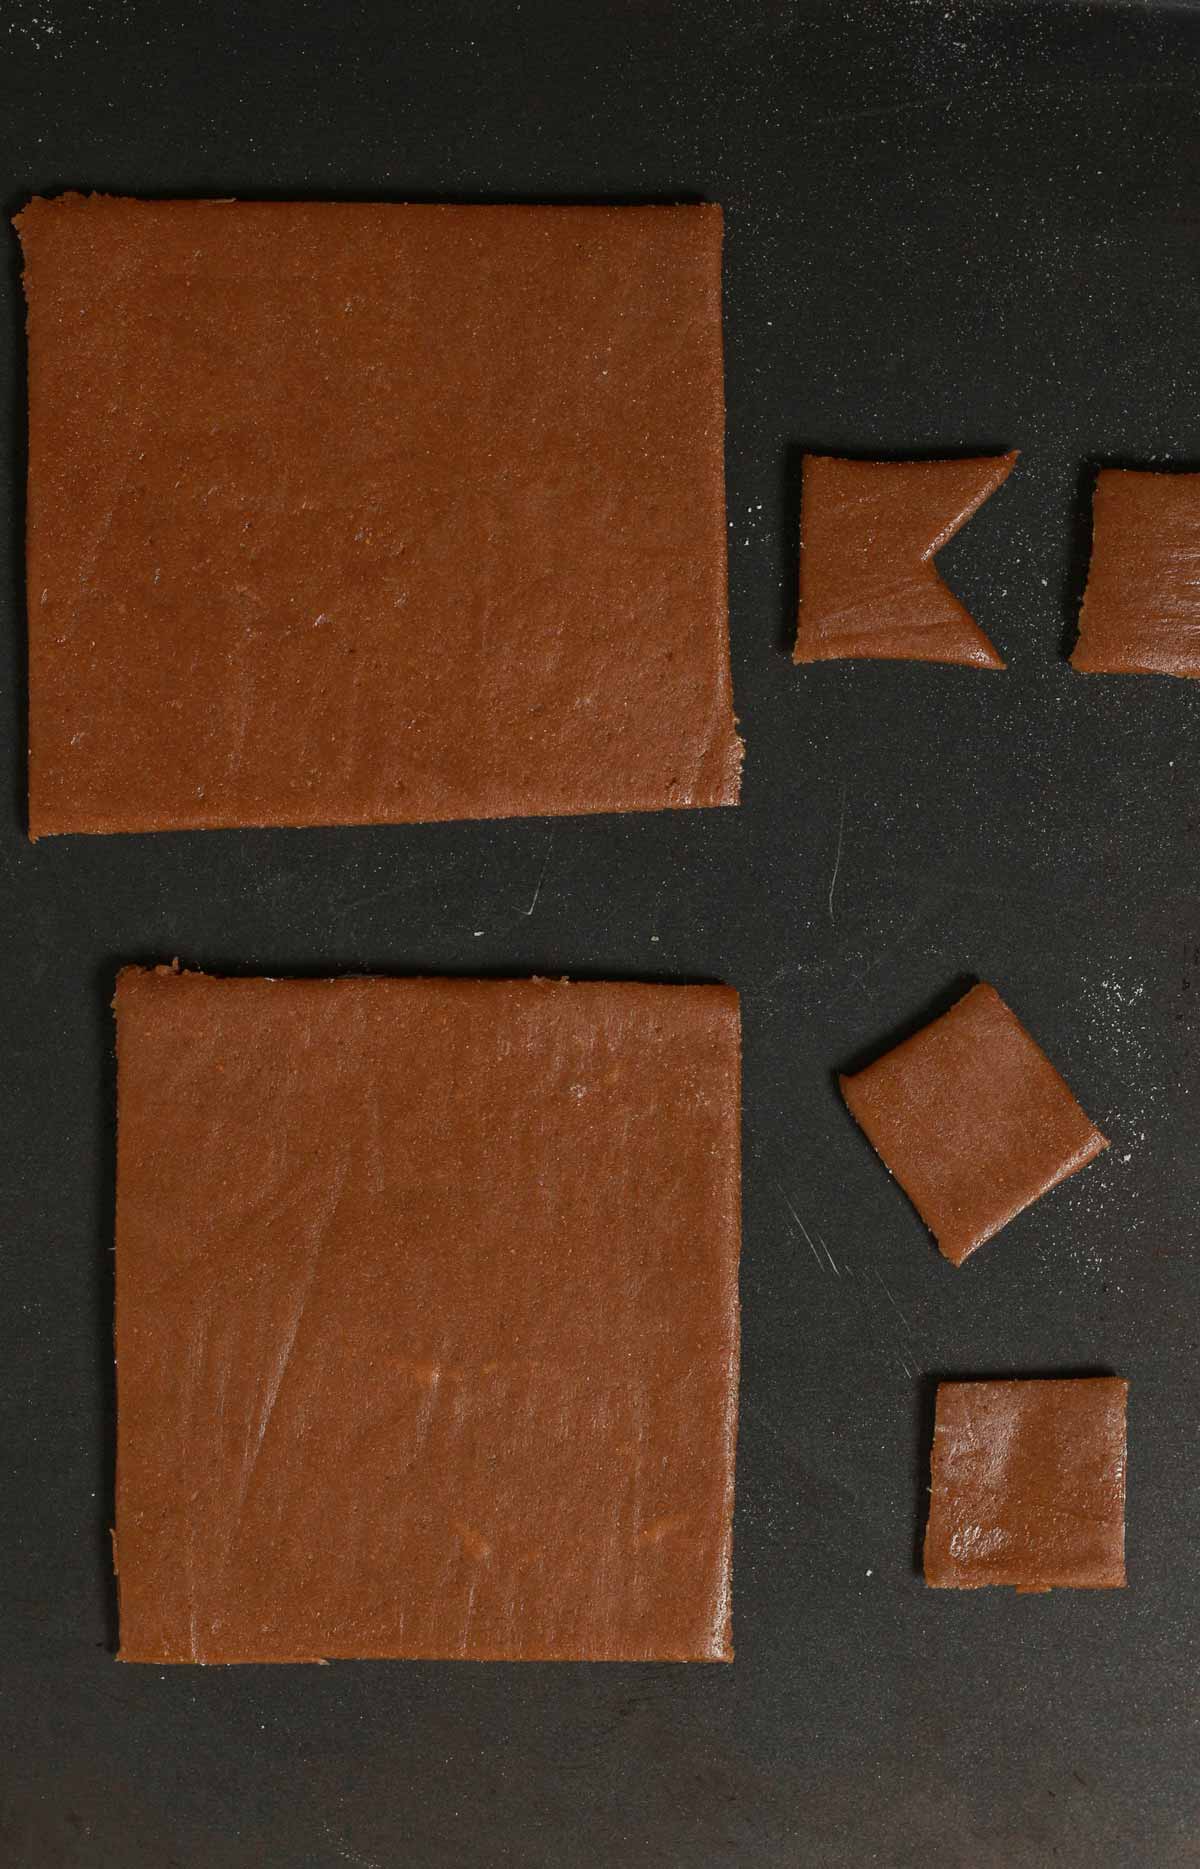
For the sides and front of the house, cut out small rectangles for the windows.
Step 7:
Freeze the house shapes (on the tray) for 15 minutes. Alternatively, you can place them in the fridge for 1 hour. This will help them to hold shape as they bake.
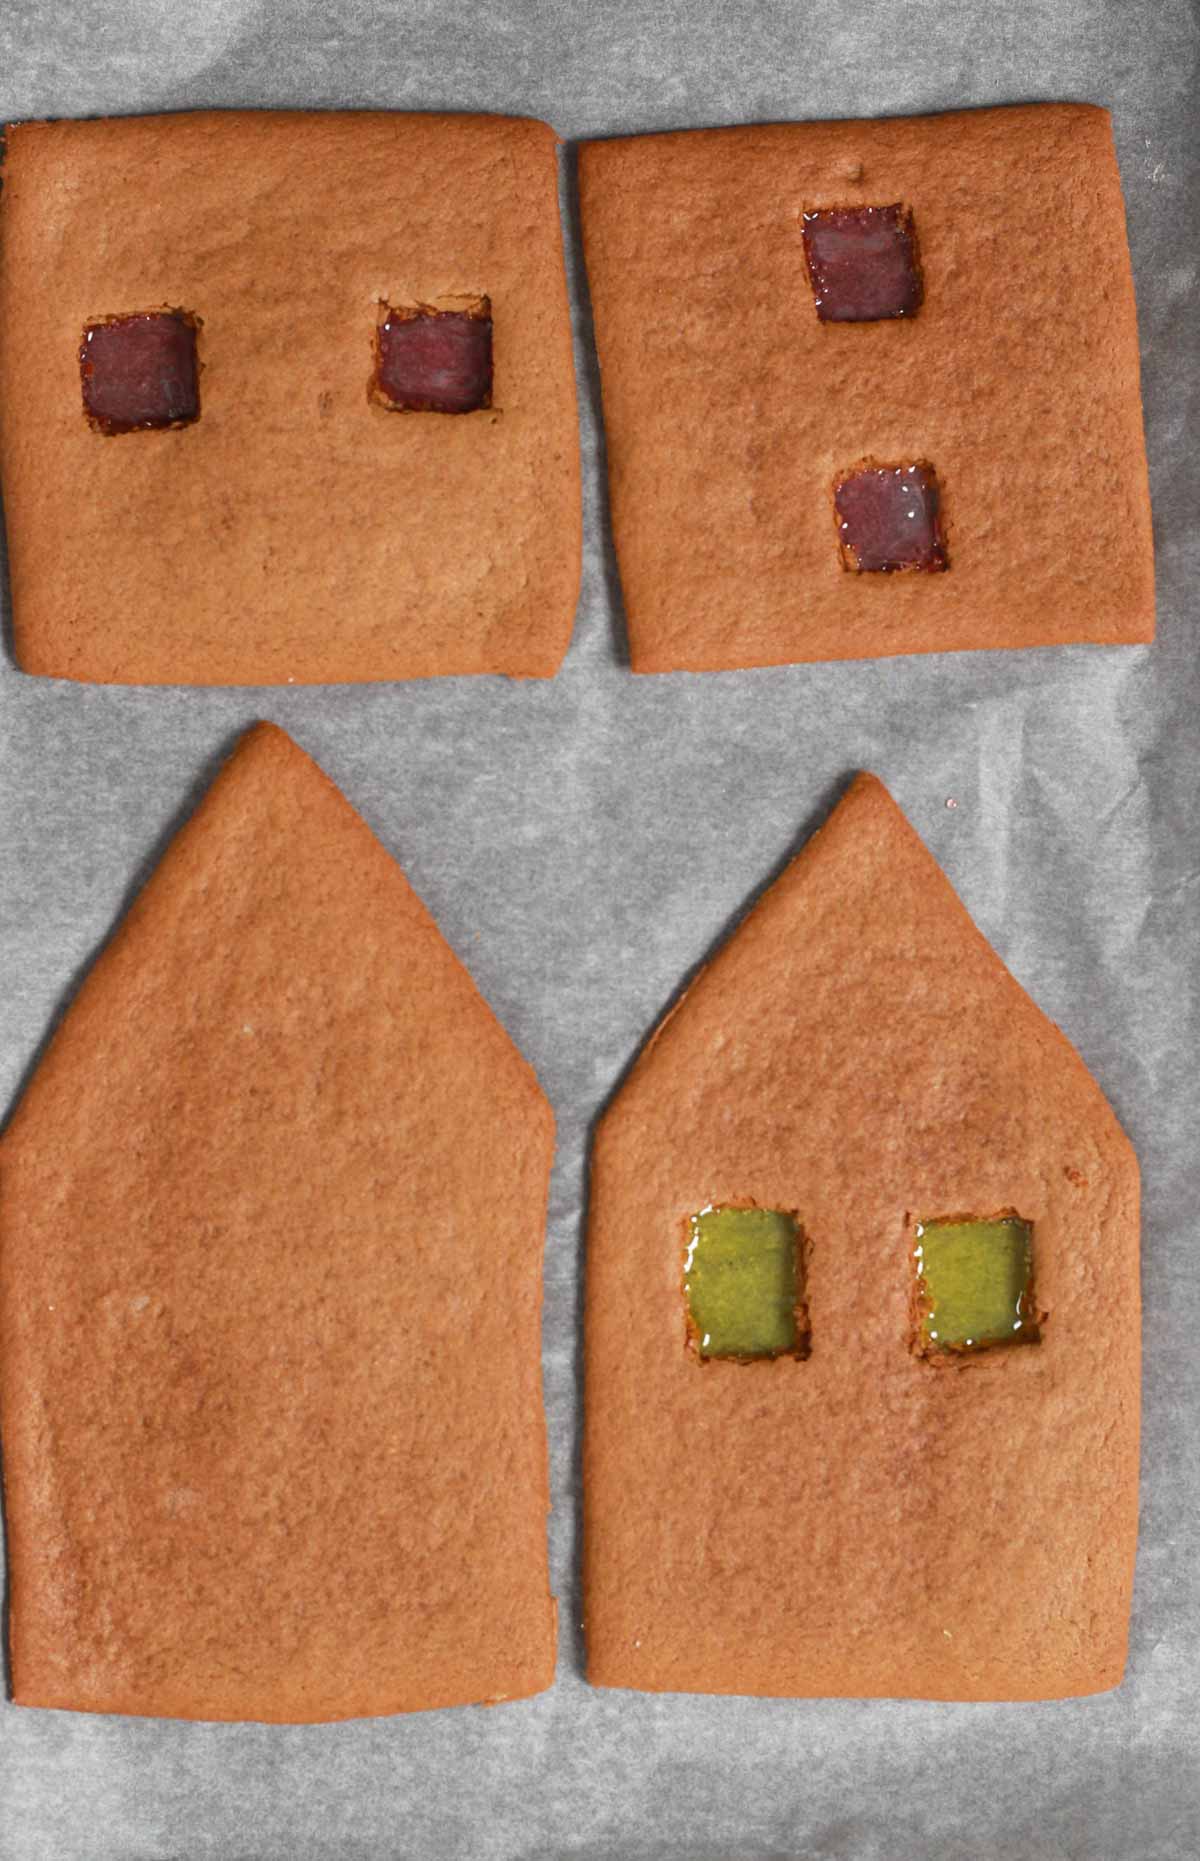
Step 8:
After the shapes have chilled, place a piece of hard-boiled sweet into the holes where the windows will be. I cut my sweets into quarters using a sharp knife.
Pop the shapes into the oven and bake for 15-18 minutes, until firm at the edges. Smaller shapes such as the chimney will need less time, around 8-10 minutes. Let them cool on the tray completely before removing.
Although soft gingerbread is usually great, you don’t want to under bake these cookies, especially if you’re making them in advance, because they’ll be too soft to hold together. Of course, be careful not to burn them either.
Using vegan royal icing as glue
If you’re wondering how to glue your vegan gingerbread house together, eggless royal icing is the answer! I used chocolate royal icing to stick the pieces together, then white/vanilla royal icing as snowy decoration.
All you need for this recipe is aqua faba, cream of tartar (or vinegar), icing sugar, cocoa powder, and vanilla extract.
Step 1:
To a large bowl, add 5 tablespoons of aqua faba, 1 teaspoon of vanilla extract and 1/4 teaspoon of cream of tartar. Use an electric mixer to whisk until frothy.
Step 2:
Add in 450g of icing sugar, a little at a time. Mix it in gently with a wooden spoon to avoid getting it everywhere. Once it’s all mixed in, give it another mix with your electric whisk until smooth and glossy.
Transfer around 1/4 of the icing into an airtight container. You can keep this aside for the ‘snow’ decoration.
Step 3:
To the rest of the icing, add 2 tablespoons of cocoa powder and whisk it in. The icing should be quite thick but easy to spread and pipe.
If it’s too thick, add a splash of water and if it’s too thin, add some extra icing sugar.
Step 4:
Transfer the chocolate royal icing into a large pastry bag fitted with a round nozzle.
How to prevent the icing from drying out
Building a vegan gingerbread house takes a lot of time and patience, so there’ll be long gaps in between using the icing.
To stop it from drying out, place a piping tip cover onto the nozzle then secure the open end of the piping bag so that it becomes airtight. Let the bag sit in a bowl or tub of room temperature water.
If you don’t have a piping tip cover, you can place the tip into a small bowl of water instead. Just make sure to secure the other side of the bag first. Before you use it, pipe a small bit of icing out to get rid of any water that may be in there.
Lastly, you could also place the icing into an airtight container. It will dry out a bit more this way but you can mix in a small splash of water to get it to the correct consistency again.
Assembly
Before assembling your gingerbread log cabin, make sure you’ve decorated all of your pieces and let any icing set fully.
Step 1:
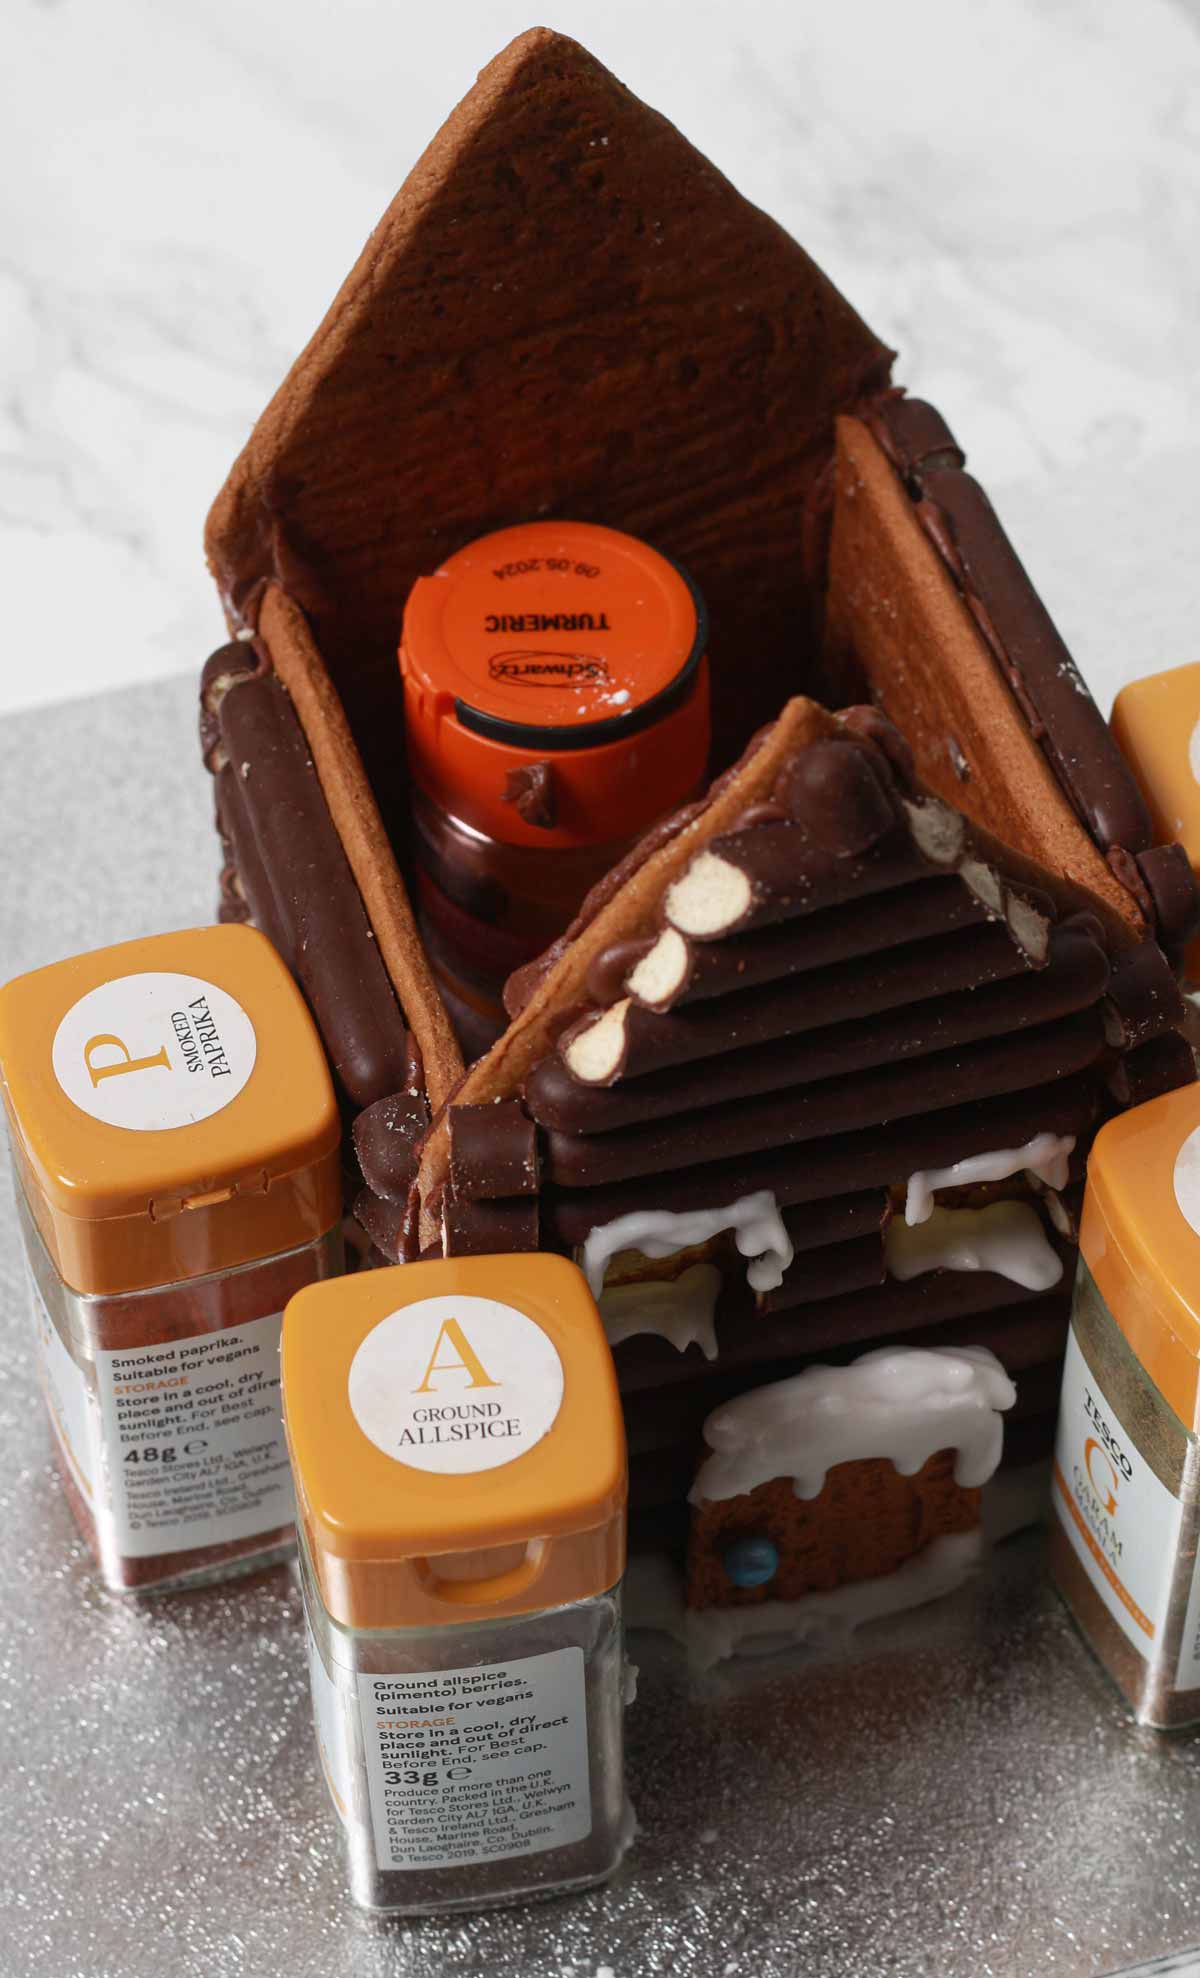
Take your first piece of gingerbread and pipe some icing along the bottom. Place it on top of your cake board and press down gently. Use a small object such as a spice bottle to hold that piece in place.
Step 2:
Repeat the process until you have all 4 sides of your house glued together with the royal icing, using spice bottles to hold them in place until the icing dries.
Let the walls set at room temperature for at least four hours, but preferably overnight. Do not add the roof until the walls are completely set.
Step 3:
Once the walls are set, remove the spice bottles and place a set of small battery-operated lights into the house. Neatly place the battery pack at the back of the house. The wire will be covered by the roof.
Step 4:
Add a thick layer of icing onto the first roof piece and stick it in place. Place something underneath to stop it from slipping down. Repeat for the second piece.
Let that set fully before sticking the chimney pieces on.
Step 5:
Use the white royal icing to decorate the house with ‘snow’.
Switch the fairy lights on and voila! A cute, cosy, eggless and dairy-free gingerbread house!
Top tips
- Draw and cut out your vegan gingerbread house template before you begin baking. It’ll take a bit longer than you think!
- Use vegan margarine for the dough- the soft, spreadable kind. It’ll likely be too dry if you use the blocky, butter type.
- Roll the dough out onto baking paper and use that to transfer your shapes to the tray. This way, they won’t lose shape as you don’t need to peel them off of your work surface. Make sure to lightly flour the top of the dough first to prevent the template from sticking to it.
- Roll out the dough to about 1/2 cm thick. The gingerbread will be too soft and heavy to hold together if you don’t roll it out thin enough.
- If the royal icing is too thick, add a splash of water. If it’s too thin, add more icing sugar.
- Use small spice bottles to hold the pieces in place as they set. They are especially helpful for holding up the roof pieces as they will slide around a lot easier due to the angle.
More vegan Christmas desserts:
I hope you love this dairy-free gingerbread house! If you try this recipe, please let me know how you get on by leaving a rating or comment below. Happy baking!xo
Vegan Gingerbread House
Eggless, dairy-free gingerbread house decorated to look like a Christmas log cabin!
Ingredients
Gingerbread:
- 125 g Black treacle (or molasses)
- 3 Tablespoons Unsweetened soy milk
- 1 Teaspoon Vanilla extract
- 350 g Plain flour
- 1 Teaspoon Bicarbonate of soda (baking soda)
- 4 Teaspoons Ground ginger (powder)
- 1 Teaspoon Ground cinnamon
- 100 g Dairy-free margarine
- 165 g Caster sugar
Decorations:
- Hard boiled sweets, roughly chopped (For the stained-glass windows. I used Fox's glacier fruits)
- Dark chocolate fingers or pretzel sticks, cut to size to cover your house pieces (see notes)
- 110 g Giant vegan chocolate buttons (see notes)
- 1 Biscoff biscuit (for the door)
- 1 Small Vegan cake decoration (for the door handle)
- Christmas wreath decoration (I used a small artificial one from Hobbycraft but you could also make one out of royal icing)
Royal Icing:
- 5 Tablespoons Aqua faba
- ¼ Teaspoon Cream of tartar
- 1 Teaspoon Vanilla extract
- 450 g Icing sugar
- 2 Tablespoons Cocoa powder
Instructions
For the gingerbread:
-
Before you begin, draw and cut out this gingerbread house template (cut out 2 of each piece). This recipe makes quite a lot of dough so you can use a larger template if you prefer.
-
Preheat your oven to 180°C (or 160°C for fan or convection ovens). Line 2 trays with baking paper.
-
In a small bowl, mix together the treacle, soy milk and vanilla until smooth.
-
In a separate bowl, mix together the flour, baking soda, ginger and cinnamon.
-
Rub the margarine into the flour mixture until it resembles breadcrumbs. Stir in the caster sugar.
-
Pour the molasses mixture into the bowl of dry ingredients and mix. When it starts to stick together, use your hands to press it into a dough.
-
Once it comes together as a ball, lightly knead the dough on a floured surface, adding more flour as needed until it's no longer sticky.
-
Using a lightly floured rolling pin, roll out about ¼ of the dough at a time onto a sheet of baking paper until ½ cm thick.
-
Lightly flour the top side of the rolled dough then use the templates to cut out the shapes. Use the baking paper to carefully transfer them to your tray (this helps it to hold shape). Use any leftover dough to cut out small gingerbread shapes such as trees, or freeze to use at a later date.
-
On the front and side pieces, cut out small rectangles where you want the windows to be.
-
Place all of your shapes in the freezer for 15 minutes, or in the fridge for 1 hour. This will help them to hold their shape as they bake.
-
Place a large piece of a boiled sweet into the window holes on the sides and front.
-
Bake the gingerbread for 15-18 minutes until firm at the edges. Smaller pieces like the chimney and gingerbread trees will need less time, around 8-10 minutes. Let them cool completely on the tray before removing.
For the royal icing:
-
Add the aqua faba, cream of tartar and vanilla extract to a bowl. Use an electric mixer to whisk until frothy.
-
Add the icing sugar, a little at a time, using a wooden spoon to mix it in. Once it's all been added, mix it with the electric mixer until smooth and glossy.
-
Transfer around ¼ of the icing to an airtight container and set aside for later. Add the cocoa powder to the rest of the icing and mix in well. Add more water to loosen it or more icing sugar to thicken it.
-
Transfer the chocolate royal icing into a piping bag fitted with a medium round nozzle.
-
Use the icing to stick the chocolate fingers onto the front/back/sides, and the chocolate buttons onto the roof and chimney pieces. Once that has dried, 'glue' the Biscoff biscuit door on and stick the door knob on with more icing. Leave to dry before assembling.
Assembly:
-
Pipe some icing onto the bottom of the first gingerbread piece and stick it onto a cake board. Use a small object such as a spice bottle to hold it in place while you get the next piece.
-
Ice the bottom and both edges of the next piece and stick it into place. I used a spice bottle for every wall to keep it sturdy! Repeat until you have the front, back, and two sides stuck together on the board.
-
Let the gingerbread house walls set completely before adding the roof. Four hours is a good amount of time but I recommend leaving it overnight if you can.
-
Once the walls are set in place, put a small set of battery-operated string lights into the house, tucking the battery pack neatly at the back of the house. The roof will cover the wire. This is optional of course, but I think it looks lovely with the stained glass windows!
-
Ice each side of the roof and stick into place, again using a spice bottle to hold it in place until dry. Repeat with the other side and let it set fully before 'gluing' the chimney on top.
-
Put the white icing into a piping bag fitted with a small nozzle and use it to add 'snow' to your house. Finish off with a small Christmas wreath decoration.
Recipe Notes
- Since I created this recipe, Bournville have added milk powder to their chocolate fingers and buttons. The only like-for-like replacement for Bournville chocolate fingers that I can find are Hotel Chocolat’s chocolate batons but they are quite pricey. For a cheaper alternative, you can use pretzel sticks, either plain or covered in vegan chocolate. Alternatively, make extra chocolate royal icing and use that to decorate the house.
- For the roof buttons, you can use Asda free-from giant buttons.
- If you can’t get molasses or treacle, use agave nectar and switch the caster sugar out for brown sugar.
- Use spreadable dairy-free margarine rather than block vegan ‘butter’. The dough will likely be too dry if you use butter.
- The white icing will likely harden by the time you’re ready to use it. Mix in a splash of water to make it pipeable again.
- To stop the icing from drying out in the bag while the house is setting, place a piping tip cover onto the nozzle then secure the open end of the piping bag so that it becomes airtight. Let the bag sit in a bowl or tub of room temperature water.
Louise
Tuesday 6th of September 2022
I didn't make the house but I used this gingerbread recipe and it was fantastic! I am definitely going to use it again at christmas and make the whole house. Do you know if there are any other types vegan of chocolate fingers because it's quite hard to find the cadbury ones here. Thanks for the great recipe, you are a fantastic baker. Lou