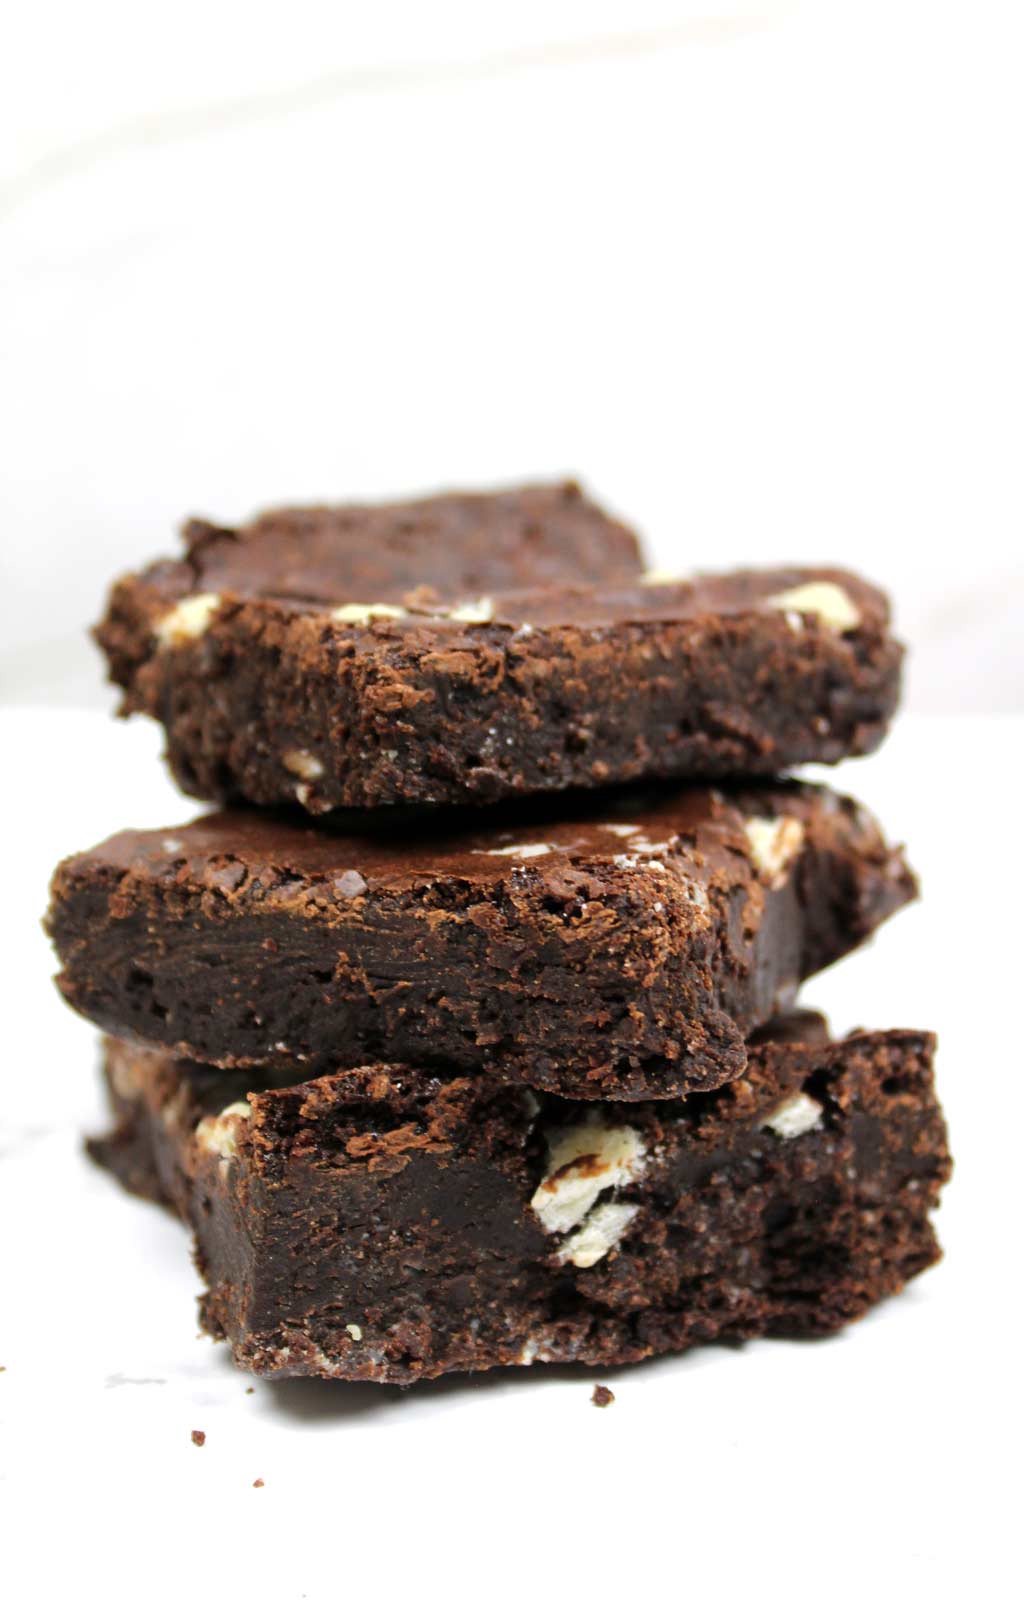
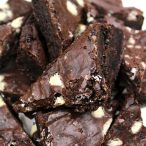
If you like them rich and fudgy, these are the BEST chewy vegan brownies you will ever try! They are dense and chewy on the inside with a crispy, papery crust on the outside. You’ll never know they’re made without eggs or dairy!

Oh my gosh, I am SO excited to share this recipe with you all! I actually think it might be the best one yet!
If you know me, you’ll know that chocolate desserts are my absolute favourite. It doesn’t matter what it is… if it contains cocoa, I’m there.
More than anything else in the whole world, I love me a good rich, fudgy, chewy vegan brownie.
Back in the day, I used to bake traditional brownies (a.k.a. ones with eggs and dairy!) for every occasion and they were always well received. I made them for my now-boyfriend on our second date and I’m convinced that the bribery brownies are what made him fall so madly in love with me.
But when I went vegan, I found it difficult to achieve the same texture without using animal products. This recipe by Orlando Murrin was my go-to non vegan recipe but it obviously contains dairy and eggs so I had to get creative.
Switching the butter and chocolate out for vegan replacements was easy enough, but making brownies without eggs turned out to be a bit more tricky than I first thought.
I originally just replaced the eggs for aqua faba and followed the same method. The result was OK but the brownies turned out oddly too fudgy and too crumbly all at the same time. They were super moist and dense but also fell apart when I picked them up. Weird.
Eggless Brownies Without Flax or Chia Seeds
Next on my list was using a mix of chia and flax seeds. These worked fine too but didn’t give me the chewy texture I was after, and I wasn’t a fan of the tackiness that the seeds caused. If you’ve ever had chia seeds stuck to your teeth, you’ll know what I mean. *shudders*
This week, I finally perfected the recipe. And no, that’s not an exaggeration.
These taste almost identical to my beloved non-vegan recipe. When it comes to eggless brownie recipes, this is one of the best. Promise.
This time around, I used a mix of Orlando’s recipe and my chocolate cake recipe. This involved using a little more fat, a little less cocoa powder and the addition of some soy milk.
I also changed the method which just so happened to make the whole thing a lot quicker and easier. It can all be done in one pan if you so wish!
The result?
Chewy vegan brownies with a thin, crispy, papery crust and heavenly chunks of chocolate throughout. All without any eggs, aqua faba or chia seeds in sight. AMAZING.
Like this post? See more brownie recipes:
- Cocoa powder brownies (no chocolate)
- Chocolate orange brownies
- Mint brownies
- Biscoff brownies
- Peanut butter brownies
- Raspberry brownies
Use 85% Dark Chocolate
I’m of the opinion that brownies MUST contain real chocolate and not just cocoa powder. Otherwise, they simply just aren’t worth the time or effort.
I’m kidding.
But seriously…using a good quality, high cocoa dark chocolate in your brownies is going to take them to the next level.
Personally, I think that using melted dark chocolate is what marks the difference between a chocolate cake and a brownie. It adds so much richness and gives a solid bite rather than a crumby, cakey texture.
For this particular recipe, you must use chocolate that contains 85% cocoa. Chocolate with a higher or lower cocoa content will mess with the delicate mix of ingredients and cause the batter to split.
Recommended dark chocolate to use:
I’ve tried using the super-cheap (low quality) chocolate and it just didn’t work the same. It created an oily mess at the bottom of the pan which I can only describe as chocolate lava, and the brownies tasted too sickly sweet.
So if you can, go for the one of the brands I mentioned above or try to get something very similar.
Why Dairy-Free Butter and Not Oil?
In my experience, I’ve found that using dairy-free margarine (a.k.a. vegan butter) helped to make my desserts a little more “sturdy” because of the added stabilizers.
When I’ve made cakes using oil in the past, they’ve fallen apart a little more easily which isn’t ideal. I don’t notice much of a difference in terms of how moist my bakes are when I use vegan margarine over oil.
I also really love the “buttery” flavour that you get. When using coconut oil or vegetable oil, I find the taste to be either too bland or too overpowering. So vegan butter it is!
I recommend using the soft, spreadable type of vegan margarine rather than the solid blocks of “butter”. I like Vitalite.
How To Make Chewy Vegan Brownies
Step 1:
The first thing you need to do is preheat your oven to 180°C/350°F and line an 8×10 inch rectangular pan with baking paper. It’s important that you use the correct size of tin here, as the baking time needs to be exactly right to get the perfect texture.
Step 2:
Add 180g (3/4 cup) of vegan margarine and 200g (7oz) of 85% dark chocolate into a medium-sized pot.
Place the pot on the stove over a low heat. Stir often until everything has melted together and there are no lumps of chocolate left.
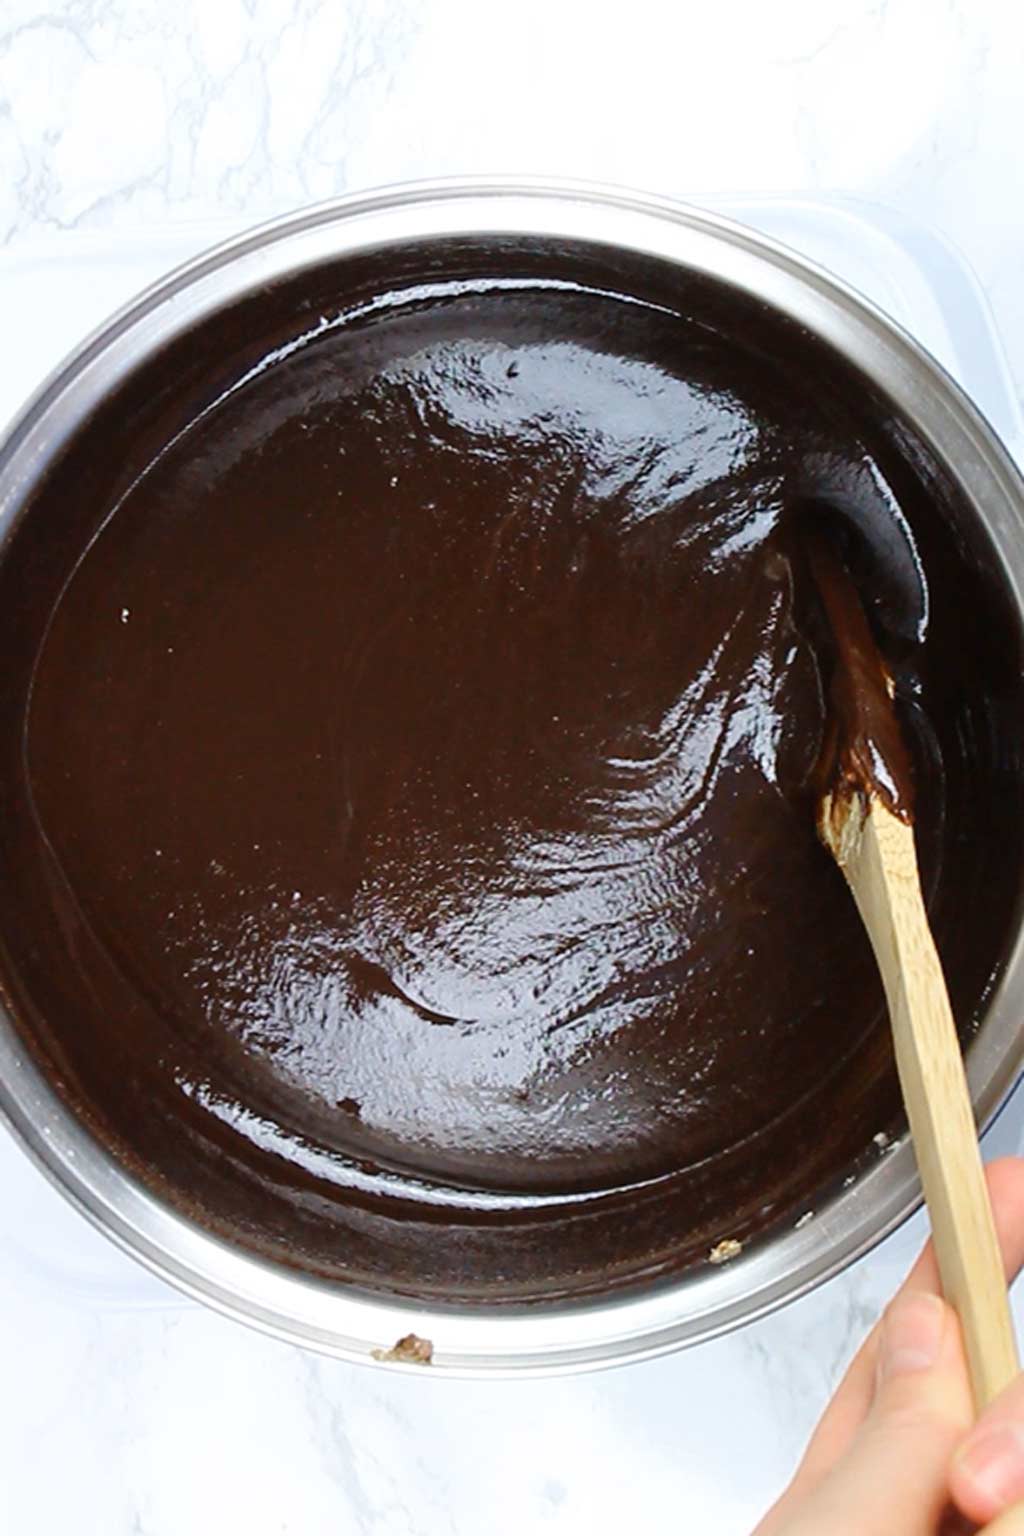
Remove the pot from the heat and set it aside to cool.
Step 3:
In a large bowl, mix together 80g (2/3 cup) of all-purpose flour, 300g (1 + 1/2 cups) of caster/superfine sugar, 60g (2/3 cup) of unsweetened cocoa powder and 1 teaspoon of baking powder. Make sure there are no lumps left in there.
Step 4:
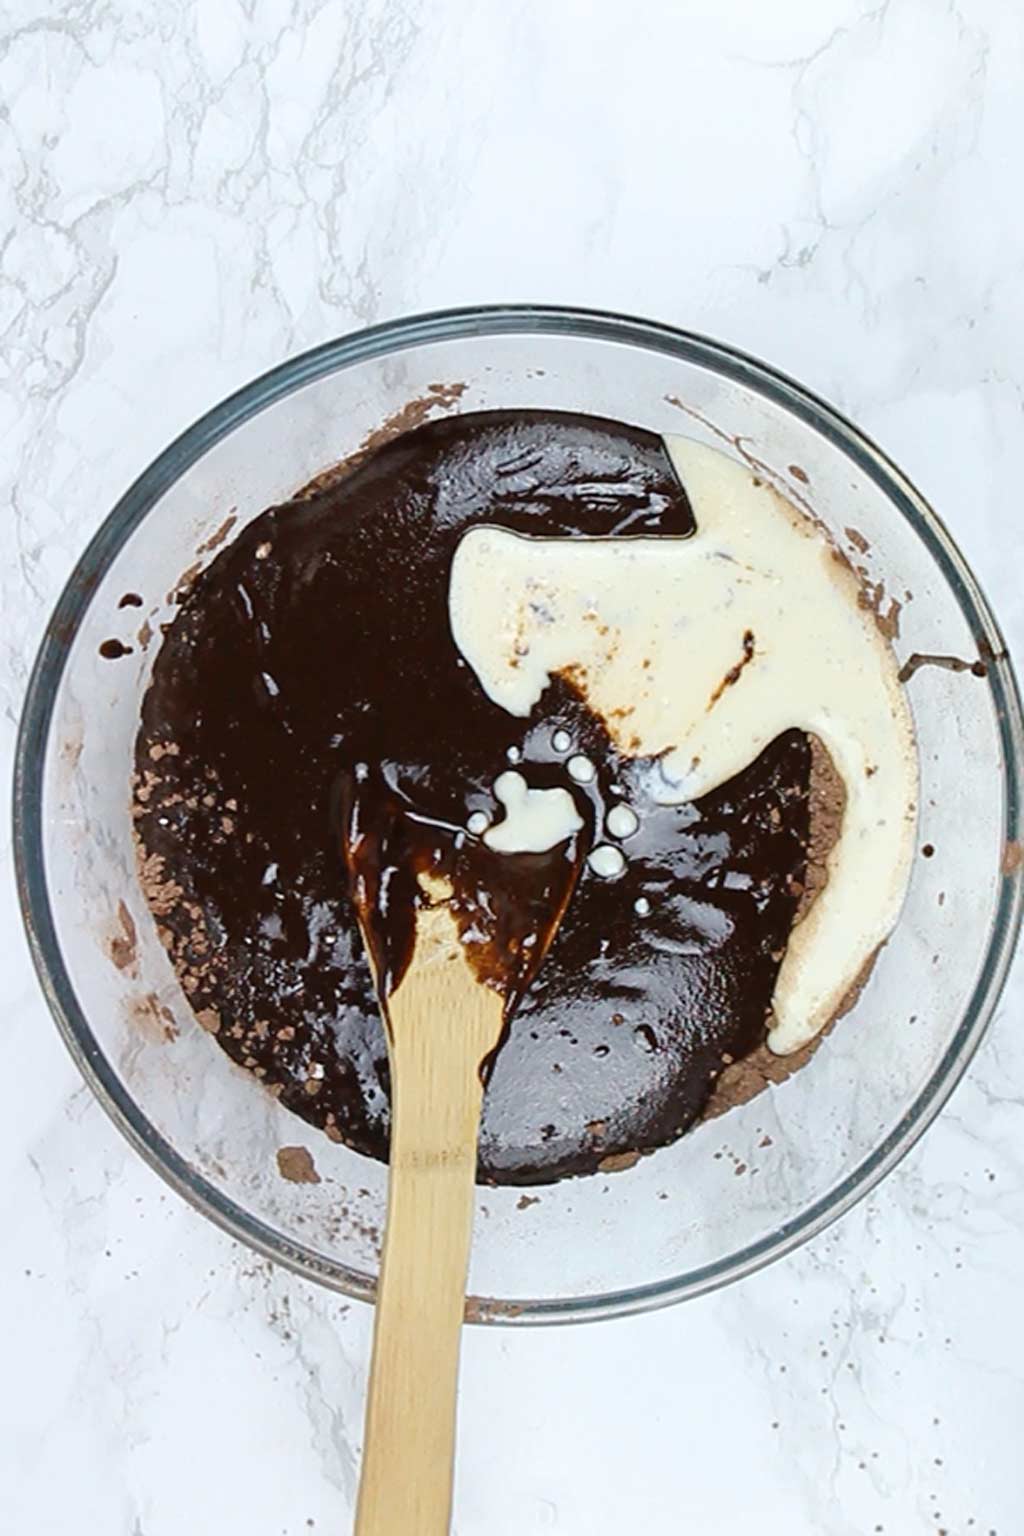
Pour in the cooled melted chocolate mix and 160ml (2/3 cup) of soy milk into the bowl. Use a wooden spoon to combine it until the batter is nice and smooth. If the batter looks a little grainy or oily, add some extra soy milk, a tablespoon at a time, until it smooths out.
It’s important to use unsweetened soy milk as any additional sugar may cause the brownie batter to split. I have not tested this recipe with any other type of plant-based milk.
Step 5:
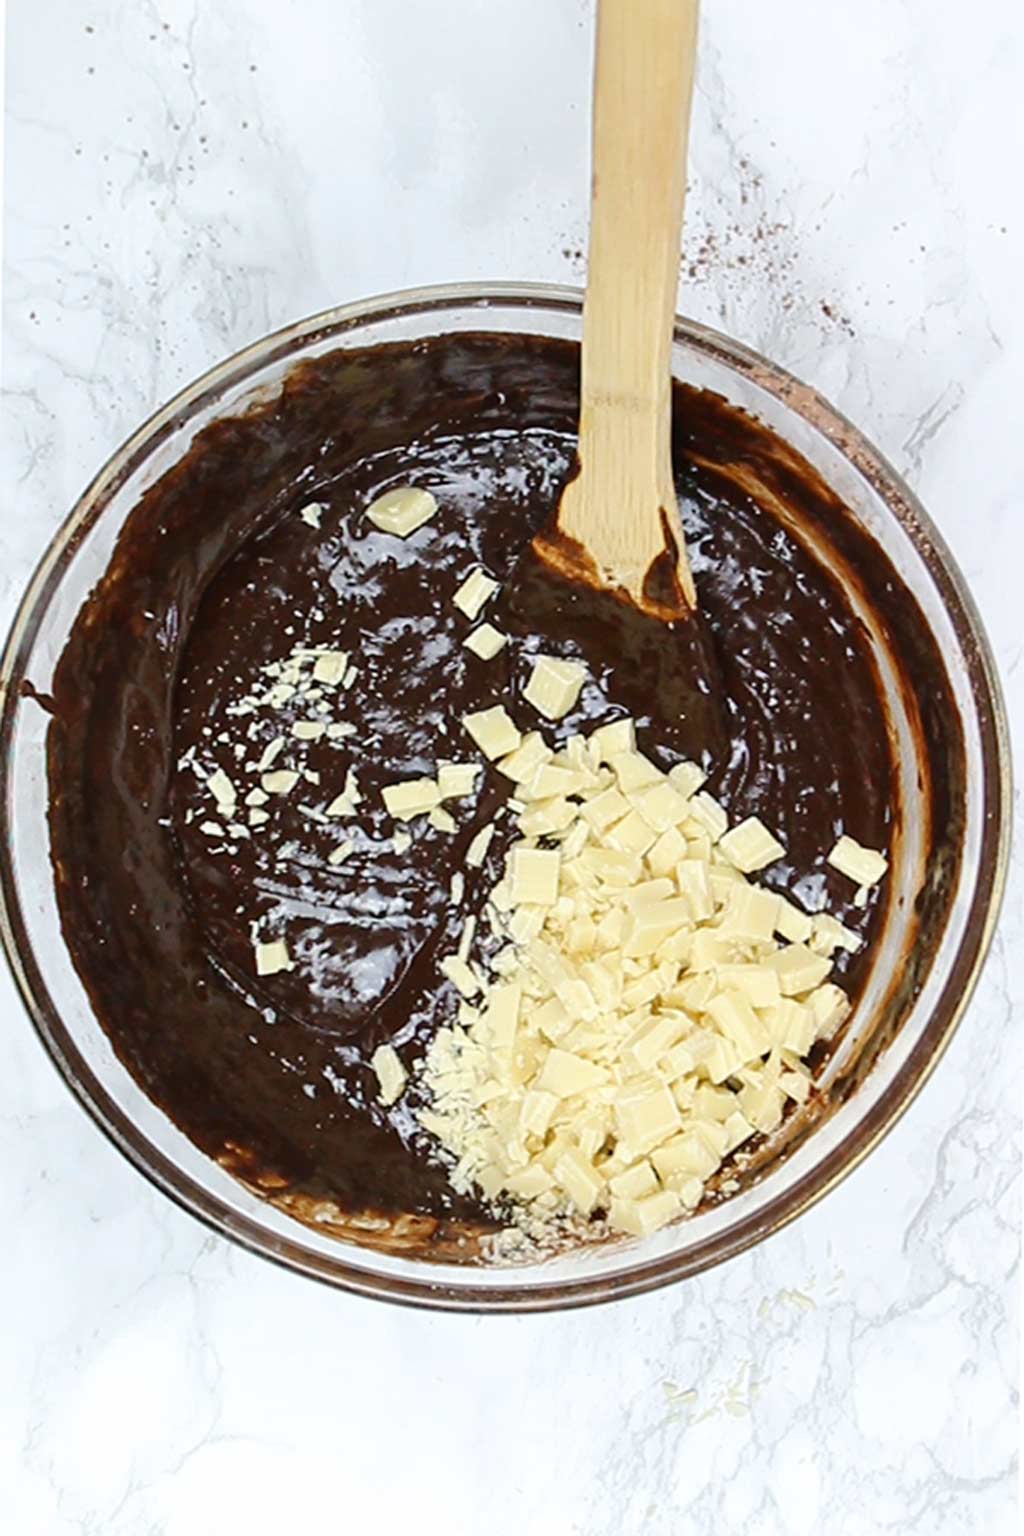
Add in 100g (1/2 heaped cup) of vegan white chocolate chocolate chunks and mix them into the batter.
My go-to white chocolate is The Free From Kitchen Co. and if you’re in the US, a friend told me that Dee Best white chocolate chips are good for baking. But if you’re unable to get vegan white chocolate, you can use any other type of vegan chocolate chips or chunks in its place.
Step 6:
Transfer the brownie batter into your prepared pan and spread it out evenly using the back of your spoon.
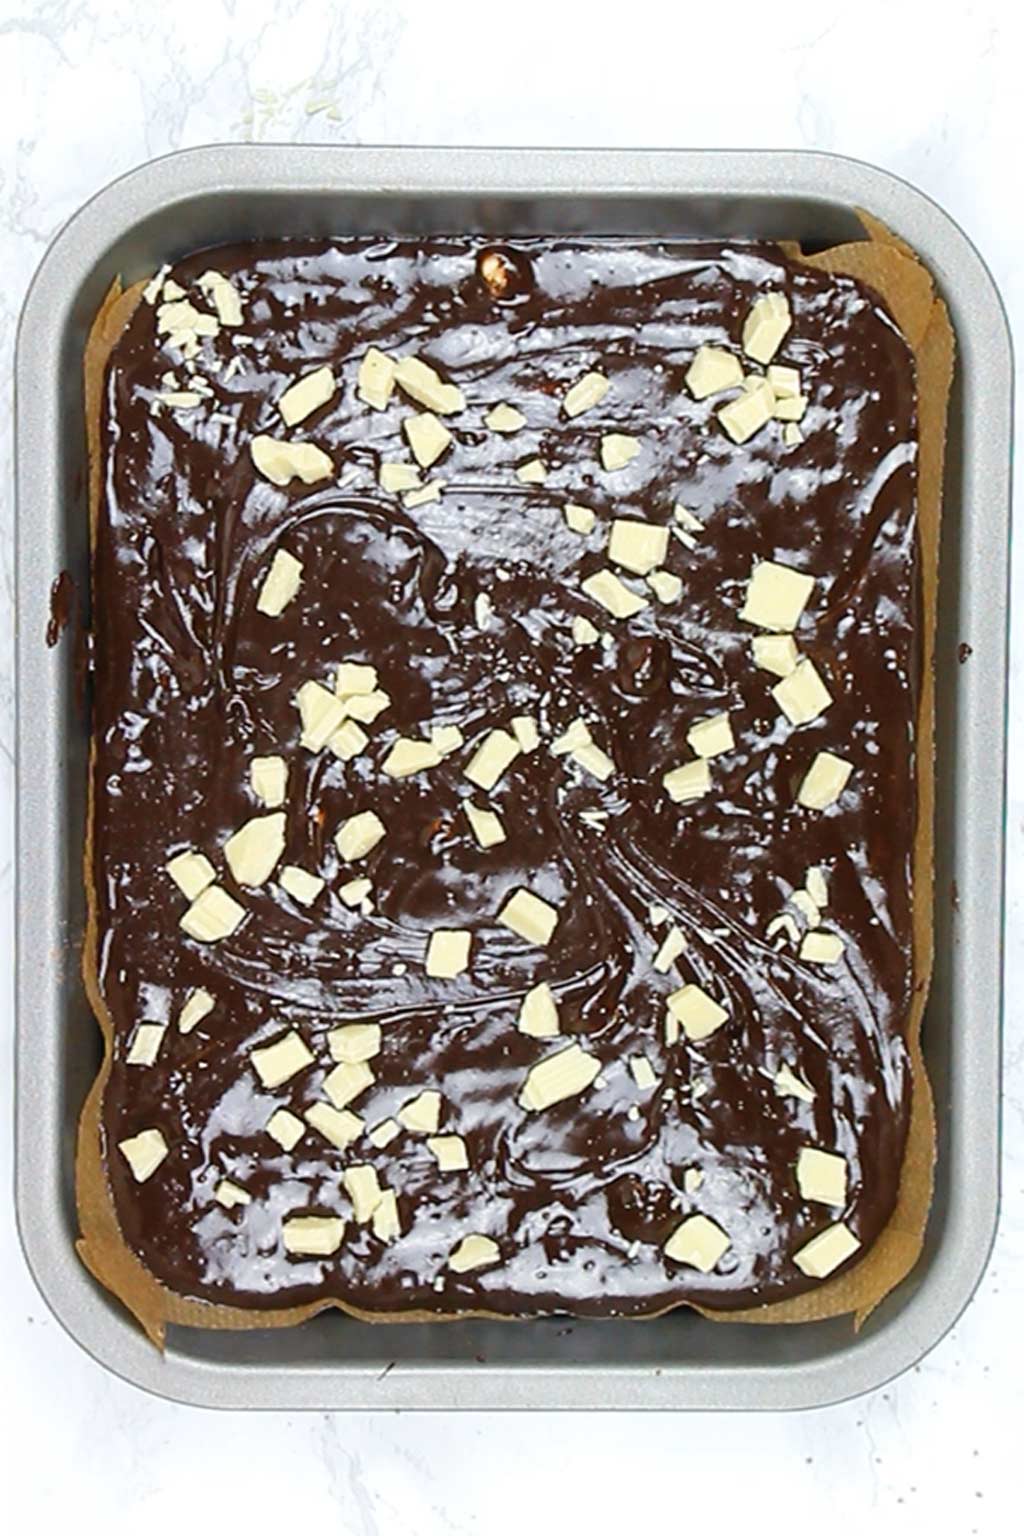
Step 7:
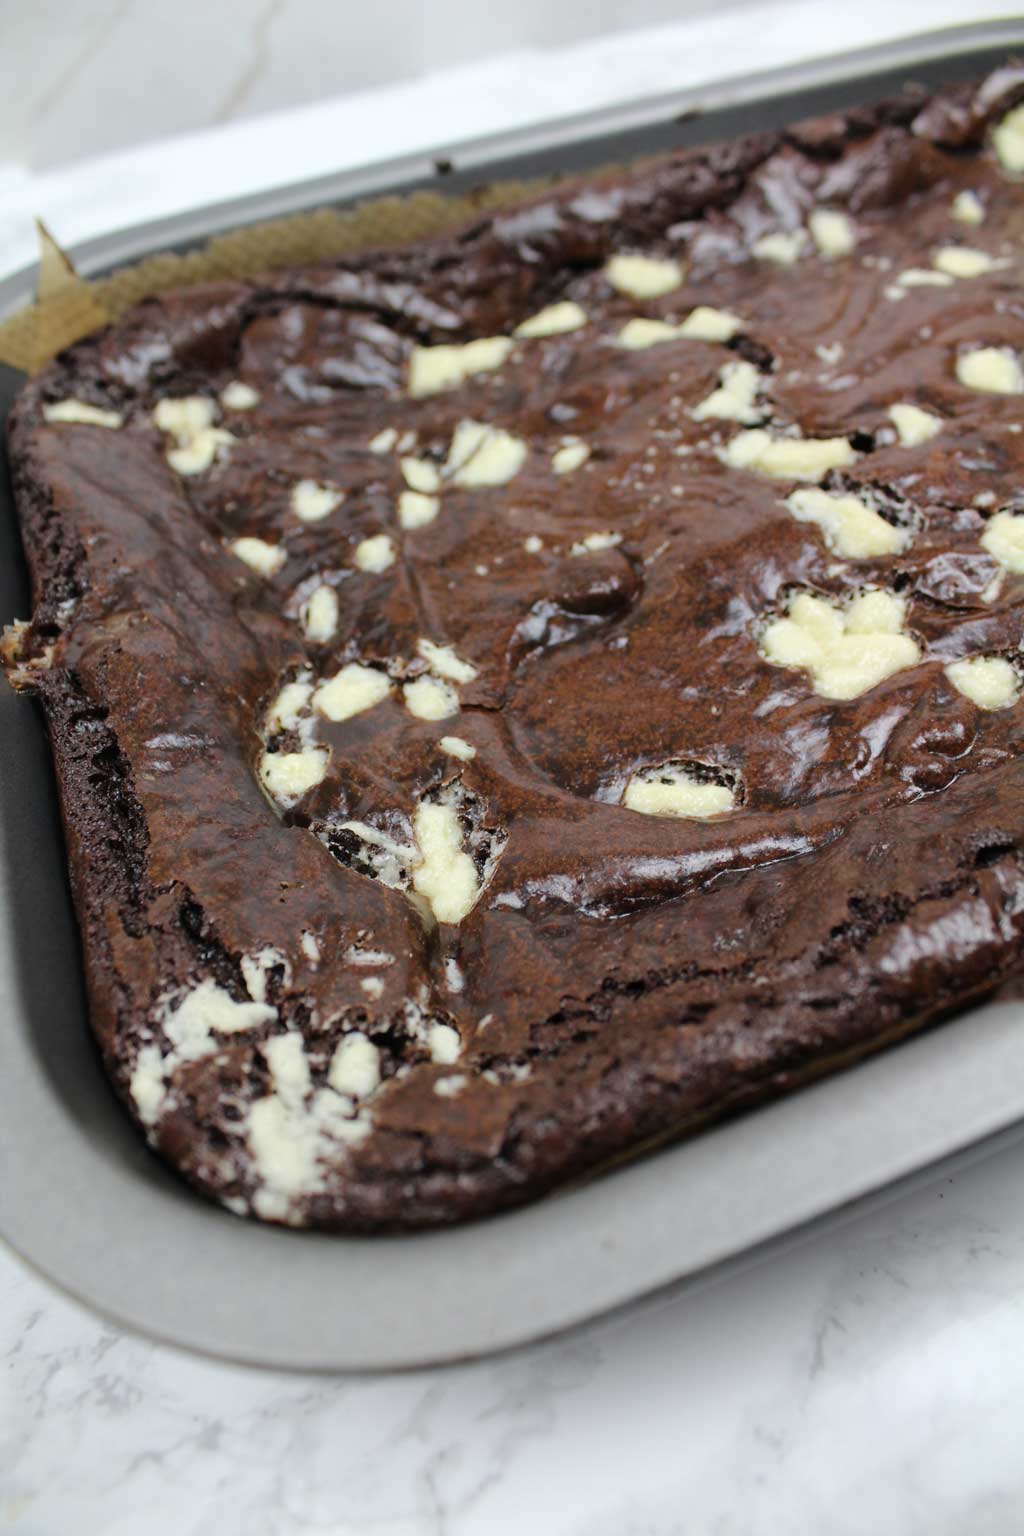
Place them in the oven to bake for 25 minutes.
When you remove the tray from the oven, the brownies may still be ever so slightly wobbly in the centre but that’s OK as they’ll firm up once they cool.
If they’re pulling away at the edges, they’re ready. Resist the urge to over-bake otherwise you’ll end up with dry brownies.
Step 8:
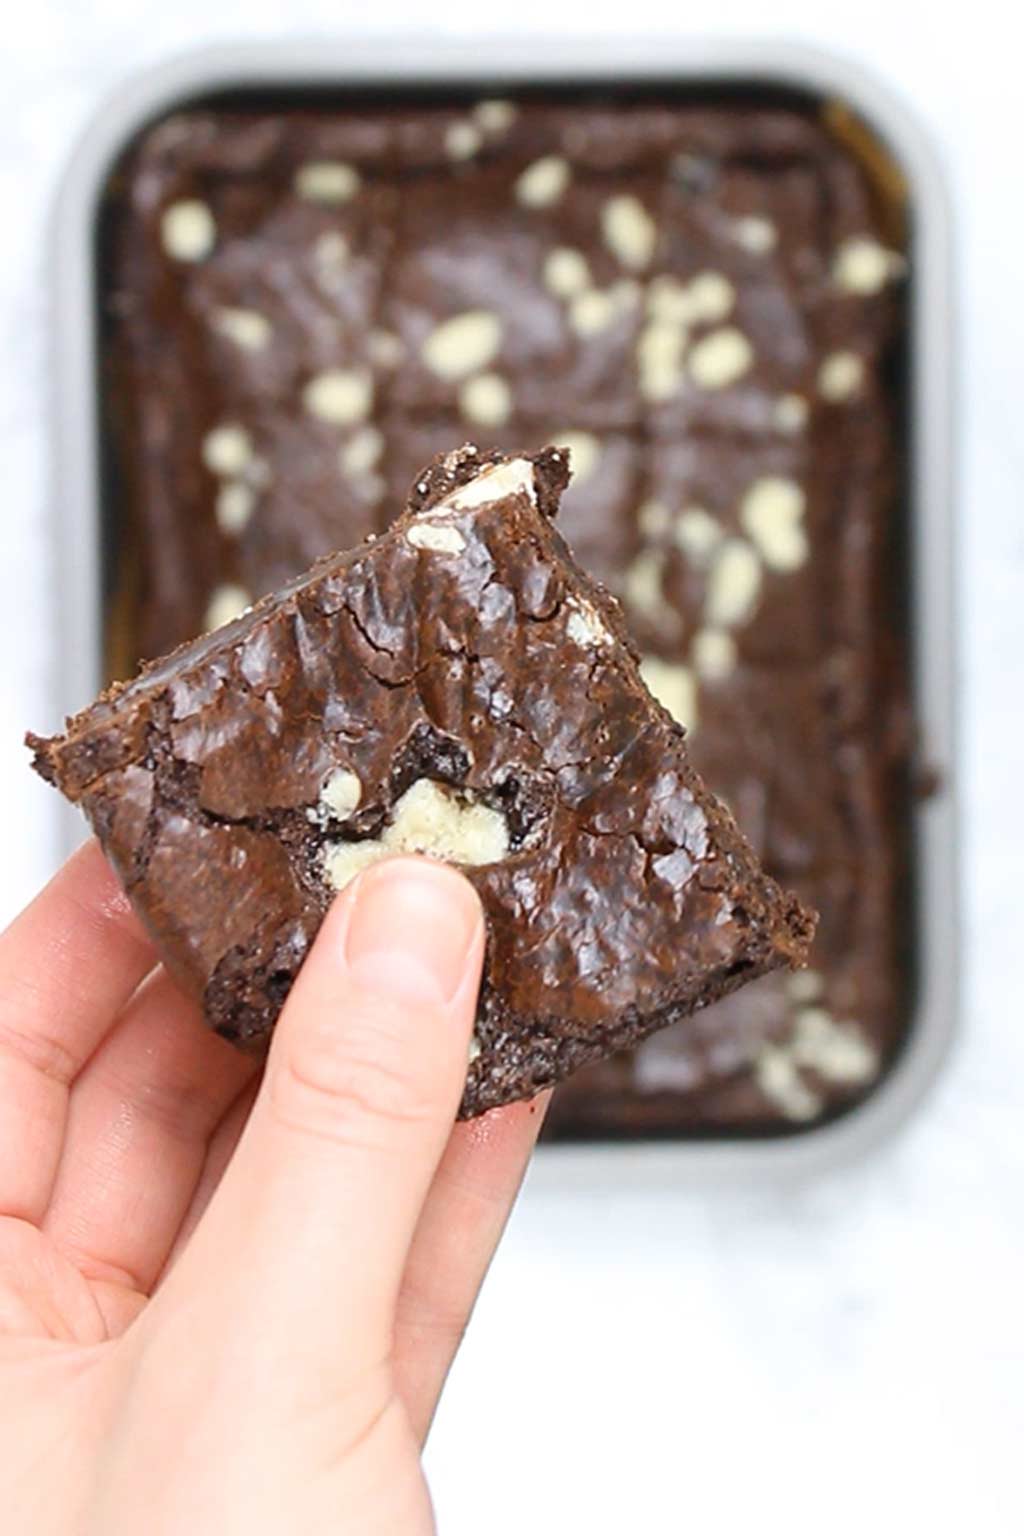
Allow the brownies to cool completely then place the whole tray in the fridge for 4 hours to set. I personally prefer the texture after they’ve been in the fridge overnight.
Step 9:
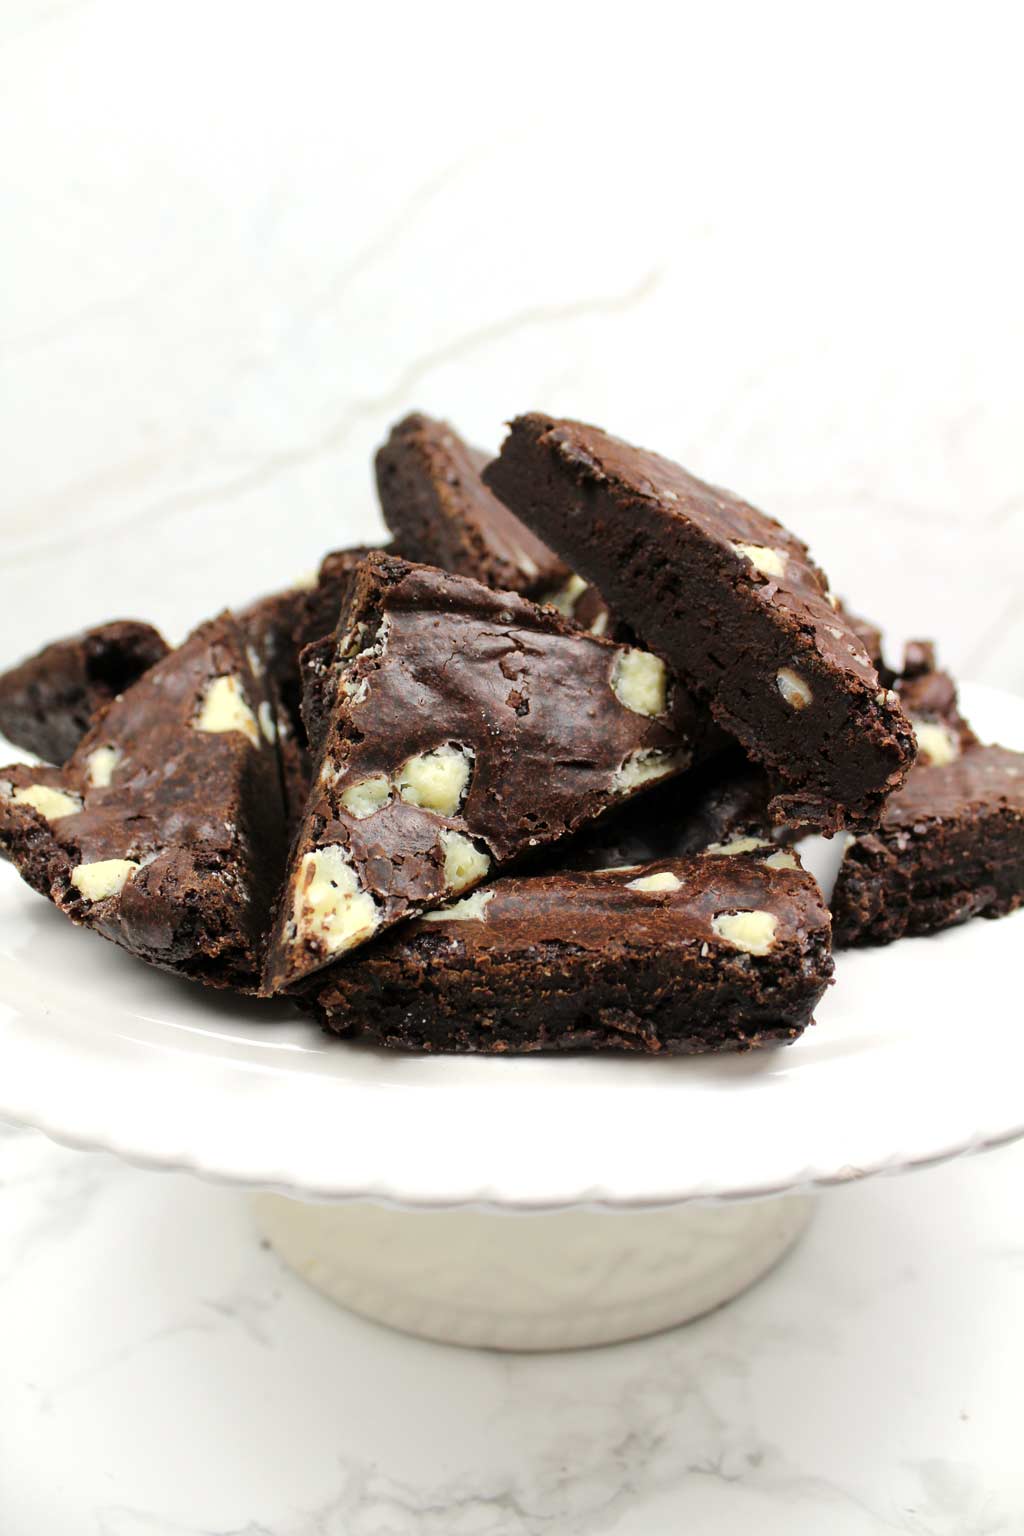
Once they’ve set, cut them into squares or triangles and enjoy!
Top tips
- Use a high quality chocolate with 85% cocoa content
As I said earlier, the low quality, low cocoa % chocolate doesn’t work well for these brownies. It makes them oily and too sweet. You don’t have to spend a lot to get good quality chocolate- the 85% bars I used are only £1 each.
See the recipe card below for links to the chocolate I use. I highly recommend using one of these brands for best results.
- Use unsweetened soy milk
Soy milk contains more protein than other plant-based milks and is great for eggless chocolate brownies as it helps to provide structure. It must be unsweetened as any extra sugar added to the batter can cause it to split or become oily. I have not tested this recipe with any other kind of plant-based milk so I cannot guarantee it will work.
- Don’t omit the chocolate chunks!
Not only do they add to the taste and texture of these brownies, the chocolate chunks are what’s going to help give the brownie that classic, “papery” crust on top.
I’d highly recommend NOT skipping the chocolate chunks but if you’re not too fussed about having a papery crust (the brownies will still taste amazing), you can replace the chunks with something like nuts, dried fruit or chopped pretzels.
- Under-bake the batter slightly
The secret to chewy brownies is to under-bake them. The classic “bake until a toothpick comes out clean” trick that’s often used in baking works well for sponge cakes but not so much for brownies.
These brownies are supposed to be chewy and dense, so they will seem slightly wobbly when you take them out of the oven. Once they’ve cooled and set in the fridge, they will firm up nicely. If you bake them for too long, they will lose their fudgy texture and turn out more cake-like.
- Refrigerate them!
Make sure you’ve had the brownies in the fridge for the recommended time before you attempt to remove them from the pan or cut them. Resist the urge to cut them while they are still warm! While warm brownies still taste delicious, they will fall apart and be very gooey.
FAQ:
Always in the fridge! When stored at room temperature, the brownies become a little softer and lacked chewiness.
Once you’ve let them set and cut them into squares or triangles, place them in an airtight container and keep them in the fridge.
They’ll last about 1 week if stored in the fridge. (Or if you love brownies as much as me, they’ll last ~12 hours).
These chocolate brownies are great for freezing. They freeze beautifully which is perfect if you want to bake a batch ahead of time.
Simply place the brownies into an airtight container and freeze for up to 3 months. When you’re ready to eat them, transfer them to the fridge and leave them there overnight to thaw. Do not refreeze.
I hope you enjoy these eggless chocolate brownies! If you make them yourself, please let me know what you think by leaving a rating and/or comment below. Happy baking! xo
Chewy Vegan Brownies (Best Ever!)
Eggless chocolate brownies that are dense and chewy with a shiny, papery crust.
Ingredients
- 200 g 85% dark chocolate (7oz)
- 180 g Vegan margarine (¾ cup)
- 80 g Plain flour (⅔ cup)
- 300 g Caster sugar (1+½ cups)
- 60 g Unsweetened cocoa powder (⅔ cup)
- 1 Teaspoon Baking powder
- 160 ml Unsweetened soy milk (⅔ cup)
- 100 g Vegan white chocolate chunks or chips (½ cup, heaped)
Instructions
-
Preheat your oven to 180°C/350°F (or 160°C/325°F if you're using a fan or convection oven).
-
Line an 8×10-inch tin with baking paper.
-
Over a very low heat, melt the chocolate and vegan margarine in a pot. Stir it often to prevent burning.
-
When there are no lumps of chocolate left in the mixture, take the pot off of the heat and set aside to cool.
-
In a large bowl, mix together the flour, sugar, cocoa powder and baking powder until there are no lumps left.
-
Pour the melted chocolate mixture into the bowl along with the soy milk. Mix until everything is well incorporated. If the batter looks grainy or oily, you can add more soy milk, 1 tablespoon at a time, to help bring it together.
-
Add the white chocolate chunks to the mixture and fold them in. I like to save a few to sprinkle over the batter once it's in the tin.
-
Transfer your brownie batter into the pre-lined baking tin and use the back of your spoon to spread it out evenly.
-
Bake for 25 minutes then remove the tray from the oven. The brownies will look a little under-baked but they will firm up as they cool. You'll know they're ready if they are slightly pulling away from the edges.
-
Allow the brownies to cool in the pan for around 30 minutes then transfer them to the fridge to set for 4 hours. This part is really important!
-
After chilling, remove the brownies from the pan and cut into 12 squares. You can leave them like this or cut the squares in half to make 24 triangles.
Recipe Notes
- Use a spreadable vegan margarine rather than a block ‘butter’. I recommend Vitalite or Pure.
- I recommend using Tesco 85% chocolate or Lindt 85% chocolate for best results- these are the two brands I tested the recipe with. Chocolate with a lower cocoa percentage will not work well in this recipe.
- The soy milk must be unsweetened. I have not tested the recipe with any other types of plant-based milk so cannot guarantee they will work.
- If you cannot find vegan white chocolate chips where you live, they can be subbed for dark chocolate chips instead.
- Store in an airtight container in the fridge for up to 1 week.
Bobby
Wednesday 28th of August 2024
I was wondering: is it DEFINITELY essential that unsweetened soy milk is used? Would it be possible to use sweetened and reduce some of the caster sugar? I have no other uses for unsweetened so I end up with almost a litre of milk left over, whereas I always have sweetened soy milk around for coffee. Tempted to test it but would be tragic to waste a whole batch if the batter split. If you've already tested this, any info would be much appreciated!
This is the most delicious brownie recipe I've come across, vegan or otherwise! The overnight refrigeration really does something magic to them. It's also easy and fun to make variations, like Oreo or hazelnut. Thanks for sharing!
Bobby
Tuesday 10th of September 2024
Hi @Chloe, thanks so much for the tips! Will try that next time, and gives me an excuse to make another batch asap ?
Chloe
Thursday 29th of August 2024
Hi Bobby, yes that’d work fine! I recommended using unsweetened after a couple of people had issues with the recipe so I just wrote out exactly what I use when I make them. I’d imagine if you reduce the amount of sugar to about 280g and use sweetened soy milk, they’d be just as good :)
Avril
Tuesday 6th of June 2023
2nd attempt successful, extra 10 minutes in oven worked well , still chewy ?
Chloe
Tuesday 6th of June 2023
Brilliant! Thanks for letting me know. I'm planning to make these soon so I'll double check the baking time again :)
Avril
Tuesday 30th of May 2023
Sadly they were a bit wet, maybe needed slightly longer in oven, difficult to judge when ready
Avril
Thursday 1st of June 2023
@Chloe, Thanks Chloe, I put them in the fridge, will try toothpick test, having another go this weekend ?
Chloe
Wednesday 31st of May 2023
Thanks for your feedback Avril! When brownies are ready, a toothpick through the middle should have some moist crumbs/streaks on it- somewhere between completely dry and ‘covered in brownie batter’. You can try popping your brownies in the fridge overnight to see if that saves them!
Sivan
Friday 21st of October 2022
the best brownies I've ever made! Amazing crust! I put 200 g of sugar instead of 400 and it was still very sweet
Chloe
Friday 21st of October 2022
Thanks so much for your review Sivan, so glad you liked them!
Nicole Rennie
Wednesday 17th of November 2021
I love this recipe thank you. I was a bit worried at first because they were oily and falling apart but I put them in the fridge like you said and they came out sooo chewy and fudgey. These are the best brownies ever thanks Chloe!
Chloe
Thursday 18th of November 2021
Glad to hear that Nicole. I should have named them fridge brownies because that's when the magic happens! Haha. Thanks for your review ?