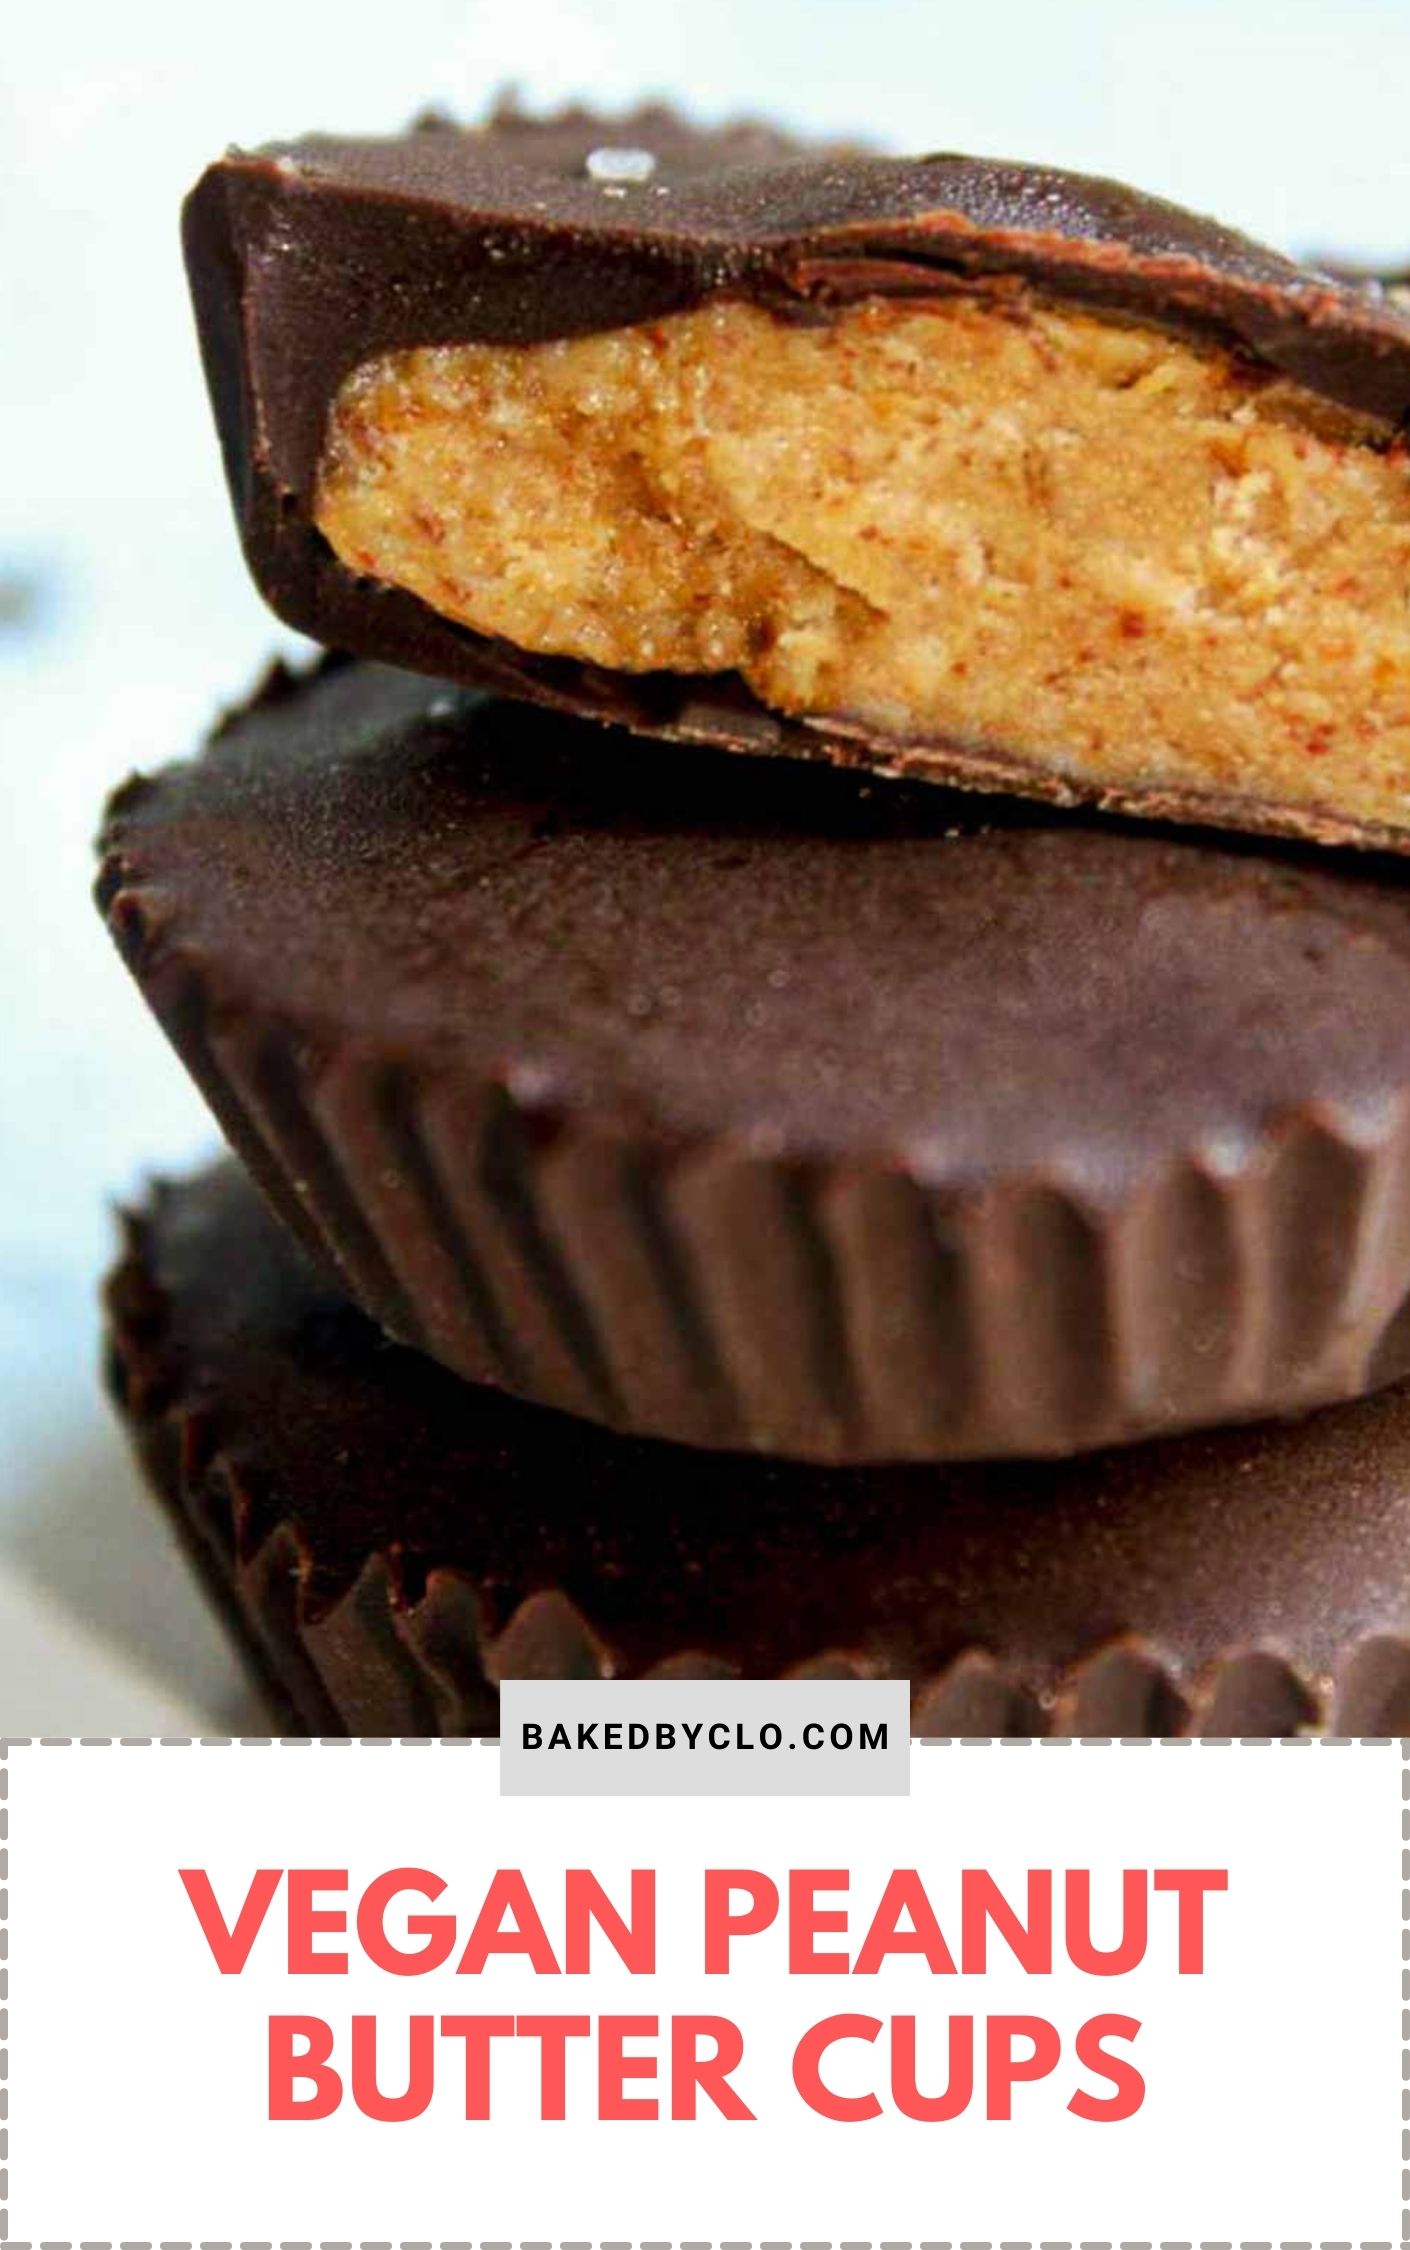
These vegan peanut butter cups are quick, easy and convenient for an on-the-go snack. They taste similar to Reese’s but are dairy-free and contain just 5 ingredients!
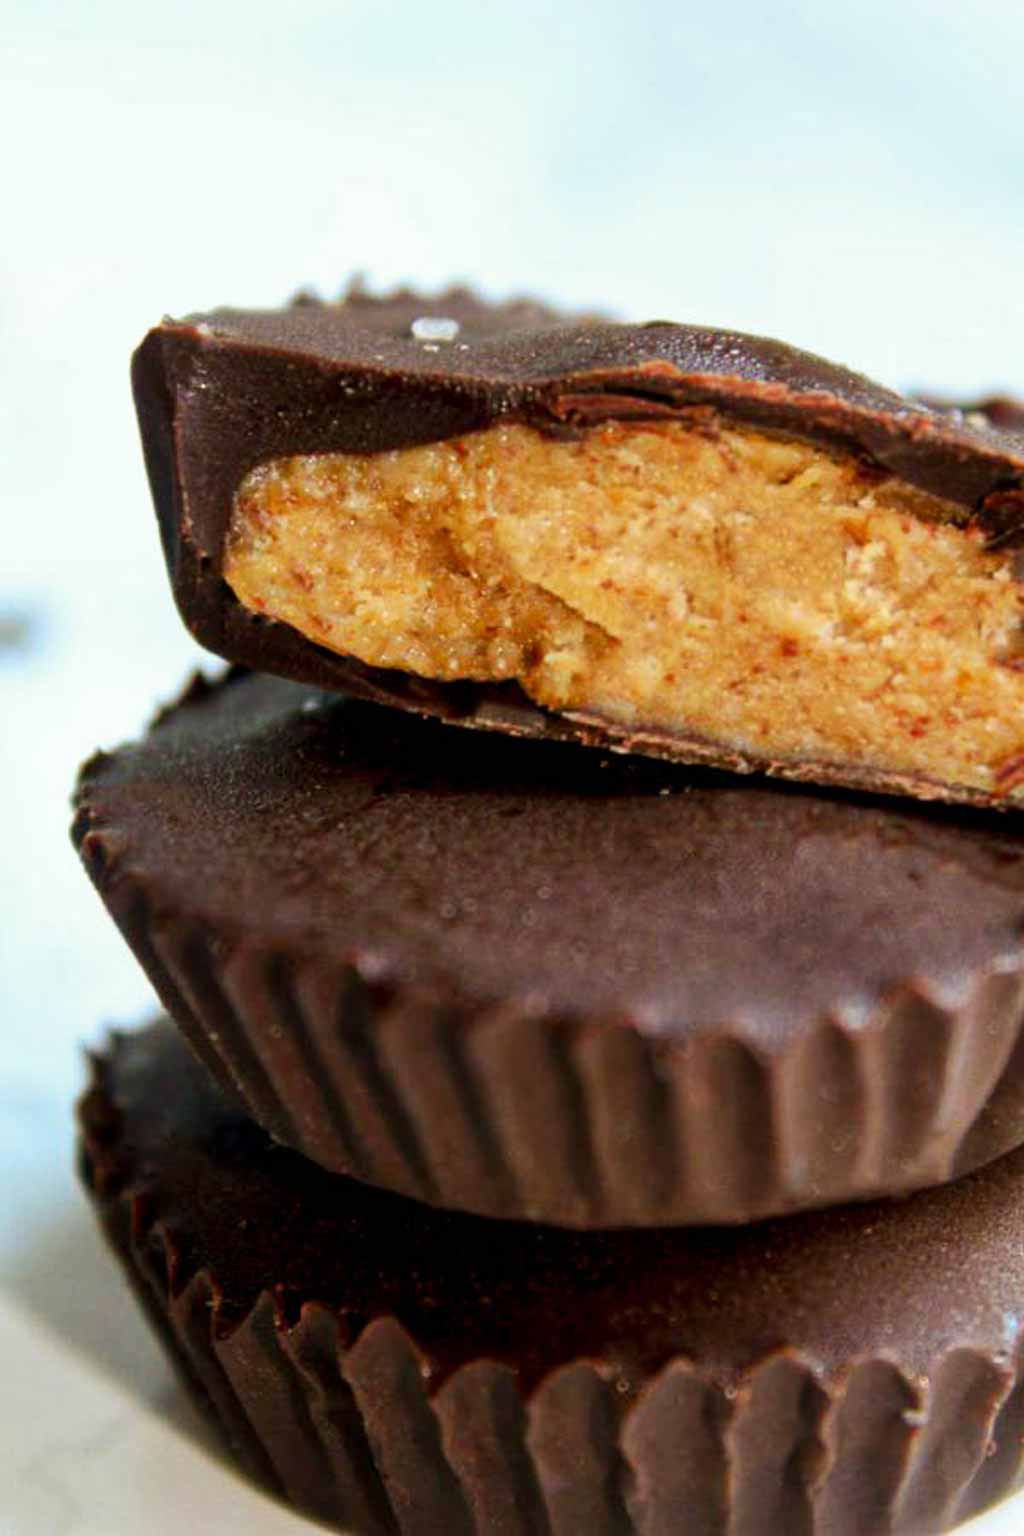
Peanut butter cups… Can you think of a sweet treat that’s more loved?
Originating from the USA, they eventually made their way over to the UK and have become a favourite for many people here. Including me, obvs.
But as you’ll probably know, Reese’s peanut butter cups are not vegan-friendly because they contain milk.
So, with a couple of super easy adaptions, I made a dairy-free version.
Homemade peanut butter cups aren’t hard to make at all and you’ll find hundreds of different recipes online.
But for those who may be new to veganism or creating treats in the kitchen, I made these especially for you. Because who doesn’t love an easy recipe?
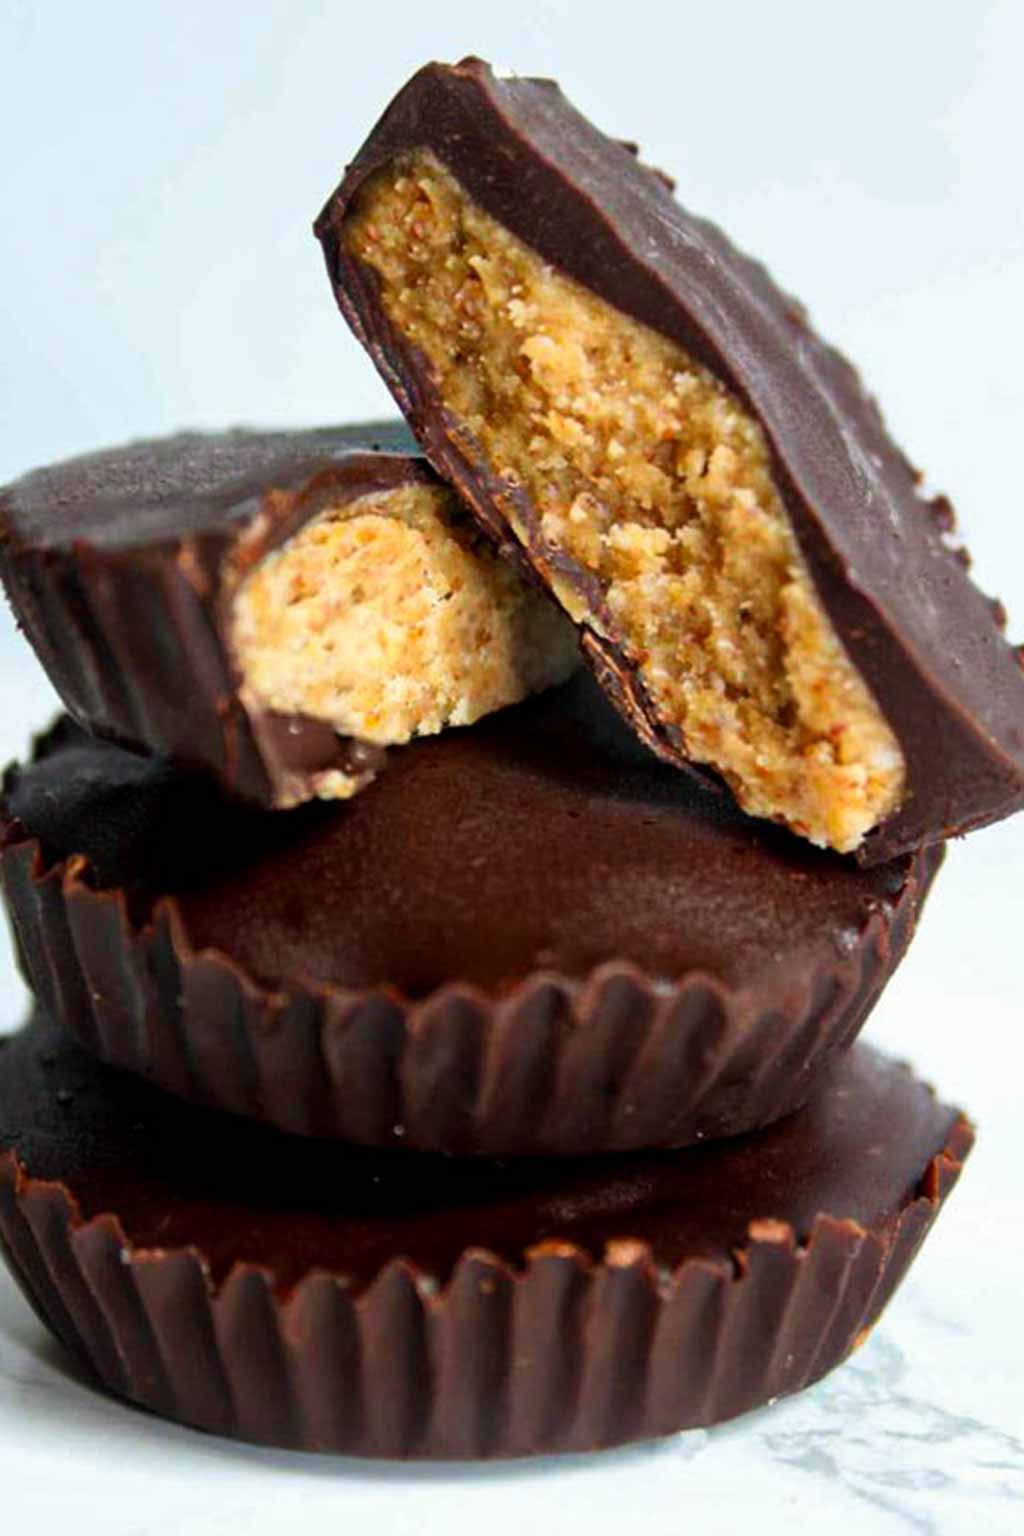
The idea for this recipe came to me as I was eating yet another piece of my 3-ingredient peanut butter fudge. It melts in your mouth and is seriously addictive. Even my gran, who hates peanut butter, loves it!
The fudge reminded me a lot of the inside of a peanut butter cup- super sweet and smooth, with a slight hint of saltiness.
And I imagined what the fudge would taste like if I completely covered it in chocolate rather than just adding a few chunks on top.
The result? The best peanut butter cups ever.
Which chocolate should I use?
I personally used Tesco 74% dark chocolate because I love the taste of it. I think the slight bitterness contrasts really well with the very sweet peanut butter filling.
Dark chocolate also tends to be higher quality too, meaning it melts a lot easier and it doesn’t seize up.
I microwave mine in 30-second increments, stirring each time until it’s melted. This makes the process really fast and mess-free.
But if you want a peanut butter cup that’s more similar to Reese’s, I’d recommend using vegan milk chocolate such as Nomo or iChoc, both of which are available from the Vegan Kind Supermarket.
Or if you want to go all out, I think some vegan white chocolate peanut butter cups would taste amazing too! My favourite is the Free From Kitchen Co.
If you’re using vegan milk or white chocolate, just be careful not to burn it. It’s a good idea to melt it in a bowl over a pan of hot water (rather than in the microwave) to prevent it from burning or clumping.
More no-bake desserts:
Which peanut butter is best?
I find that the natural style (that’s the kind that is made from 100% peanuts) gives the strongest peanut butter flavour.
There are tonnes of options available on Amazon but you can always make some homemade peanut butter if you feel up to it! Just stick some unsalted peanuts into a high-power blender and blend until smooth.
My personal favourite to buy is Meridian smooth. It has a great flavour and because it contains no other ingredients. It’s also super runny and mixes really well.
You can add a pinch of salt to it if you like, to really help bring out the flavour. It’s so good!
If you can’t get your hands on the natural style peanut butter, the creamy kind will work too but you may need to adjust the measurements slightly.
If your filling ends up being too dry, add a little more peanut butter and/or vegan butter until it sticks together.
How To Make Vegan Peanut Butter Cups
Step 1:
Line two cupcake tins with paper cases. You’ll need 16 in total, so 8 for each tin.
Step 2:
After you’ve prepared your cupcake tin, the first step is to add 150g of peanut butter (see recipe card below for cup measurements) and 1 tablespoon of vegan butter to a medium-sized bowl.
You can use coconut oil instead of vegan butter if you like, but note that it will add a slight coconut flavour to the end result.
Pop the bowl in the microwave for 30 seconds, or until the butter has started to melt a little. Mix the two ingredients together until combined.
You can also do this over the stove on a very low heat if you’d prefer.
Add 2 teaspoons of vanilla extract or essence to the bowl and mix again.
Step 3:
Add 90g of powdered sugar into the bowl with the peanut butter mixture and stir until it starts to stick together.
Use your hands to form a large ball with it, similar to cookie dough. This will be your peanut butter filling.
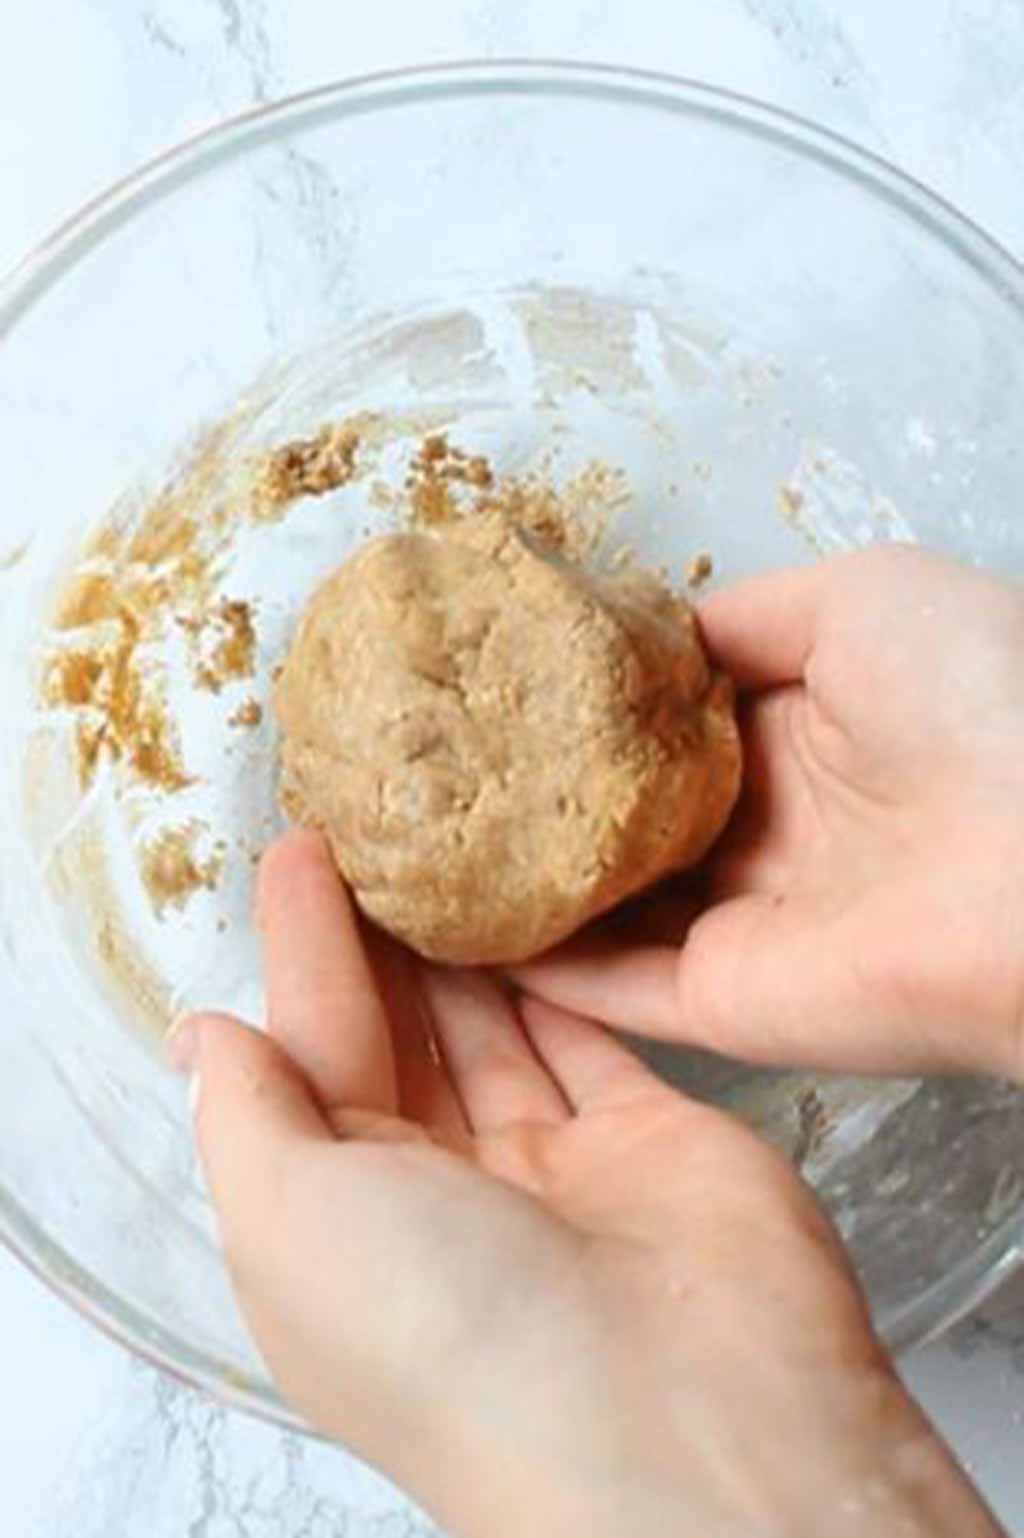
Place the filling in the fridge to chill while you prepare the chocolate cups.
Step 4:
Take 75g of chocolate and melt it in the microwave in 30-second increments, being careful not to let it burn.
Using a pastry brush or the back of a teaspoon, paint a thin layer of chocolate around the edges of each paper case, about 1/2 the way up. (I find it’s easier to hold the paper case in my hands as I do this.)
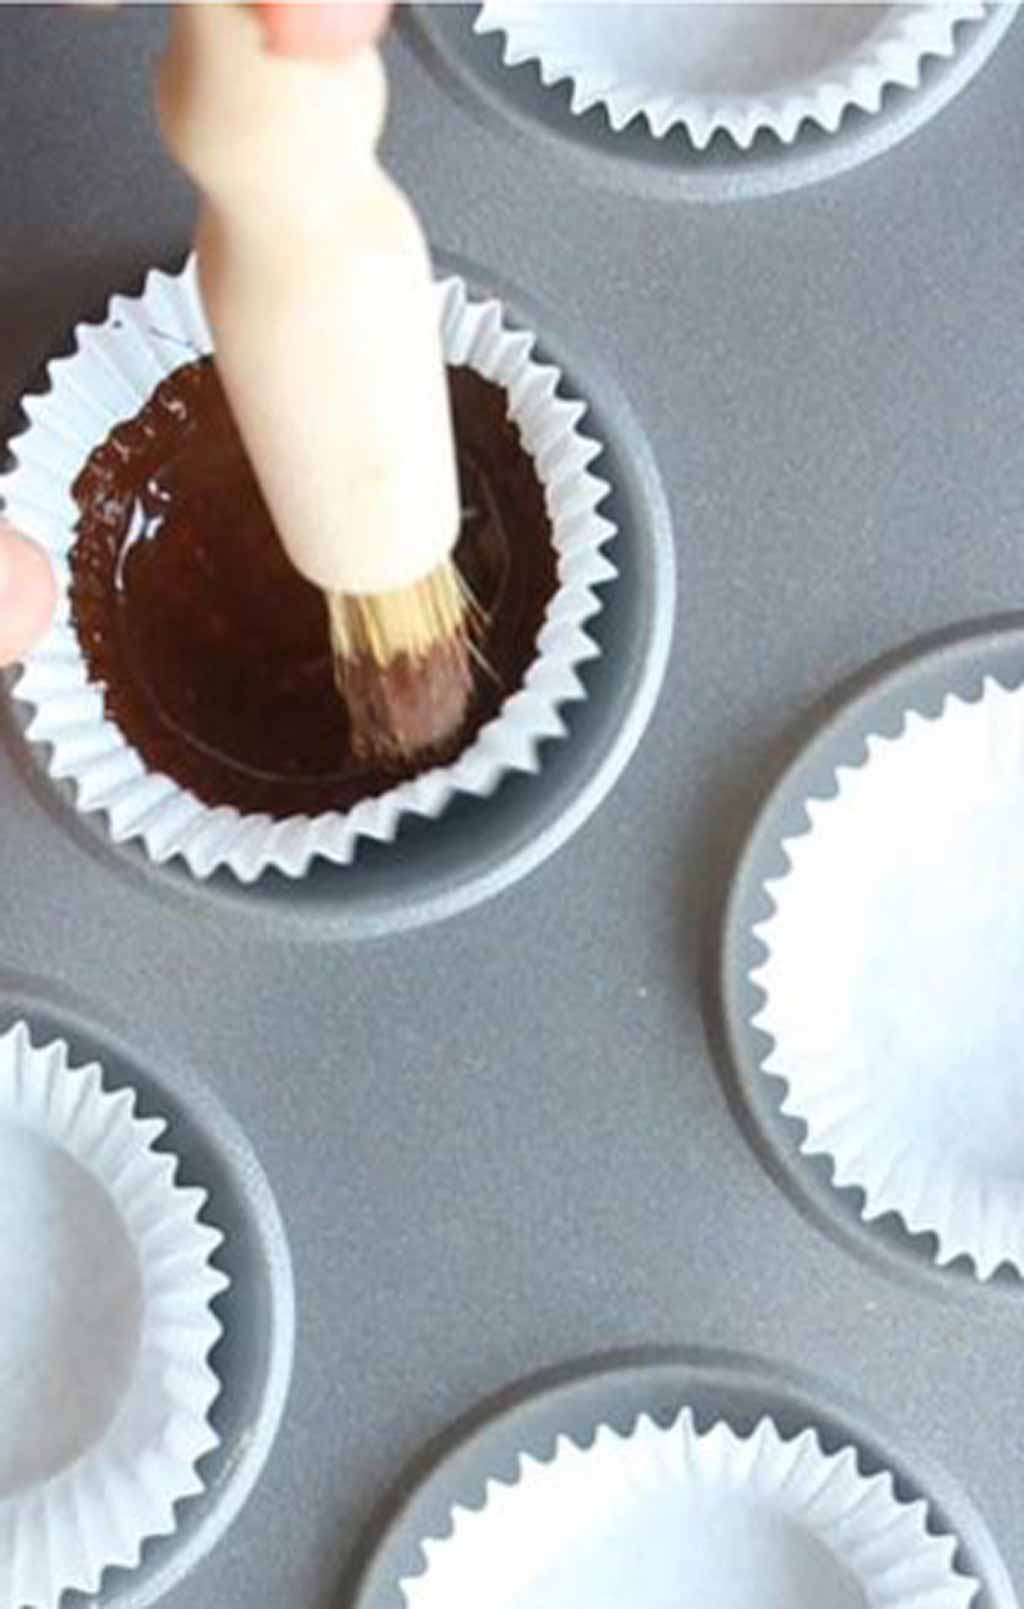
Place the cases in the freezer for 10 minutes.
Step 5:
Melt another 75g of your chocolate and paint another layer of chocolate into the cups. I also spread 1/2 a teaspoon of chocolate across the base of each cup to make it hold together better.
Pop them back into the freezer for another 10 minutes.
Step 6:
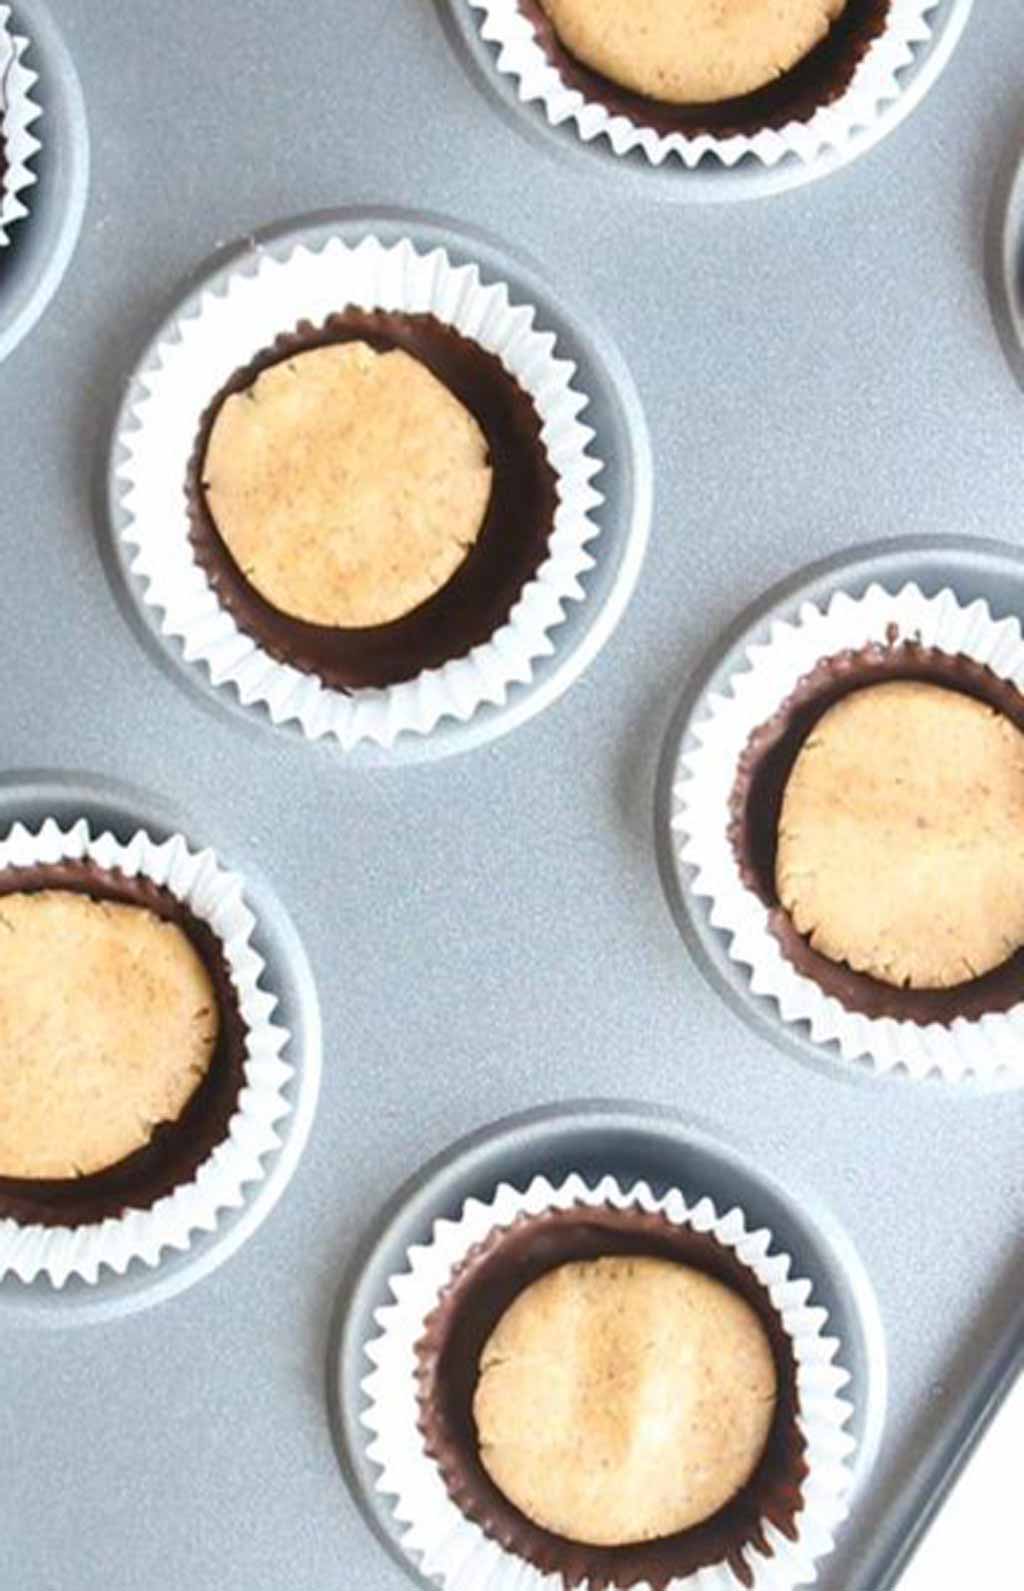
Remove the peanut butter filling from the fridge and divide it into 16 equal-sized pieces.
Roll each piece into a ball and use your fingers to flatten them. You can make your filling as thick or as thin as you like.
Place a disc of peanut butter filling into each chocolate cup.
Step 7:
Melt the rest of your chocolate (150g) and gently spoon it over the filling in the cups. Make sure the filling is completely covered and that there are no gaps down the sides.

Place the peanut butter cups into the freezer for another 20 minutes or into the fridge for 1-2 hours until the chocolate has hardened.
Top Tips:
- Use natural peanut butter, made from 100% nuts, with no added oils for a strong peanut butter flavour.
- Add a pinch of salt to your filling for a nice contrast to the sweetness.
- Use a pastry brush to paint the chocolate onto paper cases for a neat and professional-looking finish.
- Try making a mix of vegan dark, milk or white chocolate peanut butter cups for some delicious variations.
FAQ:
They’re best stored in an airtight container in the fridge.
If you prefer your peanut butter cups at room temperature, I recommend taking them out of the fridge an hour or so before serving. They won’t melt at room temperature but they won’t last as long if they’re not in the fridge.
If stored appropriately in the fridge, they will last at least 1-2 weeks.
Yes! They’ll last around 3 months if you keep them in an airtight container in the freezer.
I hope you enjoy this recipe and as always, please let me know what you think by leaving a comment or rating below!
xo
Vegan Peanut Butter Cups
Easy 5 ingredient peanut butter cups that can be made quickly at home!
Ingredients
- 150 g Natural style peanut butter (½ Cup + 2 Tablespoons)
- 1 Tablespoon Vegan butter*
- Pinch Sea salt (optional, do not add this if your peanut butter already contains salt)
- 2 Teaspoons Vanilla extract
- 90 g Icing/powdered sugar (¾ cup)
- 300 g Vegan chocolate of choice (10.5 oz)
Instructions
-
Line a muffin tray or two with a total of 16 paper cases. Set aside.
-
Place the peanut butter and vegan butter into a medium sized bowl and microwave it for 30 seconds (or put on a low heat over the stove) until the butter becomes slightly melted. Stir until the two ingredients are combined.
-
Add the salt (if using) and vanilla and mix again.
-
Now add the icing sugar to the bowl and stir. When the mixture starts to come together, use your hands to form a dough-like ball. This will be your peanut butter filling.
-
Place the filling into the fridge to chill while you prepare the chocolate cups.
-
Take ¼ of the chocolate and melt it in the microwave (I do it in 30 second increments, stirring as I go to prevent it from burning) or over a low heat on the stove.
-
Using a pastry brush or the back of a teaspoon, paint a thin layer of melted chocolate around the inside of each paper cup (around ½ the way up). Place the cups in the freezer for 10 minutes.
-
Melt another ¼ of the chocolate and paint the inside of each cup again to make the chocolate layer thicker. I also spread ½ a teaspoon of chocolate on the base of the cups to make them more sturdy. Freeze for another 10 minutes.
-
Remove the peanut butter filling from the fridge and divide it up into 16 pieces. You may have some leftover, depending on how thick you want your filling to be.
-
Roll each piece into a ball then use your hands to flatten it into a disc. Place a disc of filling into each chocolate cup.
-
Melt the rest of the chocolate and use it to cover the top of each cup, making sure the peanut butter filling is completely hidden.
-
Pop them in the freezer for another 20 minutes then enjoy! Alternatively, you can place them in the fridge for 1-2 hours until the chocolate has fully set.
Recipe Video
Recipe Notes
- *Vegan butter can be subbed for coconut oil but will alter the final taste.
- If the filling is too dry, add more vegan butter or peanut butter until it sticks together. If it’s too wet, add more icing sugar.
- Store in an airtight container in the fridge for up to 2 weeks.