Vegan Rainbow Cake
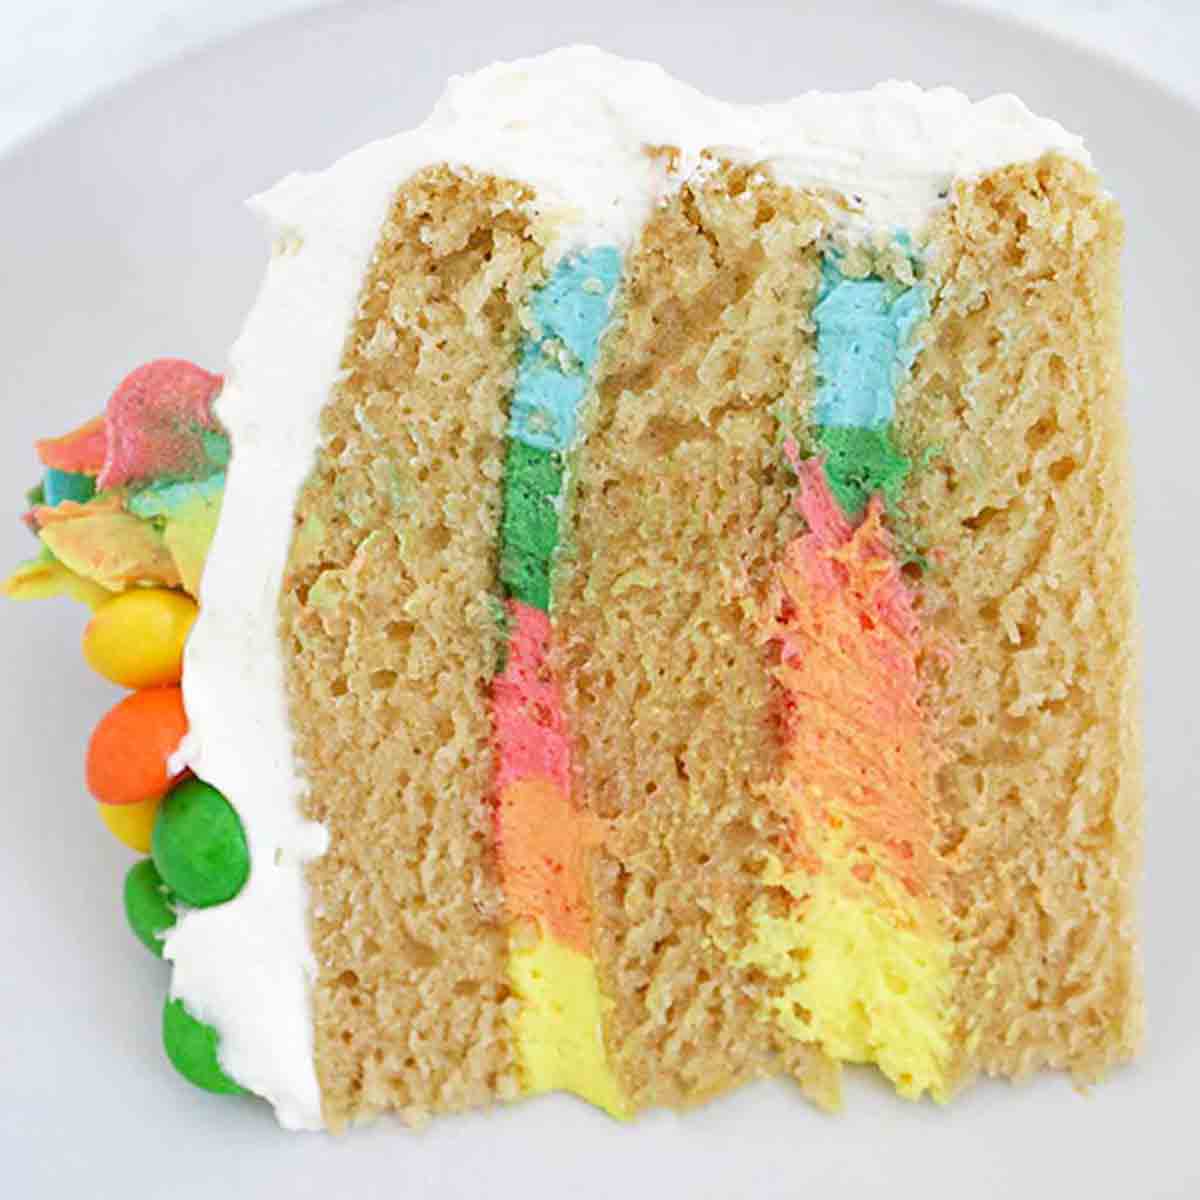
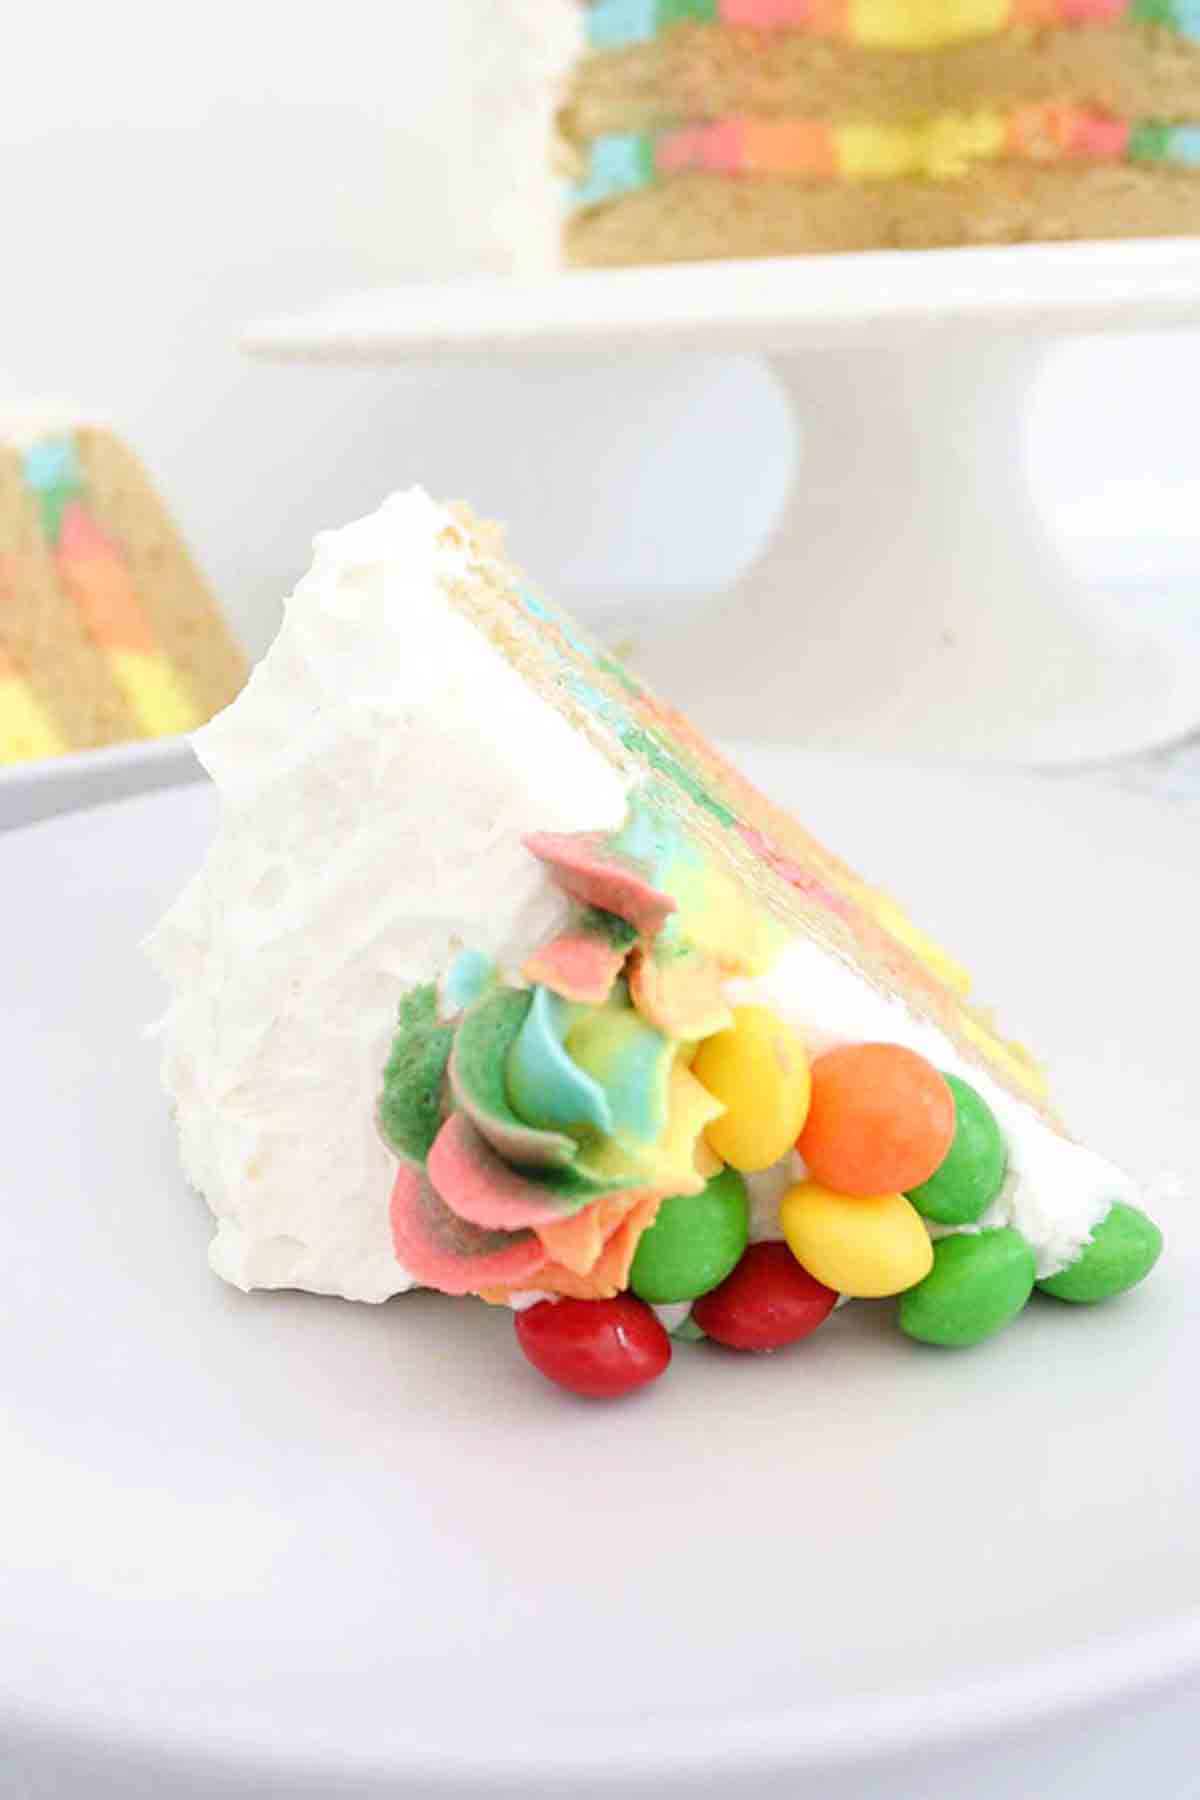
This vegan rainbow cake is bright, colourful, and perfect for all kinds of celebrations. Plain vanilla sponge cakes layered with multi-coloured buttercream and topped with fluffy, cloud-like white frosting.
I’ve been meaning to bake a rainbow cake for such a long time now but wasn’t quite sure how to go about it. I always see so many pretty rainbow designs out there on Pinterest and I wasn’t quite sure that I had the artistic ability to match them!
But low and behold, if you just let your creativity run wild, the end result usually comes out pretty cool. I’m really happy with how mine came out!
Half of my design was inspired by Cupcake Jemma’s rainbow cake video. Her cake had plain sponge layers with a rainbow-check effect in between. I thought this was so cool and seemed pretty straight forward, which it was.
I decided to go for this method, dying the frosting rather than the cake layers, because I wanted my finished result to look somewhat simple. And I know there’s only so simple you can get when using a multitude of bright colours but I’m pretty pleased with how it turned out.
A rustic design
I have to admit, I’m still quite an amateur when it comes to cake decorating. I really am quite hopeless at scraping and smoothing the outside of layer cakes so I try to avoid it whenever I can!
Instead of the beautiful rainbow stripes that Jemma did on the outside of her rainbow cake, I used a fluffy plain white buttercream which was super easy to spread around. I also went for the “rustic” look and kept the frosting swirly and rough rather than smooth. I think it looks cool because it reminds me of clouds!
To achieve that super white frosting, I used vegetable fat instead of vegan butter. I based my recipe around my usual vanilla buttercream but switched the butter for vegetable fat. I also added a bit more plant-based milk until it was super smooth and fluffy.
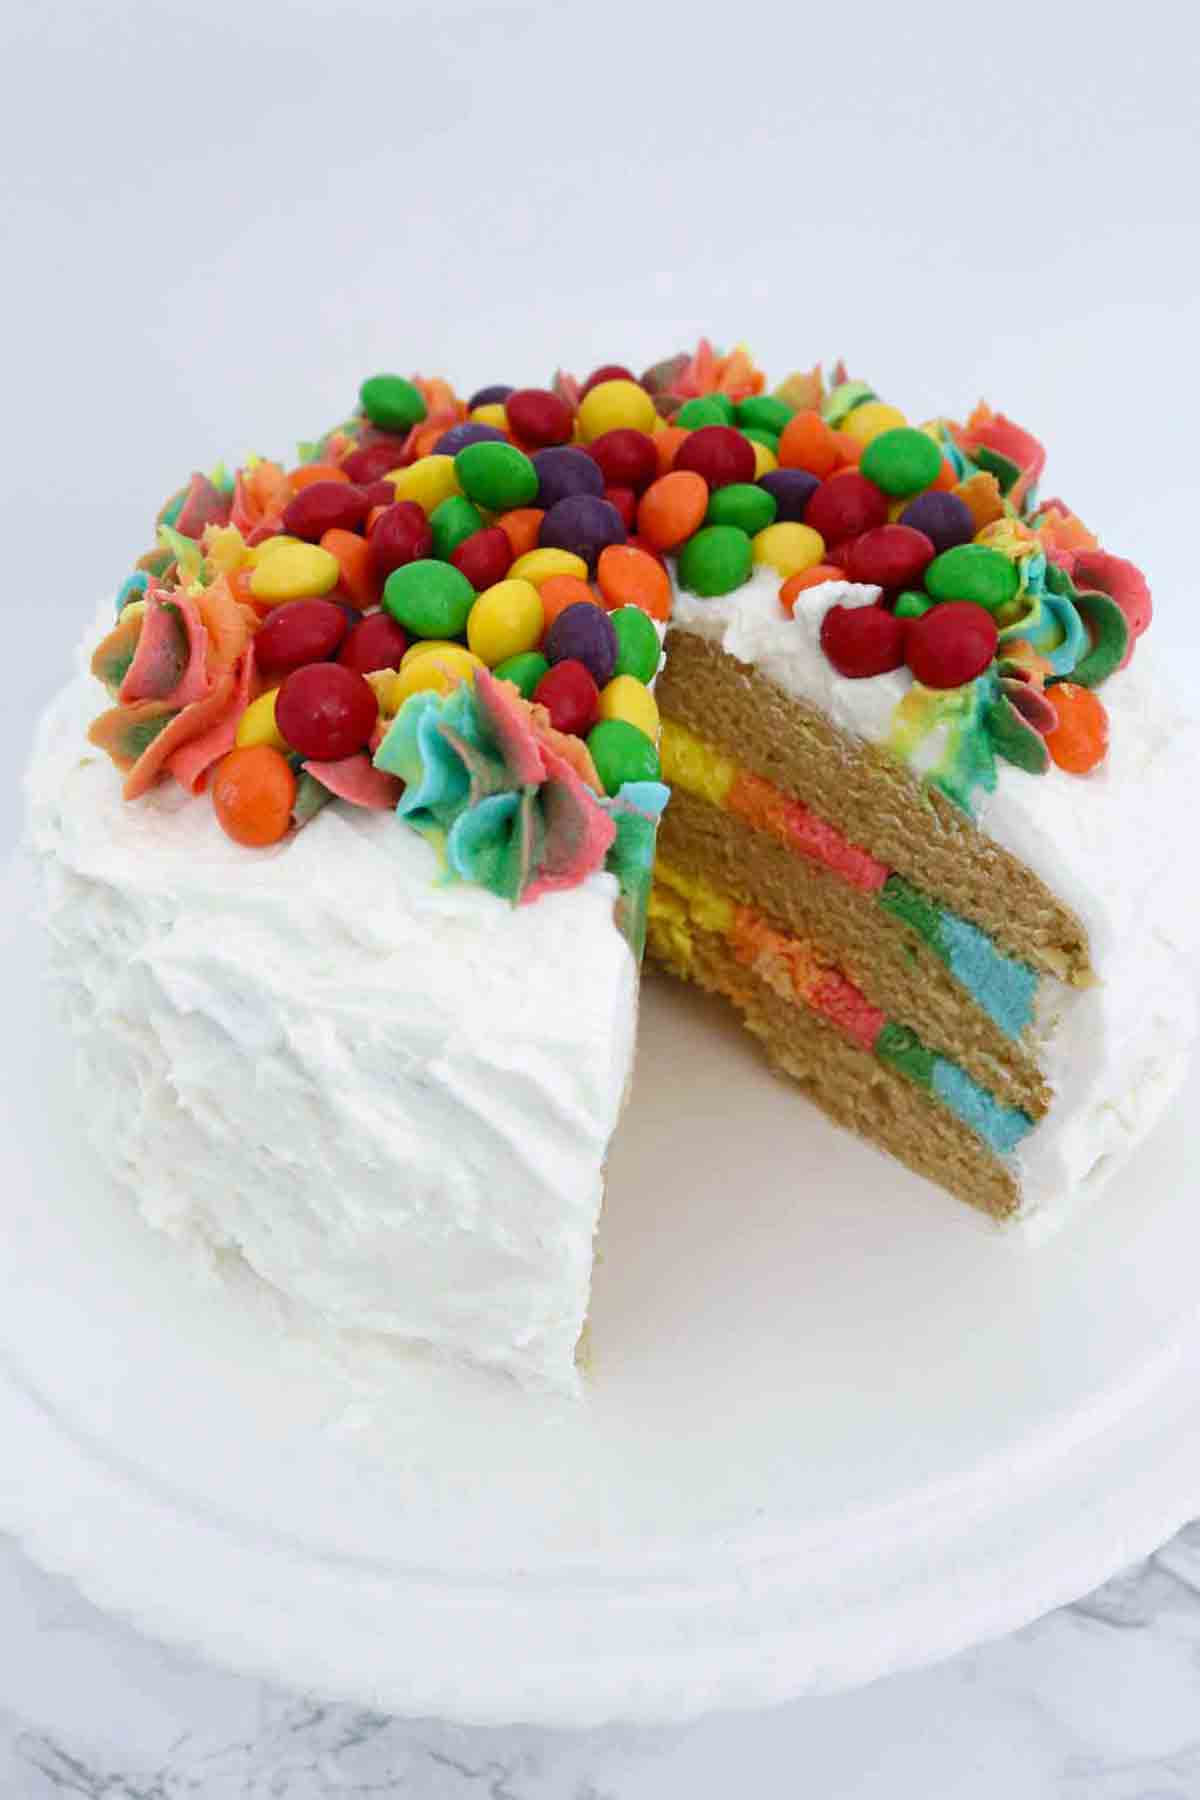
For an added extra, I also added some rainbow swirls around the top edges of my cake. This part looks more challenging than it actually is, I promise. You can find instructions below and you’ll be surprised how simple it is!
And lastly, I topped the cake with some Skittles. But of course, these are not essential to making a beautiful vegan rainbow cake. It looks just as lovely without them!
If you’d prefer something chocolatey that’s still colourful, I’d recommend Doisy & Dom drops or Chocolate No-No’s.
How to make vegan rainbow cake
Step 1:
Preheat your oven to 180°C/350°F and grease, flour and line three 7-inch cake tins.
Step 2:
Mix together 315ml (1+1/3 cups) of soy milk and 1 tablespoon of apple cider vinegar. Set it aside for now- this will act as your vegan buttermilk.
Step 3:
In a large bowl, mix together 350g (2+2/3 cups) of all-purpose flour, 1 teaspoon of baking soda and 200g (1 cup) of sugar.
Step 4:
Melt 180g (3/4 cup) of vegan margarine and leave it to cool down for a few minutes. Then add it to the bowl with your dry mixture along with the buttermilk from earlier and 3 teaspoons of vanilla extract.
Mix everything together until smooth, making sure there’s no flour stuck to the bottom of the bowl.
Step 5:
Divide the cake batter evenly between your 3 tins. I like to use a scale to weigh each one to make sure they all contain the exact same amount of batter.
Bake the cakes for 18-20 minutes, until a toothpick through the centre comes out clean.
Step 6:
Let the cakes cool in the tins for around 10 minutes then flip them out onto a wire rack and leave them to cool completely.
Prepare the rainbow buttercream filling
Step 7:
Measure out 500g (4 cups) of icing sugar and set it aside.
Step 8:
Add 120g (1/2 cup) of vegan margarine and 100g (1/2 cup) of vegetable fat such as Trex to a large bowl.
You can use all vegan margarine or all vegetable fat if you prefer. I like a mix of the two because you get a slightly “buttery” flavour but it’s also not super yellow, meaning it takes on the colours a lot easier.
Step 9:
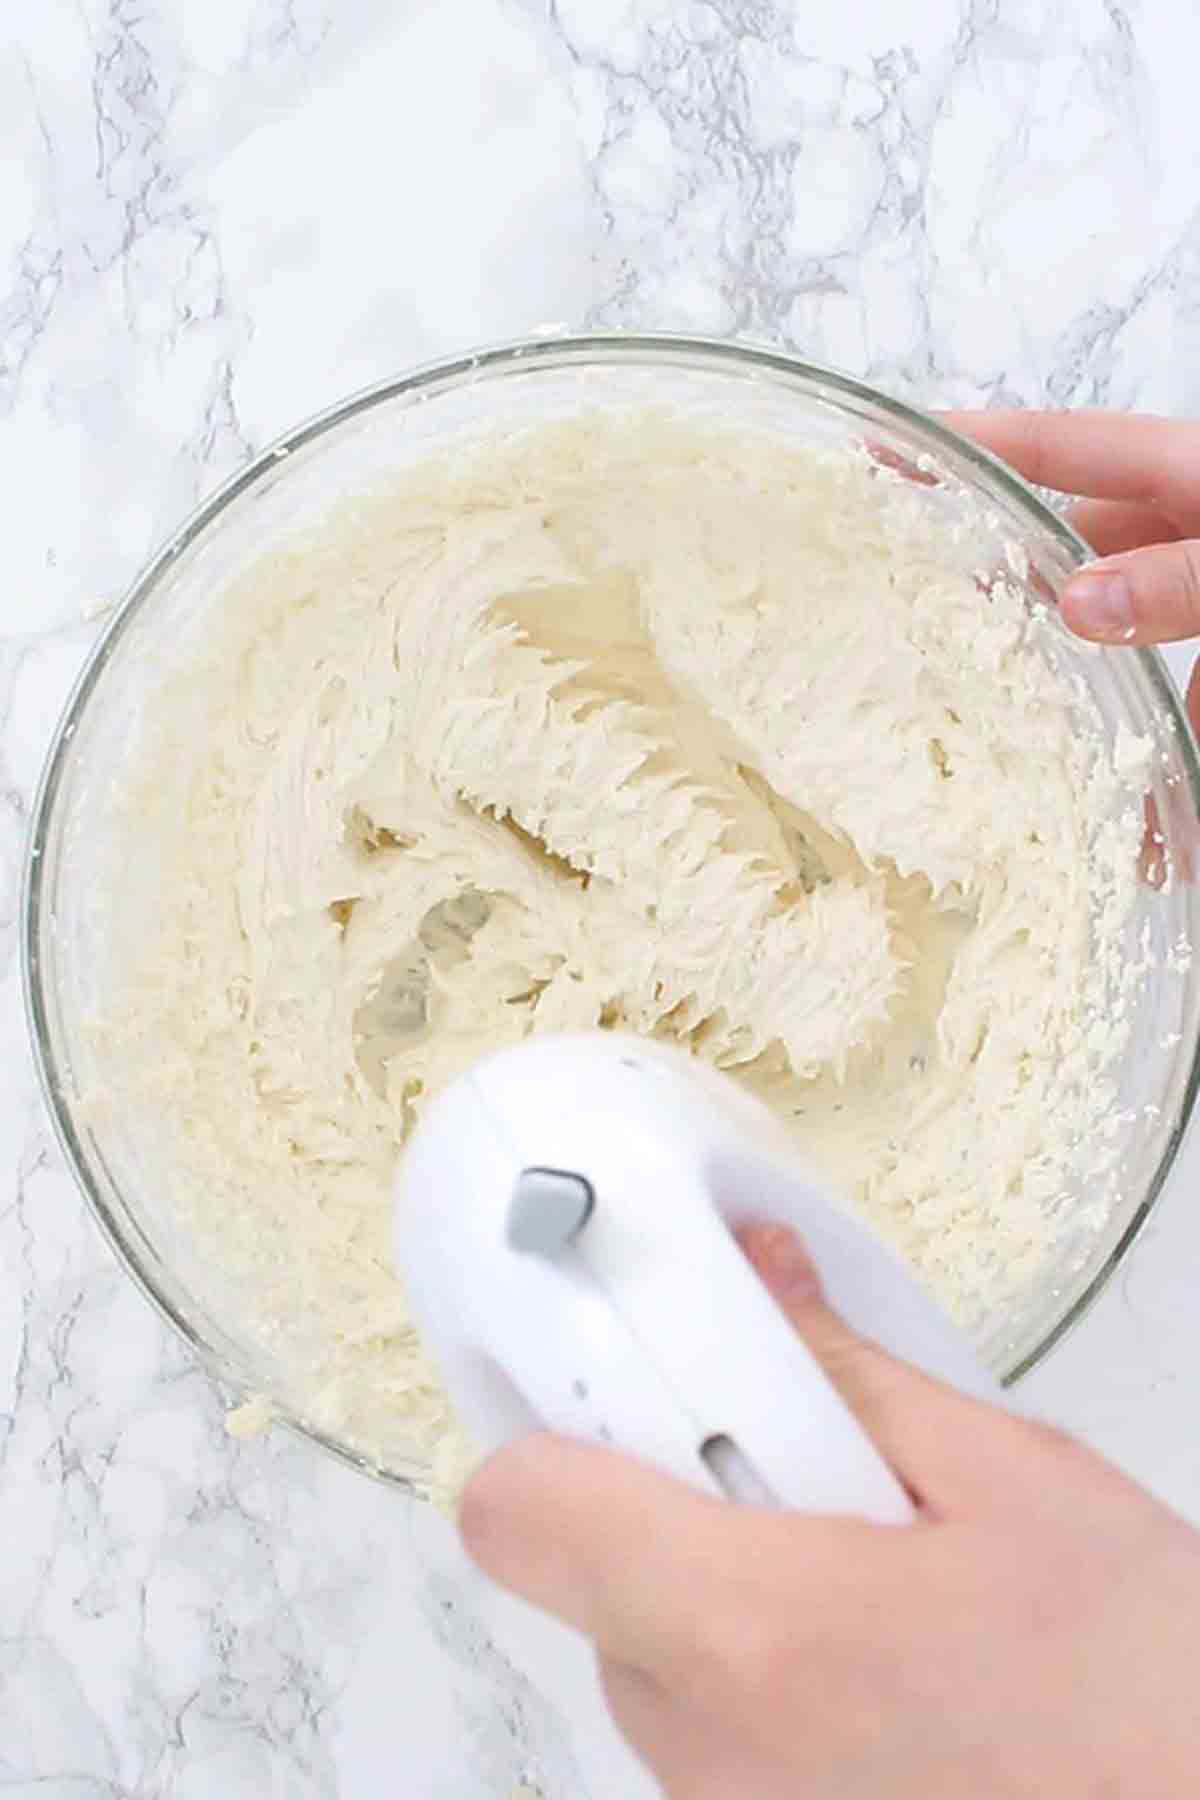
Mix the margarine and vegetable fat together using a stand mixer or electric whisk until it becomes pale and fluffy.
Step 10:
Start adding in the icing sugar, whisking it in a little bit at a time before adding more.
Add 1 teaspoon of vanilla extract and keep whisking until you have a light, smooth and fluffy buttercream.
Step 11:
Divide the buttercream equally between 5 small bowls and add a different colour to each one.
I used yellow, orange, red, green and blue. I didn’t have any orange food paste so just made my own by mixing red and yellow together. PME is my go to vegan food colouring.
Start with a little bit of colour at a time. Mix it in to see what it looks like first before adding any more. You can always add more if it’s too pale but it’s hard to undo it if you add too much!
Fill your cake layers
Step 12:
Transfer each colour of frosting into a small piping bag.
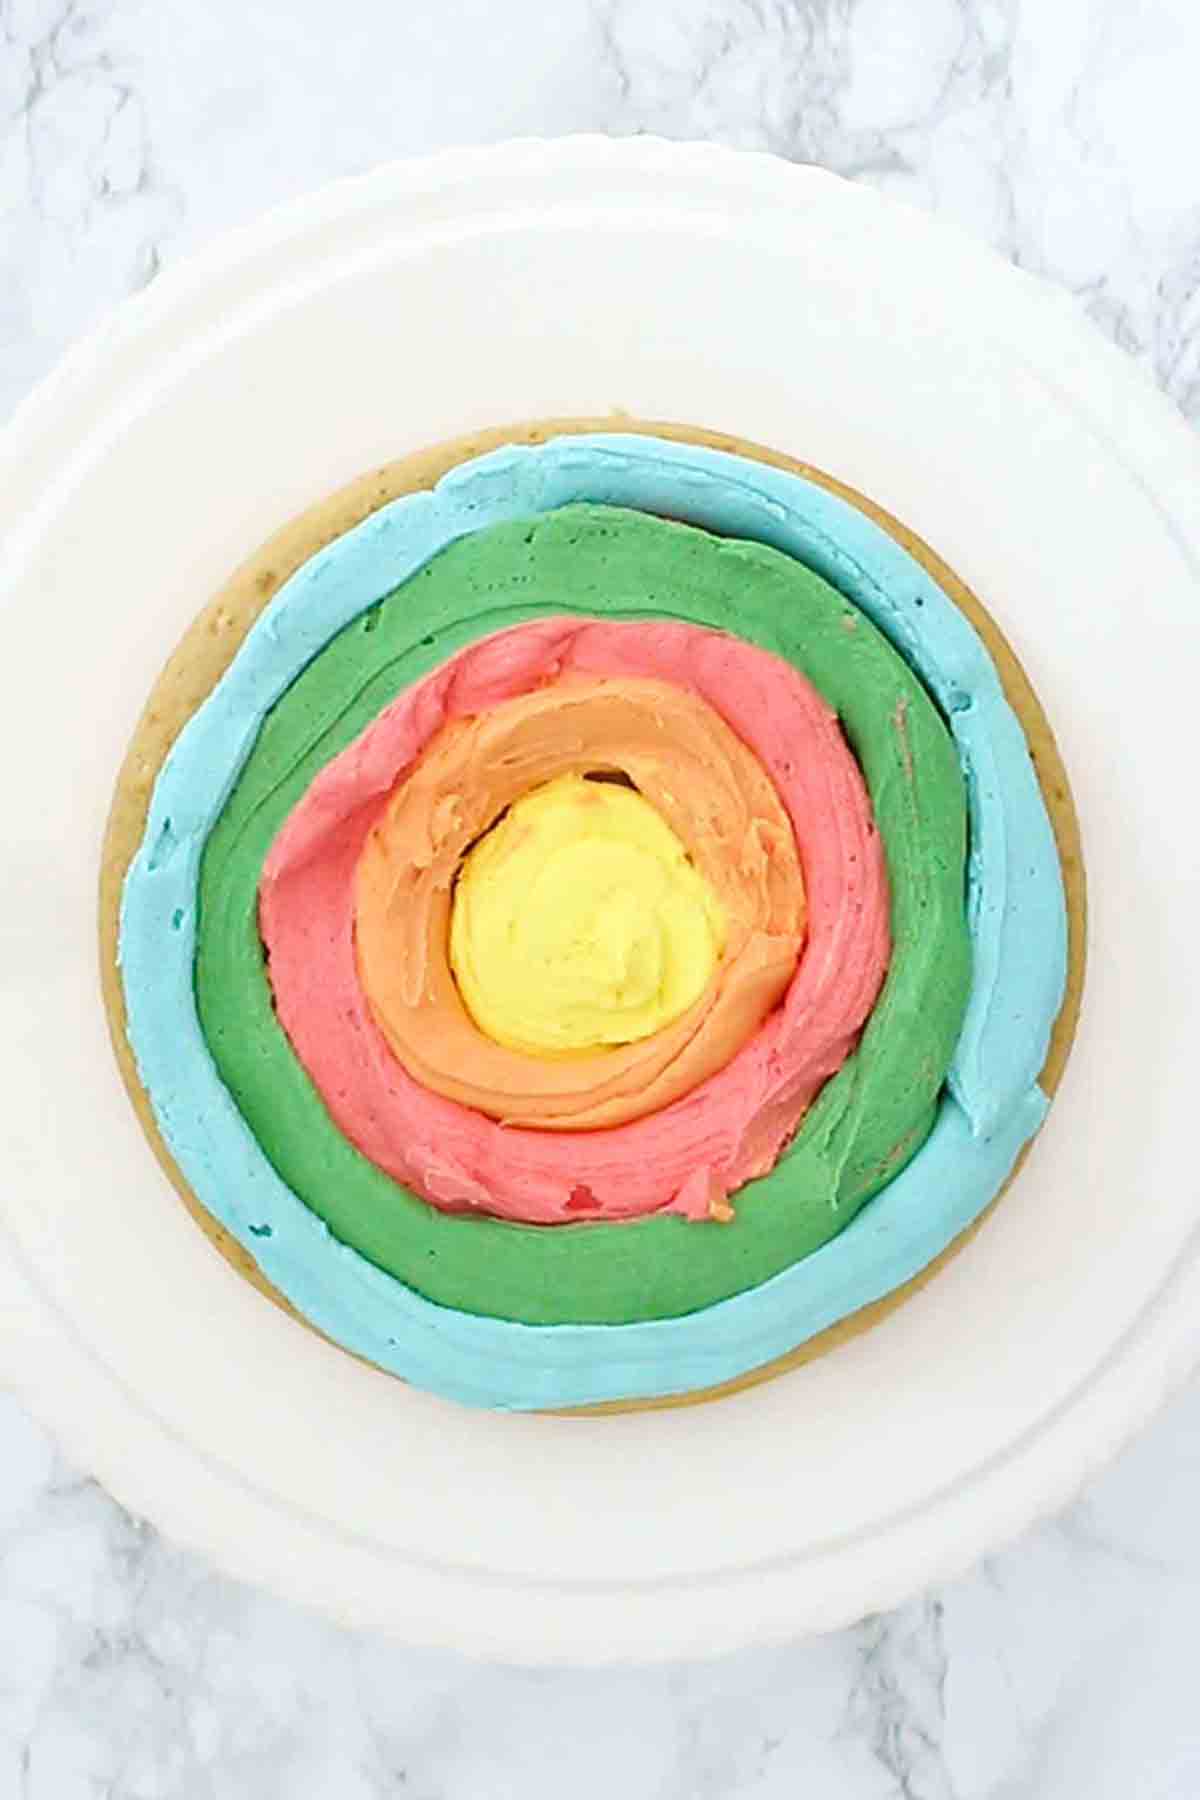
Step 13:
Start with your first cake layer and pipe a small circle of one colour into the middle. Then pipe a circle of each of the other colours around it, as shown in the picture below.
Step 14:
Add your second cake layer on top and repeat. Top with the third cake layer and place the whole thing in the fridge.
Set the remaining frosting in the piping bags aside for now.
Now prepare your fluffy white frosting
Step 15:
In a large bowl, whisk 100g of pure vegetable fat until soft and smooth. Add in 250g (2 cups) of icing sugar, a little bit at a time, and keep whisking.
Once all the sugar is incorporated, add 1 teaspoon of vanilla extract and some plant-based milk. Keep whisking until the frosting becomes super soft and fluffy.
I ended up adding around 5-6 tablespoons of milk to mine which gave it lots of volume and made it super easy to spread around the outside of the cake.
Step 16:
Remove your cake from the fridge and use a palette knife or spatula to spread the white frosting over the top and down the sides of it.
I used a small teaspoon to fluff up my frosting to give it a more rustic look. You can leave the cake like this or decorate it with some rainbow swirls using the leftover coloured frosting!
How to make rainbow buttercream swirls
This looks so beautiful and elegant but is actually super easy. All you need to do is cut open a disposable piping bag and lay it out flat. You could also use plastic wrap or baking paper instead.
Using the leftover coloured frosting from earlier, pipe a thick line of each colour onto the bag. Fold the piping bag/baking paper as pictured below, leaving the bottom open, then place it into another piping bag that’s lined with a large star nozzle. I used Wilton’s 1M nozzle for my cake.
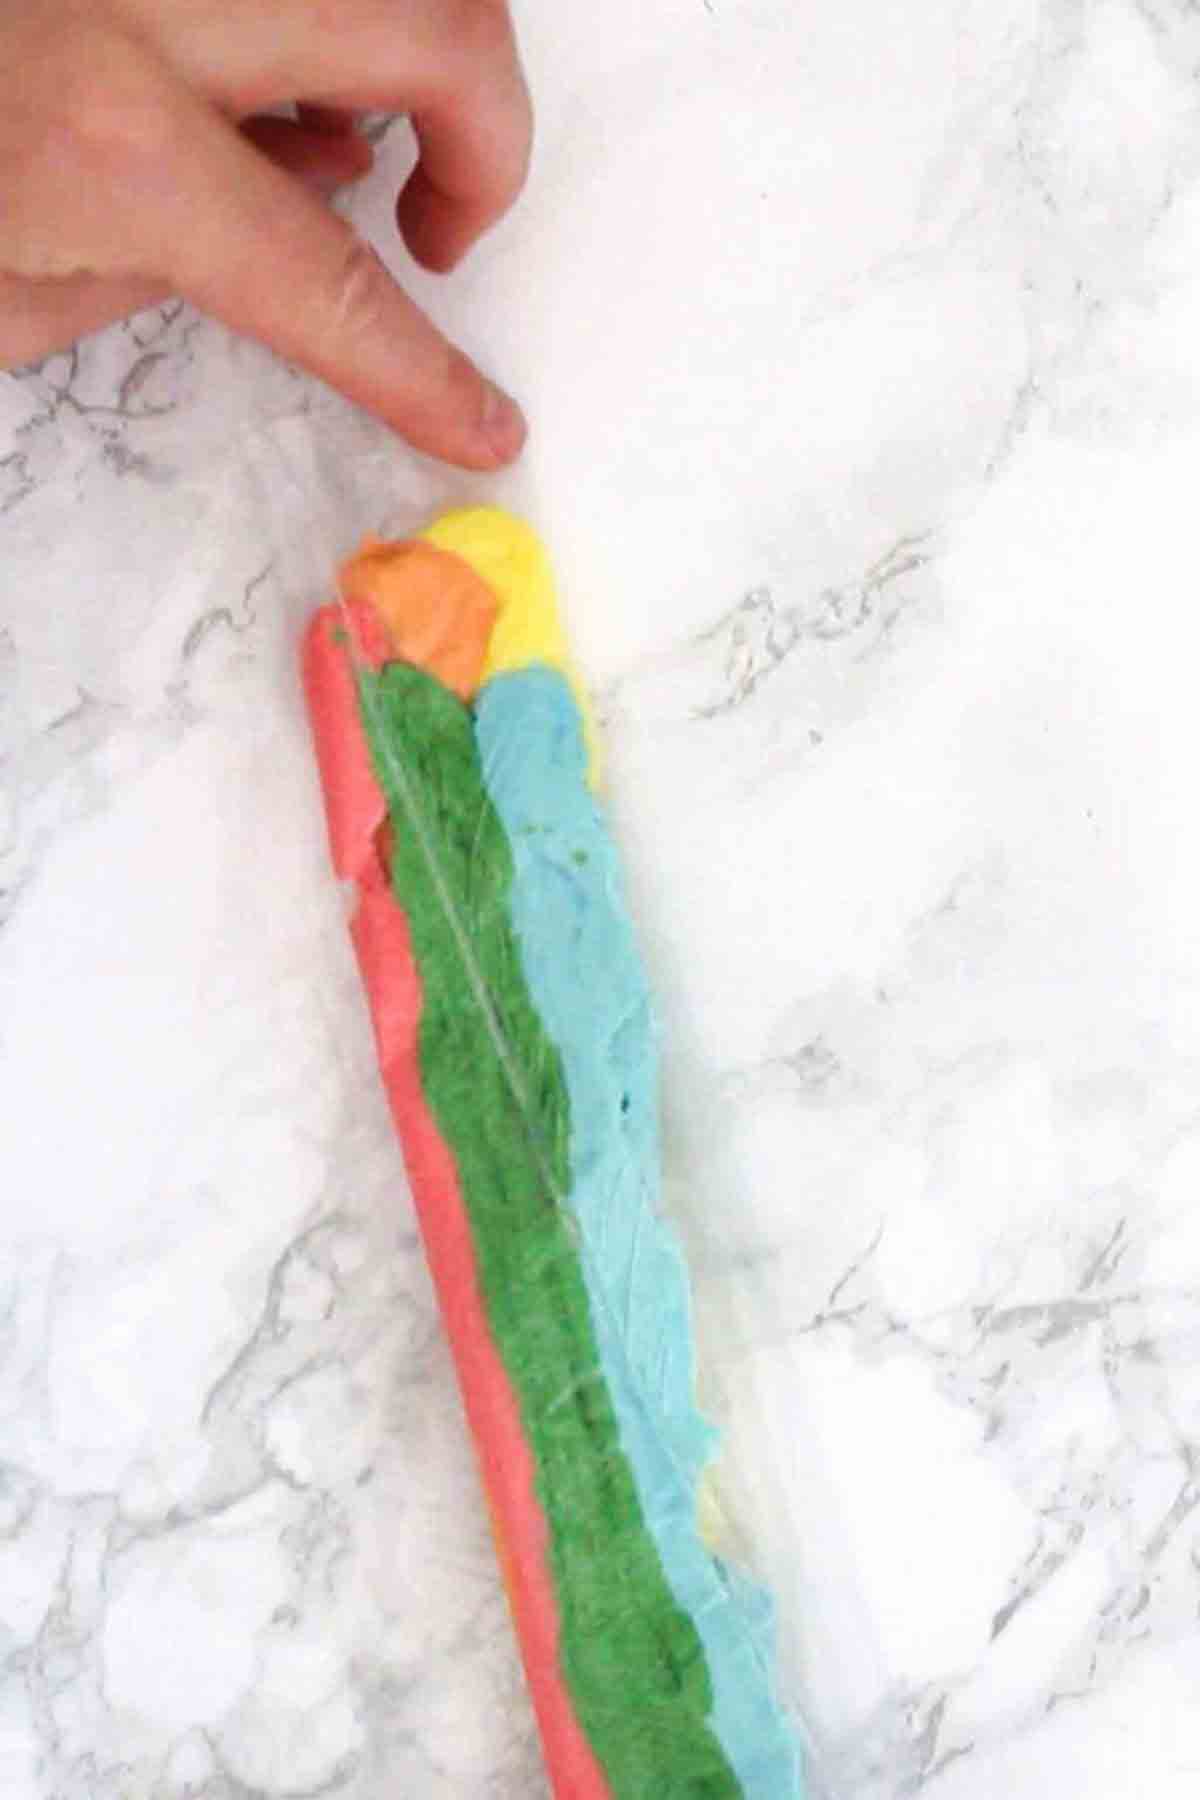
Pipe swirls onto the top of your vegan rainbow cake and you’ll see a little bit of each colour should come out!
Lastly, cover the whole cake in Skittles or your favourite vegan sweets.
FAQ:
I always recommend using food gels or pastes over liquid food colouring. I find that gels and pastes give a stronger colour and sometimes liquid food colouring can alter the texture or taste of a cake a little bit.
You’ll need to also make sure that whichever food colours you’re using are suitable for vegans as some of them contain non vegan e-numbers such as carmine. I always use PME food pastes which are reasonably priced, vegan-friendly, and available on Amazon.
If stored in the fridge and kept well covered, it should last for around 4-5 days. Any longer than that, and it’ll start to become a little bit sticky and dense. I’d recommend not storing this cake at room temperature as the white frosting holds up much better in the fridge.
I would also recommend that you do not freeze this cake. While it will taste OK after it has defrosted, the texture and flavour is much better from fresh.
More vegan cakes:
I hope you enjoy eating this vegan rainbow cake as much as I enjoyed baking it. If you make any adaptions to the recipe I’d love to hear how they went for you. Happy baking! xo

Vegan Rainbow Cake
A 3-layer vegan sponge cake decorated with rainbow frosting.
Ingredients
For the sponge cakes:
- 315 ml Unsweetened soy milk (1+¼ cups)
- 1 Tablespoon Apple cider vinegar (or sub for white vinegar)
- 350 g All-purpose flour (2+⅔ cups)
- 1 Teaspoon Baking soda (bicarbonate of soda)
- 200 g Caster sugar (1 cup)
- 180 g Vegan margarine (¾ cup)
- 3 Teaspoons Vanilla extract
For the rainbow frosting filling:
- 120 g Shortening/Vegetable fat* (½ Cup + 1 tablespoon)
- 120 g Vegan margarine (½ cup)
- 500 g Icing sugar (4 cups)
- 1 Teaspoon Vanilla extract
- Vegan food colouring gel in red, yellow, orange, blue & green.
For the white frosting:
- 100 g Shortening/Vegetable fat (½ cup)
- 250 g Icing sugar (2 cups)
- 1 Teaspoon Vanilla extract
- Few Tablespoons Plant-based milk (I used soy)
To top:
- Colourful vegan sweets (such as Skittles, Chocolate No No's or Doisy & Dom drops)
Instructions
For the cakes:
-
Preheat your oven to 180°C/350°F (160°C/325°F for fan or convection ovens). Grease, flour and line three 7-inch cake tins.
-
Mix together the soy milk and apple cider vinegar and set it aside for 5 minutes. This will act as your vegan buttermilk.
-
In a large bowl, mix together the flour, baking soda and sugar.
-
Melt the vegan margarine and let it cool for a few minutes. Then add it to your bowl, along with the buttermilk you made earlier and the vanilla extract. Mix well and make sure there is no dry mixture stuck at the bottom of the bowl.
-
Divide the cake batter equally between the 3 cake tins. I like to use a scale to make sure they all have the exact same amount in them.
-
Bake the cakes for 18-20 minutes until a toothpick through the center comes out clean. Leave them in the tins for 10 minutes, then flip them out onto a wire rack and let them cool completley.
For the rainbow frosting:
-
In a large bowl, whisk the shortening and vegan margarine until pale, smooth and creamy.
-
Keep whisking (I used a hand mixer) and start adding in the icing sugar a little bit at a time.
-
Once all of the icing sugar is incorporated, add in the vanilla extract and whisk one last time until you have a pale, fluffy buttercream.
-
Divide the buttercream equally between 5 small bowls and add a different colour of food gel to each one.
-
Transfer each colour of frosting into its own piping bag and cut the ends of to make a medium-sized hole for piping.
To fill the cake layers:
-
Place your first cake layer onto a cake stand and pipe a small circle of one colour of frosting into the center.
-
Using the next colour, pipe a larger circle around the edges of the first one and repeat until all of the colours are used. I recommend leaving around ½ an inch of space at the edges so the frosting doesn't spill out.
-
Place the second cake layer on top and repeat. Then top with the third cake layer and place the whole thing in the fridge while you prepare the white frosting. Keep the leftover coloured frosting in the piping bags for later.
For the white frosting:
-
In another large bowl, whisk the shortening until smooth. Start adding in the icing sugar a little at a time and keep whisking until it's all incorporated.
-
Add in the vanilla extract and a few tablespoons of the plant-based milk. Whisk for a few minutes until the frosting becomes super light and airy and increases in volume. If you'd like it lighter, just add in more plant-based milk until you get your desired consistency.
-
Remove the cake from the fridge and use a palette knife to spread the white frosting on top and down the edges. Use the back of a teaspoon to create swirly patterns on the frosting.
-
Return the cake to the fridge.
For rainbow buttercream swirls:
-
Cut open a disposable piping bag and lay it out flat. Alternatively, you can use plastic wrap or baking paper.
-
Using the leftover coloured frosting, pipe a line of each colour (side by side) onto the flattened piping bag. Then fold it up and place it inside of another piping bag with a large star nozzle.
-
Pipe small swirls around the top of the cake, fill the empty space with your colourful sweets and enjoy!
Recipe Notes
- *I used Trex.
- Store, covered, in the fridge for up to 5 days.